 EVERY CROCHET
 Amigurumi Accessories 3 rounds No account, no download
A three-round mini hat for tiny amigurumi heads
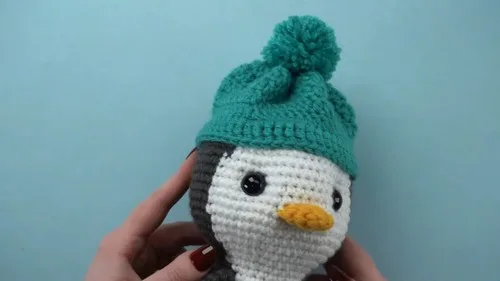
A three-round mini hat worked in double crochet (UK treble crochet), sized for keychains and small amigurumi companions.
- Skill
- Intermediate
- Time
- 1-2 hours
- Yarn weight
- Worsted (Aran)

Intermediate
What the original write-up called it. Nothing here is graded again.

Worsted (Aran)
What the sample was worked in. Any weight works; the size moves with it.

1-2 hours
What the original page reckoned. Your own pace is the one that matters.
About this pattern
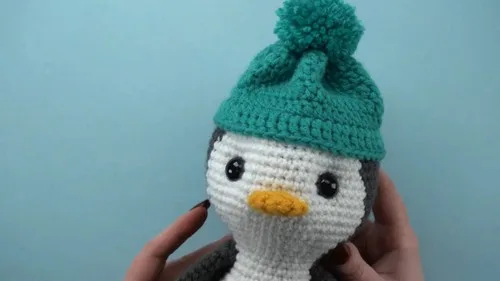
This is a three-round mini hat crocheted directly onto the crown of an amigurumi head, sized for a keychain or small toy companion. Round 1 anchors into the head with single crochet (UK double crochet); rounds 2 to 6 build height in double crochet (UK treble crochet), worked in back loop only throughout. Finishing includes cinching the top, attaching a pom-pom, and adding a trebled trim.
This mini hat is a compact amigurumi accessory, small enough to crown a keychain-sized toy or sit atop a plush companion's head. Its main rounds are worked in double crochet (UK: treble crochet), the taller stitch that gives the crown height and the brim its structure. A single foundation round in single crochet locks the hat to the head before the taller stitches take over, and a trebled trim finishes the brim edge.
Construction begins directly on the finished head rather than as a separate piece: the hook picks up exposed front loops on round 48 of the head, so the hat's foundation round is anchored into existing stitches rather than a chain or magic ring. Round 1 closes in the back loop only to leave a clean ridge, and rounds 2 through 6 continue in back loop only double crochet, keeping every round's front loop free for the trim worked later into round 1's untouched loops.
Materials
- Yarn
- Crochet hook
- Yarn needle
- Pom-pom
- Stitch marker
The list is the pattern's own wording.
Instructions
Every round is printed as the pattern wrote it, brackets and all. Open the key beside a round to see only the short forms that round uses.
Main Pattern
- Round 1
Make a slip knot on your crochet hook; hold the piece right side up, starting anywhere on the head, typically centered on the back; insert hook bottom-to-top through an exposed front loop on round 48 of the head; single crochet in each stitch around; in the back loop only, slip stitch into the first stitch to join the round. (48 sts)Step by step: Start by making a slip knot on your crochet hook; hold the piece right side up, starting anywhere on the head, typically centered on the back; insert your hook bottom-to-top through an exposed front loop on round 48 of the head; single crochet in each stitch around; join in the back loop only with a slip stitch into the first stitch; confirm you have 48 stitches.
Key1
- sts
- stitches
- Round 2
Chain 2 (does not count as a stitch); double crochet in the back loop only of each stitch around; slip stitch into the first double crochet to join the round. (48 sts)Step by step: Begin by chaining 2 (this does not count in the stitch count); double crochet in the back loop only of each stitch around; join with a slip stitch into the first double crochet; ensure you have 48 stitches.
Key1
- sts
- stitches
- Rounds 3–6
Chain 2 at the start of each round; double crochet in each stitch around; slip stitch to join each round. After Round 6, slip stitch into the first stitch of the round, then cut an 18-inch tail.Step by step: Chain 2 at the start of each round; double crochet in each stitch around; slip stitch to join each round; after Round 6, slip stitch into the first stitch of the round, then cut an 18-inch tail.
Making up
- Step 1Finishing the Hat: Thread the tail through a yarn needle and weave it between every stitch on the last round, pulling tight every 5 stitches or so; after cinching, hide the tail inside the work.
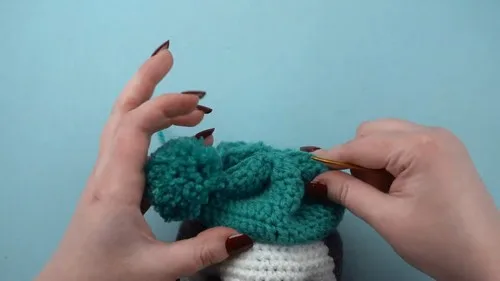
- Step 2Attaching the Pom-Pom: Thread one of the pom-pom tails through a yarn needle; tie a double knot with the two tails from the pom-pom; hide these tails inside the hat.
- Step 3Adding a Trim: Hold the piece upside down; work into the round of back loop only from the first round of the hat; chain 3; treble crochet into that first stitch (optionally place a stitch marker in the top of this stitch); treble crochet in each of the exposed front loops around; slip stitch to fasten off, cut an 8-inch tail, thread it through a yarn needle, and secure it at the base by the beginning yarn tail with a knot.
- Step 4Final Steps: Hide all remaining tails inside the work.
Notes from the pattern
- Use a stitch marker to flag the joining point of round 1, since working through the head's existing front loops on round 48 is easy to lose track of at this small scale.
- Match the hook to the yarn actually used for the head, not just a label recommendation, so the new rounds tension evenly against the completed piece rather than pulling it out of shape.
- Because every round joins in the back loop only, the seam line runs vertically up the back of the hat; keep the joins stacked in the same spot round to round for a straight, tidy line.
- No colour change happens within the hat itself, but if the hat colour differs from the head, weave the round 1 join tail in immediately so the two colours don't peek through the thin single crochet band.
The essentials
- Rounds
- 3
- Level
- Intermediate
- Time
- 1-2 hours
- Yarn
- Worsted (Aran)
Stitches you will use
- Back loop only crochet Used in every round of the hat body; keeps the front loop of round 1 free for the trim and leaves a visible ridge along each join, so watch for consistent loop placement round to round.
- Joining into an existing piece's stitches Round 1 is worked bottom-to-top through the exposed front loops on round 48 of the head rather than a fresh foundation ring, so spacing must match the head's 48 stitches evenly around.
- Cinch-and-close finishing The final round is gathered by weaving an 18-inch tail through every stitch and pulling tight every five stitches or so; watch for an even pull so the crown closes without puckering or leaving a gap.
Troubleshooting
The hat won't sit flush against the head
Round 1 likely skipped or doubled up on some of the head's front loops on round 48; unpick and recount to confirm all 48 stitches were picked up evenly before continuing.
The crown doesn't cinch closed and a hole remains at the top
The tail wasn't woven through every stitch of the final round, or wasn't pulled tight often enough; rethread the tail, weave through each stitch again, and pull firmly every five stitches or so until the opening closes.
The trim looks loose or wavy instead of
The treble trim was worked with extra fullness relative to round 1's stitch count; check the trim stitch total against the original 48 stitches and adjust tension so it matches rather than adds bulk.
Substituting yarn
- Acrylic, worsted/aran weight
- Close to the likely original weight; keeps the finished hat sturdy for keychain use with little change to hook size or drape.
- Cotton, DK weight
- Gives firmer stitch definition to the back loop only ridges but produces a slightly smaller hat; a hook a size smaller may be needed to keep the fabric dense.
- Wool-blend, chunky weight
- Speeds up the three main rounds but noticeably enlarges the finished hat and pom-pom scale, making it better suited to a shelf companion than a keychain unless a larger hook is also used.
Washing and care
- The materials list doesn't name a specific fibre, so check the yarn band before washing; a gentle hand wash in cool water is the safest default for a small trim piece like this.
- Reshape the brim and cinched crown while still damp, then let the hat dry flat away from direct heat so the pom-pom keeps its fluff and the back loop only ridges stay crisp.
The photographs taken while this was being made
Every one was taken by whoever published the pattern, in the order the source listed them.
FAQs
Questions
Can this hat be made without attaching it to a head?
Round 1 is designed to join into an existing amigurumi head's round 48, so making it stand-alone means substituting a foundation ring or chain for that starting round. The 48-stitch count should be kept the same for the rest of the rounds to work as written.
Why does round 1 use single crochet while the rest of the hat uses double crochet?
Single crochet (UK double crochet) creates a tight, low-profile band that anchors firmly into the head's existing stitches. Double crochet (UK treble crochet) then builds height quickly over just a few rounds, giving the crown shape without adding extra rounds.
How is the trim edge finished?
The piece is turned upside down and worked into the back loop only of round 1, using a chain-3 treble start. This gives the brim a distinct edge that stands apart from the plain double crochet body above it.
How is the pom-pom attached?
One pom-pom tail is threaded through a yarn needle and the two tails are tied in a double knot, then hidden inside the hat. No glue or extra stitching is needed.
Can this be finished as a keychain rather than attached to a toy?
Yes; since the hat is built directly onto a small head piece, a keychain version simply needs a ring or clasp finished onto that same base head. The hat rounds themselves stay identical either way.
These answers came from whoever first published the pattern, kept word for word.