 EVERY CROCHET
 Accessories 7 rounds No account, no download
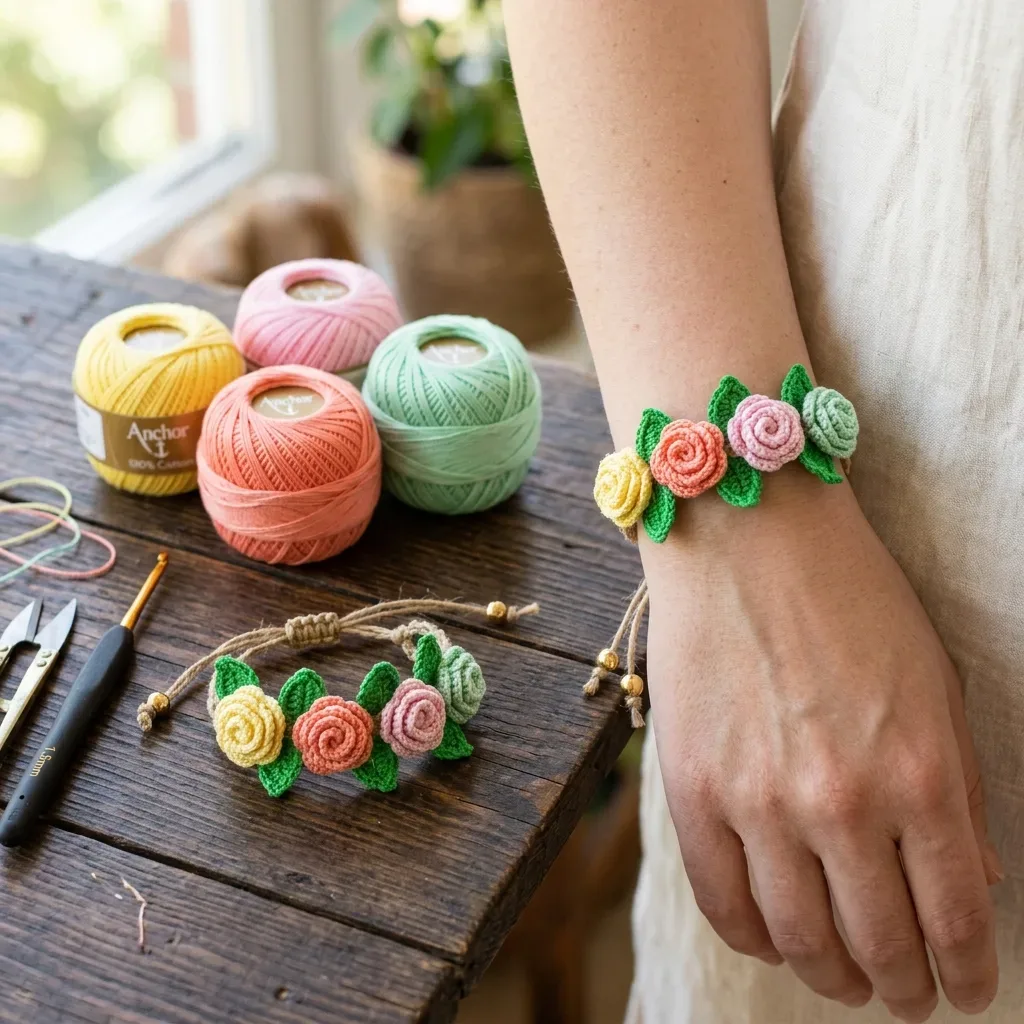
Crochet spiral rose bracelet with leaves and cord closure
Spiral rose bracelet worked in double crochet (UK treble crochet); US and UK stitch terms given.
- Skill
- Intermediate
- Time
- 2-3 hours
- Yarn weight
- Fingering / Thread
- Hook
- 1.65 mm

Intermediate
What the original write-up called it. Nothing here is graded again.

Fingering / Thread
What the sample was worked in. Any weight works; the size moves with it.

2-3 hours
What the original page reckoned. Your own pace is the one that matters.
About this pattern
This is an intermediate crochet bracelet featuring four dimensional spiral roses in graduating pastel shades, sage-green and bright-green leaves, and an adjustable sliding-knot cord closure with gold bead ends. Worked in size 10 crochet thread or fingering weight cotton with a steel hook, the floral centrepiece measures 2.75 inches wide, and the whole piece takes roughly 2 to 3 hours including assembly.
This bracelet builds four spiral roses from strips worked mostly in double crochet (UK treble crochet), with single crochet and half double crochet marking the shorter petal edges. The escalating stitch heights along each strip are what curl the fabric into overlapping petals once rolled, rather than any separate shaping round. Pointed leaves in two sizes, crocheted in the round from a chain base, fill out the spray around the roses. The result reads as a small floral cluster rather than a flat motif, which is what gives the finished piece its dimensional, almost sculptural character on the wrist.
Construction happens in three separate stages. Each rose, leaf, and the sage-green base strip is made individually and fastened off, then the pieces are stitched onto a hidden foundation strip that becomes the bracelet's backbone. Once the floral cluster is assembled and secured, two lengths of macrame cord are attached with lark's head knots at each end and finished with a sliding knot closure and gold beads, so the whole bracelet adjusts to fit before it is ever worn.
Skill level: Intermediate. You should be comfortable working in the round, joining with slip stitches, and sewing pieces together. The spiral rose rolling technique requires some manual dexterity.
Materials
Crochet Thread
- Size 10 crochet thread or fingering weight 100 percent cotton in the following amounts:
- Color A (Yellow): approximately 8 yards
- Color B (Coral/Salmon): approximately 8 yards
- Color C (Pink/Rose): approximately 8 yards
- Color D (Sage Green for one rose): approximately 5 yards
- Color E (Bright Green for leaves): approximately 15 yards
Recommended yarn
- Anchor Mercer Crochet Cotton Size 10 works beautifully and comes in the exact pastel palette shown. DMC Petra Size 3 or Scheepjes Catona Fingering Weight are also excellent choices if you prefer slightly easier-to-handle thread.
Hook
- Steel crochet hook size 7 (1.65 mm) for size 10 thread, or size B/1 (2.25 mm) for fingering weight cotton
Additional supplies
- Approximately 36 inches of natural linen or jute macrame cord, 1 mm to 1.5 mm thick
- 4 small gold beads with holes large enough for the cord (2 mm to 3 mm hole diameter)
- Tapestry needle
- Sharp scissors
- Straight pins for blocking
- Fabric glue or clear nail polish (optional, for securing knots)
The list is the pattern's own wording.
Instructions
Every round is printed as the pattern wrote it, brackets and all. Open the key beside a round to see only the short forms that round uses.
Rose Pattern (Make 4)
The Spiral Rose Strip Method: This technique creates realistic dimensional roses. Crochet a long strip with escalating stitch heights that create natural petal shapes. Hold the starting end (the smallest end) between your thumb and forefinger. Roll the strip tightly around itself, keeping the flat bottom edge aligned as you roll. After two full rotations, use a straight pin to hold your progress. Complete all rolling, then thread a tapestry needle with your tail and stitch back and forth through the flat base several times to secure all layers. The base should end up flat and stable. If your rose unravels, add more securing stitches before moving on.
Make one rose each in Color A (yellow), Color B (coral), Color C (pink), and Color D (sage).
Foundation: Ch 26.
- Round 1
(RS): Working into the back bump of each chain only: Sc in 2nd ch from hook, sc in next ch. (2 sc)Hdc in next 2 ch. (2 hdc)Dc in next 2 ch. (2 dc)(Dc, ch 1, dc) in next ch. (petal point 1)Dc in next 2 ch. (2 dc)Hdc in next 2 ch. (2 hdc)Sc in next 2 ch. (2 sc)Sl st in next ch. (1 sl st, valley between petals)Sc in next 2 ch. (2 sc)Hdc in next 2 ch. (2 hdc)Dc in next 2 ch. (2 dc)(Dc, ch 1, dc) in next ch. (petal point 2)Dc in next 2 ch. (2 dc)Hdc in next ch. (1 hdc)Sc in last ch. (1 sc)Turn. (25 sts plus 2 ch-1 points)
- Round 2
(WS): Ch 1. Working into the front loops only of Row 1 from right to left: Sc in first st, hdc in next st, 2 dc in next st, 2 dc in next st, 2 tr in next st, (tr, ch 1, tr) in ch-1 sp of petal point 1, 2 tr in next st, 2 dc in next st, 2 dc in next st, hdc in next st, sc in next st, sl st in sl st valley, sc in next st, hdc in next st, 2 dc in next st, 2 dc in next st, 2 tr in next st, (tr, ch 1, tr) in ch-1 sp of petal point 2, 2 tr in next st, 2 dc in next st, hdc in next st, sc in last st.Fasten off, leaving a 10-inch tail.Assembly: Roll the strip beginning from the sc end. The slip stitch valley naturally causes the strip to fold, creating two distinct petal groupings. Secure the base with your tapestry needle and tail.
Checkpoint: Each rose should measure approximately 0.6 inches in diameter and 0.4 inches in height with a flat, stable base.
Small Leaf Pattern (Make 2 in Color E)
The Pointed Leaf Technique: Leaves are worked along both sides of a foundation chain to create a pointed oval shape. You work up one side of the chain, put extra stitches at the tip to turn the corner, then work back down the other side. The result is a complete leaf worked in one continuous round.
Foundation: Ch 6.
- Round 1
Sc in 2nd ch from hook, hdc in next ch, dc in next ch, hdc in next ch, 3 sc in last ch (tip). Working back along opposite side: hdc in next ch, dc in next ch, hdc in next ch, 2 sc in first ch. Join with sl st to first sc. (14 sts)Fasten off, leaving a 6-inch tail.
Each small leaf measures approximately 0.6 inches long by 0.35 inches wide.
Medium Leaf Pattern (Make 6 in Color E)
Foundation: Ch 9.
- Round 1
Sc in 2nd ch from hook, sc in next ch, hdc in next ch, dc in next 2 ch, hdc in next ch, sc in next ch, 3 sc in last ch (tip). Working back along opposite side: sc in next ch, hdc in next ch, dc in next 2 ch, hdc in next ch, sc in next ch, 2 sc in first ch. Join with sl st to first sc. (20 sts)Fasten off, leaving a 6-inch tail.
Each medium leaf measures approximately 0.9 inches long by 0.45 inches wide.
Blocking tip: Pin each leaf to a foam mat with the tip pointed away from you. Mist with water and let dry completely before assembly. This helps the leaves hold their pointed shape.
Base Foundation Strip (Make 1 in Color E)
This hidden strip holds everything together.
Foundation: Ch 28.
- Round 1
Sc in 2nd ch from hook and in each ch across. Turn. (27 sc)
- Round 2
Ch 1, sc in each st across. Turn. (27 sc)
- Round 3
Ch 1, sc in each st across. Fasten off, leaving a 6-inch tail. (27 sc) The finished strip measures approximately 2.7 inches long by 0.3 inches wide.
Making up
- Step 1Step 1: Cut two lengths of macrame cord, each 18 inches long.
- Step 2Step 2: Fold the first length in half. Insert the folded loop through the left end of the foundation strip. Pull the loose ends through the loop and pull snug to create a lark’s head knot.
- Step 3Step 3: Repeat on the right side.
- Step 4Step 4: To create the sliding knot: lay two strands from one side alongside one strand from the opposite side. Wrap a 3-inch scrap of cord around all three strands 5 times. Thread the end under the wraps and pull firm. Apply a tiny drop of fabric glue.
- Step 5Step 5: Repeat on the other side.
- Step 6Step 6: Thread one gold bead onto each of the four cord ends. Tie an overhand knot below each bead. Trim and apply glue to prevent fraying.
- Step 7Step 7: Test the sliding action. The bracelet should adjust from approximately 6 to 8 inches.
Notes from the pattern
- Gauge for the roses is not flexible: at size 7 steel hook with size 10 crochet thread, 10 single crochet stitches equals 1 inch and 10 rows of single crochet equals 1 inch, and each finished rose should measure about 0.6 inches across so that all four fit the 2.75-inch centrepiece width.
- Swap to a smaller hook if roses come out oversized, or a larger hook if they are too tight to roll evenly; hook size affects the roll more than the yarn choice does.
- Each colour (A through E) is used for a single, separate motif rather than blended within a round, so there are no colour changes mid-row to track — just fasten off and start the next motif fresh.
- Leave a 6-inch tail when fastening off each leaf; that length is needed both for stitching the leaf into the cluster and for a little slack while positioning it before final sewing.
The essentials
- Rounds
- 7
- Parts
- 4
- Level
- Intermediate
- Time
- 2-3 hours
- Hook
- 1.65 mm
- Yarn
- Fingering / Thread
Stitches you will use
- Spiral rose rolling Used for all four roses after the strip is crocheted; keep the flat bottom edge aligned as you roll and pin at the two-rotation mark so the layers do not slip before stitching.
- Joining in the round Both leaf sizes are worked from a chain, then joined with a slip stitch to the first single crochet; keep the join stitch snug so the tip doesn't gap.
- Lark's head knot and sliding knot cord closure Used when attaching the two 18-inch cord lengths to the foundation strip and building the adjustable closure; wrap the scrap cord evenly the full 5 times so the knot slides smoothly.
Troubleshooting
The rolled rose loosens or the layers
This happens when the flat bottom edge wasn't kept aligned while rolling; unroll to the last secure point, realign the base, and hold the two-rotation mark with a straight pin before continuing.
The finished rose is too large or too
Gauge is off from the stated 10 sc = 1 inch; go down a hook size for an oversized rose or up a size for an undersized one and re-check against the 0.6-inch target diameter.
The leaf tip looks blunt or rounded instead of pointed.
This is usually a blocking issue rather than a stitch issue; pin the leaf tip-out on a foam mat, mist, and let it dry fully before it goes anywhere near the assembly step.
Substituting yarn
- Mercerised cotton, size 3 (light weight)
- A slightly heavier cotton than the size 10 thread specified; roses come out visibly larger than the 0.6-inch target, so move up to at least a B/1 (2.25 mm) hook and expect the finished floral cluster to run larger than 2.75 inches wide.
- Fingering weight cotton (100% cotton, 4-ply)
- This is the alternative already named for easier handling; it behaves closer to the size 10 thread at a B/1 (2.25 mm) hook but is easier on the hands during the tight spiral rolling.
- Cotton-linen blend, size 10 equivalent
- Adds a little more body to the petal strip, which can make the rolled rose hold its shape with less pinning, though the finished colour may look slightly less crisp than pure mercerised cotton.
Washing and care
- Hand wash the bracelet only, in cool water with a mild soap, gently pressing suds through the cotton motifs rather than rubbing, since the tightly rolled roses can shift out of shape if agitated.
- Lay flat to dry away from direct heat, and store the bracelet flat or loosely coiled rather than wrapped tightly, so the linen or jute cord doesn't crease and the roses keep their rolled dimension.
FAQs
Questions
Can the bracelet be made with a different thread weight than size 10?
Yes; fingering weight 100% cotton works with a B/1 (2.25 mm) hook instead of the steel size 7 (1.65 mm), though the rose diameter and overall centrepiece width will shift slightly from the stated 2.75 inches.
Why does gauge matter so much for a small bracelet?
All four roses need to sit within the fixed 2.75-inch centrepiece width, so a hook that's too loose or tight throws off how the pieces fit together on the foundation strip; the 10 sc = 1 inch gauge is the anchor point to check against.
How long does the spiral rose technique take to get comfortable with?
Each rose takes about 15 to 20 minutes once the rolling technique is familiar, so the first one or two are likely to take longer while the pinning and stitching rhythm is worked out.
Can the cord length be adjusted for a smaller or larger wrist?
The sliding knot closure is built to adjust the wearable circumference from roughly 6 to 8 inches without recutting the cord, so most adult wrists are covered without any changes to the pattern.
What is Colour D used for?
Colour D, the sage green, is worked for one specific rose in the cluster rather than for the leaves, which use the separate bright green Colour E instead.
These answers came from whoever first published the pattern, kept word for word.