 EVERY CROCHET
 Accessories & Home Decor 3 rounds No account, no download
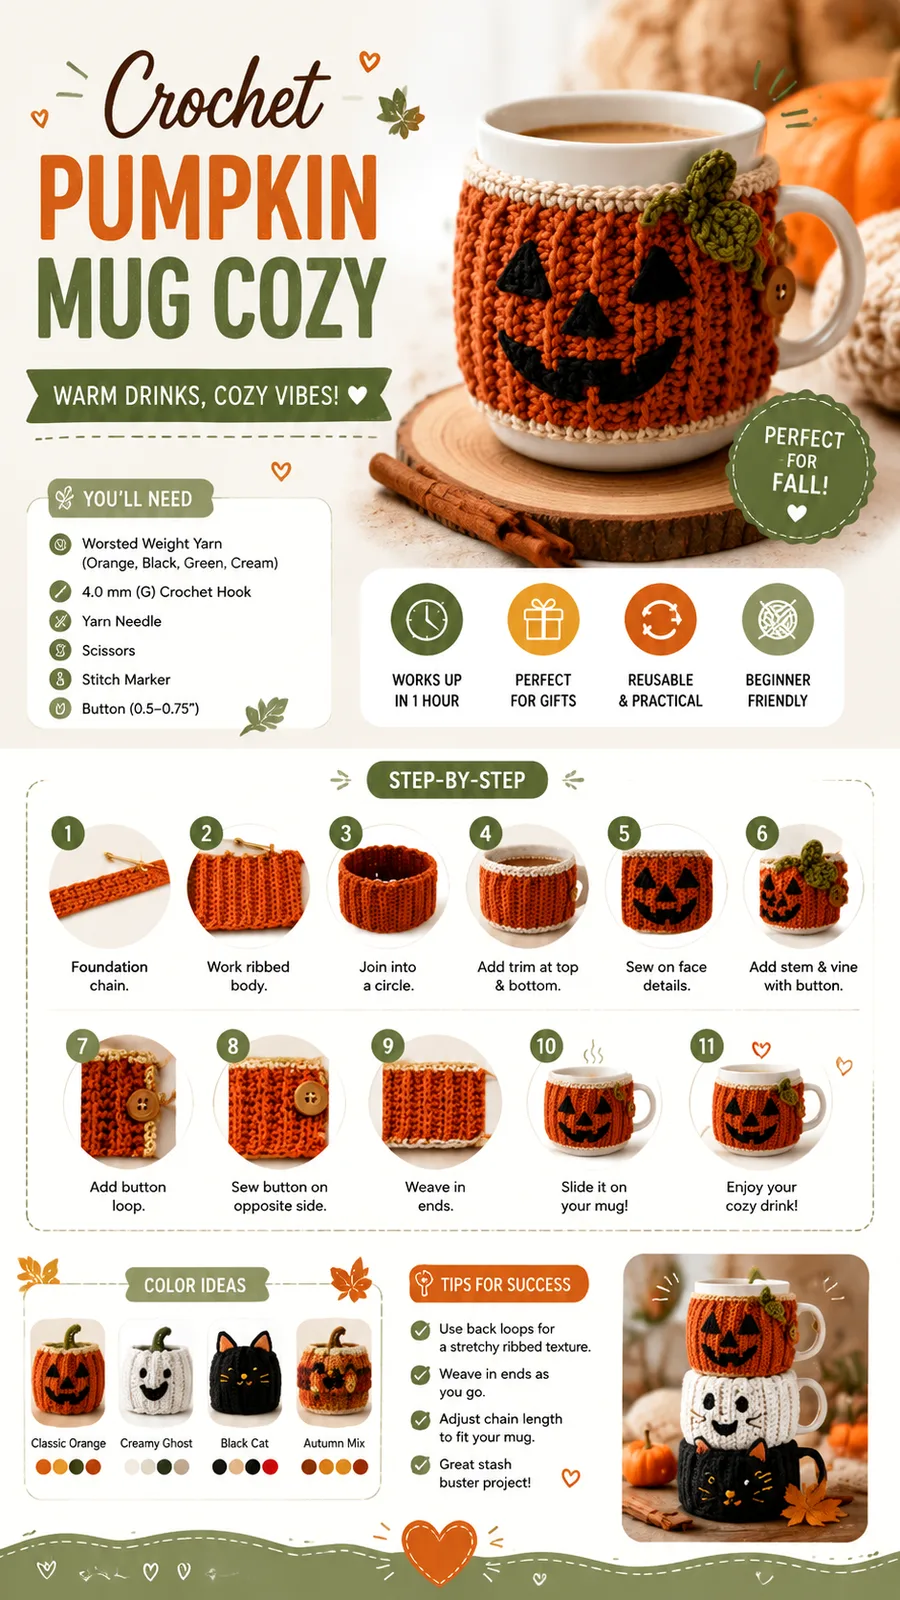
Textured pumpkin mug cosy in half double crochet
Worked flat in half double crochet (UK half treble), this pumpkin mug cosy gives both US and UK stitch names.
- Skill
- Beginner
- Time
- 4-6 hours
- Yarn weight
- Worsted
- Hook
- 4.0 mm

Beginner
What the original write-up called it. Nothing here is graded again.

Worsted
What the sample was worked in. Any weight works; the size moves with it.

4-6 hours
What the original page reckoned. Your own pace is the one that matters.
About this pattern
This beginner-friendly crochet mug cosy is worked flat in half double crochet (UK half treble) through the back loop, forming a ridged rectangle of 32 stitches across 30 rows. The panel folds into a cylinder, seams at the short edge, and gains cream trim plus an embroidered pumpkin face with a stem and leaf. A 4.0 mm hook and worsted yarn in four colours are needed.
This mug cosy belongs to the half double crochet family—known in UK terms as half treble crochet (htr)—worked through the back loop only to raise a ridged, ribbed texture across the body. This single stitch, repeated row after row, gives the cosy its structured yet flexible fabric, sturdy enough to hold its shape around a mug while remaining soft against the hand. The technique sits firmly within beginner-friendly crochet, since only one stitch type carries the entire main panel.
Construction follows a flat-panel method rather than shaping a cup directly. A rectangle of 32 stitches across, worked for 30 rows, grows to roughly 9.5 inches (24 cm) long and 3.5 inches (9 cm) tall, then folds into a cylinder and joins along the short edges. Cream trim finishes the top and bottom edges, while the pumpkin face, stem, and leaf are added afterward, keeping the main panel the only real shaping decision a maker needs to make.
Materials
- Worsted weight yarn in pumpkin orange, cream, black, and green, approximately 80 yards / 73 meters total
- 4.0 mm crochet hook (US G-6)
- Yarn needle
- Scissors
- Stitch marker
- Optional small button for decoration
The list is the pattern's own wording.
Instructions
Every round is printed as the pattern wrote it, brackets and all. Open the key beside a round to see only the short forms that round uses.
Main Pattern
The cozy is worked flat from the bottom edge upward, using a simple rectangle method: a textured panel is made first, then folded into a cylinder and joined along the short edges. Turning chains do not count as a stitch. A stitch marker is optional here since the project is worked in rows rather than continuous rounds.
- Row 1
With pumpkin orange yarn, ch 33. Hdc in the second ch from hook and across. Turn. (32 hdc)
Key2
- hdc
- half double crochet
- ch
- chain
- Row 2
Ch 1, hdc blo across. Turn. (32 hdc)
Key3
- hdc blo
- half double crochet in back loop only
- hdc
- half double crochet
- ch
- chain
- (32)Rows 3–30
Repeat Row 2 for a total of 30 rows. Each row should contain 32 hdc stitches.
Key1
- hdc
- half double crochet
The rectangle should measure approximately 9.5 inches (24 cm) long and 3.5 inches (9 cm) tall.
Adding the Mug Cozy Trim
Attach cream yarn at the top edge.
Ch 1 and work 1 round of sc evenly around the top edge.
Repeat on the bottom edge using cream yarn.
FO and weave in ends.
Joining the Cozy
Fold the rectangle so the short edges meet.
Join the edges using slip stitches through both layers or sew with a yarn needle.
Secure the seam and weave in all remaining ends.
Pro Tip Because mugs vary widely in circumference, measure your mug before finishing the seam. The cozy should stretch slightly around the cup without being difficult to slide on or remove.
Pumpkin Face Details
Using black yarn, embroider two small triangle eyes near the upper center of the cozy.
Add a small triangle nose between the eyes.
Create a curved smile using simple back stitches or chain stitches.
Adjust the placement to create a happy, spooky, or playful expression.
Crochet Stem and Leaf
With green yarn, ch 6.
Sl st back along the chain to create a small stem.
Attach the stem to the top edge of the cozy.
For a leaf, ch 5, sc in second ch from hook, hdc in next stitch, dc in next stitch, sl st in last stitch.
Sew the leaf beside the stem.
Making up
- Step 1Secure all yarn tails with a yarn needle. Lightly steam block if needed to even the stitches. Allow the cozy to dry completely before placing it on a mug.
- Step 2This handmade crochet mug cozy benefits from gentle finishing. Light steam blocking can relax the stitches and improve the shape, but avoid pressing directly on textured stitches. Acrylic yarn should be treated carefully with heat, while cotton blends can usually handle gentle washing.
- Step 3For best care, hand wash when possible and allow the cozy to air dry flat. Remove the cozy from the mug before washing and avoid leaving it exposed to excessive moisture.
Notes from the pattern
- The 4.0 mm (US G-6) hook is sized to keep the hdc blo ridges dense but not stiff; swapping hooks without adjusting stitch count will change the fit around the mug.
- A stitch marker is optional here since the cosy is worked in turned rows rather than continuous rounds; it is most useful simply for flagging a midpoint row while checking the panel against the actual mug.
- Every row must hold exactly 32 hdc; losing or gaining even one stitch over the 30 rows will skew the rectangle and make the final seam uneven.
- Cream trim and the black and green details are worked after the main panel is finished, so ends from each colour can be fastened off and woven in separately rather than carried through the body.
- Gauge is approximately 14 hdc stitches by 10 rows = 4 inches x 4 inches (10 x 10 cm); checking gauge before starting helps the finished panel fit a standard mug at the stated 3.5 inch by 9.5 inch (9 cm x 24 cm) size.
The essentials
- Rounds
- 3
- Parts
- 5
- Level
- Beginner
- Time
- 4-6 hours
- Hook
- 4.0 mm
- Yarn
- Worsted
Stitches you will use
- Half double crochet through the back Used for all 30 rows of the main panel; keep tension even so the ridge from each front loop stays consistent and the stitch count stays at 32.
- Flat-panel seaming into a cylinder Done once the rectangle reaches its full length; align the short edges carefully before joining with slip stitch or whip stitch so the ridges run horizontally without a twist.
- Surface embroidery for the face Applied in the Pumpkin Face Details stage after the panel is complete; keep the triangle eyes small and evenly spaced so the face reads clearly on the orange background.
Troubleshooting
The finished cosy does not sit evenly around the mug.
The stitch count has likely drifted from 32 hdc on one or more rows; recount periodically while working and frog back to the last correct row if the total is off.
The fabric curls at the top or bottom
Working hdc through the back loop only tends to roll slightly before trim is added; working the cream single crochet (UK double crochet) border round promptly on both edges stabilises the fabric.
The seam looks twisted or the face sits
The panel was likely folded with the wrong short edges matched, or the face was added before folding; lay the rectangle flat first to confirm orientation and mark the centre front before seaming and embroidering.
The cosy feels too loose on the mug.
Reduce the hook size slightly or remove a few starting chains so the panel wraps more snugly around the mug's circumference.
The texture looks uneven across rows.
Make sure every hdc blo stitch is worked through the same back loop each time; mixing back-loop-only and both-loop stitches breaks the ridge pattern.
The seam feels bulky.
Use a neat whip stitch with matching yarn tension when joining the short edges, rather than a thick or loose seam.
Substituting yarn
- Cotton, worsted weight
- Gives firmer stitch definition to the ridged texture but less stretch, so the panel should be sized closer to the mug's actual circumference; the same 4.0 mm hook works well.
- Acrylic, chunky or bulky weight
- Grows the panel faster with thicker ridges; reduce the stitch count per row and size up to roughly a 5.0-5.5 mm hook, producing a bulkier, warmer cosy.
- Wool-blend, DK (light worsted) weight
- Produces a thinner fabric with softer ridges, needing more rows to reach the same 3.5 inch height; a smaller hook around 3.5 mm keeps the fit snug.
Washing and care
- Hand wash gently in cool water; acrylic yarn tolerates only light steam rather than direct heat, while cotton blends can usually take a normal gentle wash if preferred.
- Reshape the cosy over a mug or a rolled towel while still damp and let it air dry flat, then store it flat rather than folded so the back-loop ridges keep their definition.
FAQs
Questions
Does the hook size change how the cosy fits?
Yes; the pattern's 4.0 mm hook is chosen to keep the 32-stitch panel snug around a standard mug. A smaller hook tightens the fit, while a larger one loosens it and may need fewer rows.
Why work through the back loop only instead of both loops?
Working hdc blo leaves the front loop standing as a visible ridge on every row, which is what creates the knit-like ribbing. Working both loops instead would give a flat panel without that texture.
Can the cosy be resized for a larger or smaller mug?
Yes; the starting chain and the 30-row height are both straightforward to adjust, since every row simply repeats the same hdc blo stitch across whatever starting count is chosen.
Is a stitch marker actually needed for this pattern?
No; the source notes a marker as optional because the cosy is worked flat in turned rows, not in continuous joined rounds, so there is no round start to track.
When should the pumpkin face and trim be added?
The cream trim is worked once the main panel is finished and before folding. The black face details and the green stem and leaf are added after the piece has been seamed into its cylinder shape.
These answers came from whoever first published the pattern, kept word for word.