 EVERY CROCHET
 Amigurumi 22 rounds No account, no download
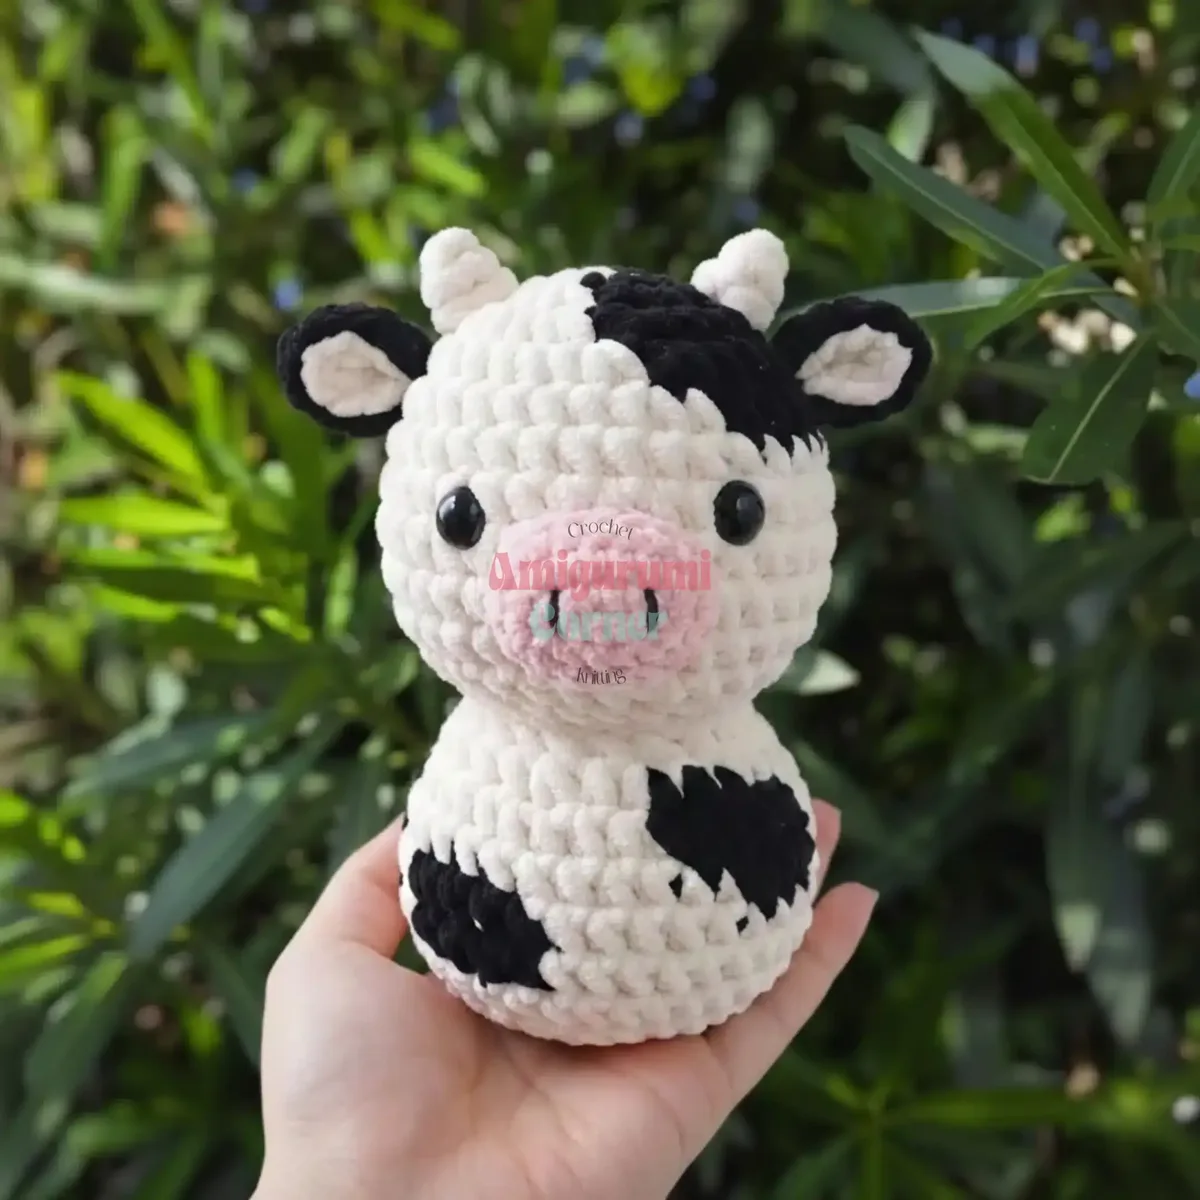
Crochet amigurumi cow pattern with horns and safety eyes
Amigurumi cow pattern worked in US single crochet terms, with white bobble horns, embroidered face details, and 12mm safety eyes; finished
- Skill
- Intermediate
- Time
- 4-6 hours
- Yarn weight
- Bulky
- Hook
- 4.5 mm

Intermediate
What the original write-up called it. Nothing here is graded again.

Bulky
What the sample was worked in. Any weight works; the size moves with it.

4-6 hours
What the original page reckoned. Your own pace is the one that matters.
About this pattern
This pattern makes a 19 cm amigurumi cow worked in single crochet (UK double crochet) from a magic ring, shaping head, body, horns, ears and tail with no separate legs. It uses a 4.5 mm hook, Bulky yarn in white, black and blush pink, 12 mm safety eyes, and fibrefill stuffing. Eye placement follows reference points marked across two rounds, and the body rests on a flat oval base.
This amigurumi cow is built from single crochet (UK: double crochet), the small, dense stitch that gives stuffed toys their smooth, firm surface. Every round increases evenly to shape a rounded head and body in one continuous piece, with the horns formed directly into the fabric rather than sewn on separately. The finished toy stands about 19 cm tall. The pattern is written in standard US crochet terminology and is rated Intermediate–Advanced (4 out of 5 stars), assuming comfort with color changes, bobble stitches, and working in continuous rounds.
Construction starts from a magic ring at the crown of the head and works outward in twelve rounds that shape head and body as a single piece, finishing each round with a slip stitch and chain one to keep the increases sitting flat. The horns appear within Round 4 as bobble stitches worked straight into the white base colour, so no colour change is needed there. Two symmetrical ears, each a short row of black and white, and a separate tail are added afterwards, and the body sits directly on a flat oval base rather than on crocheted legs.
Materials
Yarn
- Bernat #5 Bulky Yarn in White, Black, and Blush Pink (one skein of each color)
Crochet Hook
- 4.5mm (US size 7)
Tools
- Stitch marker
- Yarn/sewing needle
- Scissors
- Fiberfill stuffing
- Plastic safety eyes: 12mm
The list is the pattern's own wording.
Instructions
Every round is printed as the pattern wrote it, brackets and all. Open the key beside a round to see only the short forms that round uses.
Main Pattern
- Round 1
6SC in a MR (6)
Key1
- mr
- magic ring
- Round 2
6INC (12)
- Round 3
(SC, INC) 6 times (18)
Key2
- inc
- increase
- sc
- single crochet
- Round 4
SC, INC, SC, INC, BO (4 loops), INC, SC, INC, (INC, SC) 2 times, INC, BO (4 loops), (INC, SC) 2 times (27)
Key3
- inc
- increase
- sc
- single crochet
- BO
- bobble stitch
Note: BO stitches create the WHITE horns on Row 4 – no color change needed
- Round 5
4SC, SWITCH TO BLACK: 6SC, SWITCH TO WHITE: 17SC (27)
- Round 6
4SC, SWITCH TO BLACK: 4SC, SWITCH TO WHITE: INC, (8SC, INC) 2 times (30)
Key1
- inc
- increase
- Round 7
30SC (30)
- Round 8
7SC, 3INC, 7SC, SWITCH TO BLACK: 3SC, SWITCH TO WHITE: 3INC, 7SC (36)
- Round 9
16SC, HDC, 2DC-INC, HDC, SWITCH TO PINK: 5SC, SWITCH TO WHITE: 11SC (38)Cut the Blush Pink, continue with White yarn.Use a different colored yarn to mark the position for the face between rounds 8 and 9, the first eye between the 14th and 15th stitches, and the second eye between the 22nd and 23rd stitches.
Key2
- hdc
- half double crochet
- inc
- increase
- Round 10
16SC, (BLO SC, 2DEC, SC), SC, SWITCH TO BLACK: 3SC, SWITCH TO WHITE: 12SC (36)
Key2
- blo
- back loops only
- sc
- single crochet
- Round 11
(2SC, DEC) 9 times (27)
Key1
- dec
- decrease
- Round 12
(SC, DEC) 9 times (18) [STUFFING]Thread a piece of yarn from the neck through point A to C, and from point B to D, then back down to the neck. Pull the yarn tight and tie a knot to create the eye sockets. Hide the excess yarn inside the head.
Key2
- dec
- decrease
- sc
- single crochet
Eye Socket Reference Points
Point A = Above right eye (between stitches 14-15 of Row 8)
Point B = Above left eye (between stitches 22-23 of Row 8)
Point C = Center below right eye (stitch 18 of Row 9)
Point D = Center below left eye (stitch 20 of Row 9)
Attach the eyes between R8-9 at the two points where we have created the eye sockets.
- Round 13
3SC, 2DEC, 4SC, 2DEC, 3SC (14)
- Round 14
FLO for all sts: (SC, INC) 7 times (21)
Key4
- sts
- stitches
- inc
- increase
- flo
- front loops only
- sc
- single crochet
- Round 15
6SC, SWITCH TO BLACK: 4SC, SWITCH TO WHITE: 11SC (21)
- Round 16
INC, 2SC, INC, SC, SWITCH TO BLACK: SC, SWITCH TO WHITE: INC, 2SC, INC, SC, SWITCH TO BLACK: SC, SWITCH TO WHITE: (INC, 2SC) 3 times (28)
Key2
- inc
- increase
- sc
- single crochet
- Round 17
9SC, SWITCH TO BLACK: 5SC, SWITCH TO WHITE: 14SC (28)
- Round 18
11SC, SWITCH TO BLACK: 2SC, SWITCH TO WHITE: 9SC, SWITCH TO BLACK: 6SC, SWITCH TO WHITE (28)
- Round 19
6SC, HDC, DC-INC, HDC, 3SC, SWITCH TO BLACK: 1SC, SWITCH TO WHITE: 3SC, SWITCH TO BLACK: 1SC, SWITCH TO WHITE: 3SC, HDC, DC-INC, HDC, 3SC, SWITCH TO BLACK: 2SC, SWITCH TO WHITE (30)
Key3
- hdc
- half double crochet
- inc
- increase
- dc
- double crochet
Note: Black spots on belly are flat (small color changes only – creates subtle spots matching the photo)
- Round 20
BLO for all sts, (SC, DEC) 10 times (20) [STUFFING]
Key4
- sts
- stitches
- dec
- decrease
- blo
- back loops only
- sc
- single crochet
- Round 21
(2SC, DEC) 5 times (15)
Key1
- dec
- decrease
- Round 22
(SC, DEC) 5 times (10)Cut the yarn and use a yarn needle to close the gap.
Key2
- dec
- decrease
- sc
- single crochet
Ears (Symmetrical)
Both ears are black with white inner detail, creating a symmetrical look.
RIGHT EAR: Attach the Black yarn just below the horn (between Row 4-5).
Chain 2, switch to White: 2DC, switch to Black: chain 2 and slst in the same stitch.
Cut the yarn and hide the excess yarn.
LEFT EAR: Attach the Black yarn just below the horn (between Row 4-5).
Repeat the same as the right ear.
Cut the yarn and hide the excess yarn.
Tail
Attach White yarn to the first stitch between R18-19
Chain 9, change to Black yarn: chain 2, begin at the third chain from hook: BO (2 loops), change to White yarn: 9SLST, SLST to the next st.
Cut the yarn and hide the excess yarn.
Embroidery: Use black yarn to embroider the eyelashes (small curved lines above each eye).
Embroidery: Embroider nostrils on the pink nose using pink yarn (two small vertical stitches on the blush pink nose section in Row 9).
Notes from the pattern
- Work with the 4.5 mm (US size 7) hook specified; a smaller hook on Bulky yarn produces a looser fabric that lets the fibrefill show through, which matters on a toy this size.
- Place a stitch marker at the start of each round rather than joining and chaining, since the body is worked in a continuous spiral from Round 1 through Round 12.
- Finish each round with a slip stitch and chain one, as noted for this pattern, to keep the increase rounds (such as Row 4's horn shaping) sitting flat rather than spiralling off-centre.
- Insert the 12 mm safety eyes at the Round 8–9 reference points before closing the head, and stuff firmly around the horns and eye sockets so neither area collapses once the toy is handled.
- Color variations: the classic colorway uses a white body with black spots as shown; you can also try a white body with brown/tan spots, a tan/beige body with white patches (Jersey-style), or a brown body with beige accents (Highland-style).
The essentials
- Rounds
- 22
- Parts
- 4
- Level
- Intermediate
- Time
- 4-6 hours
- Hook
- 4.5 mm
- Yarn
- Bulky
Stitches you will use
- Magic ring start Used to begin Round 1 at six stitches; keep the loop snug before increasing so the centre does not leave a hole once the piece is stuffed.
- Bobble stitch shaping (BO) Worked within Row 4 to form both white horns in the same colour as the surrounding fabric; pull the bobble loops firm so the horns stay raised rather than sinking flat.
- Safety-eye placement using mapped reference points Points A–D on Rounds 8–9 mark where the eyes sit relative to the eye sockets; insert the 12 mm eyes before stuffing the head, since they cannot be repositioned afterwards.
Troubleshooting
The horns flatten out or vanish into the head once stuffed.
This happens when the Row 4 bobble (BO) stitches are left loose; pull each bobble closed firmly before continuing the round and add a small pinch of extra stuffing directly behind each horn.
The eyes sit too high, too low, or uneven side to side.
This comes from miscounting stitches 14–15, 18, 20–23 on Rounds 8–9; recount to Points A–D before pushing the safety eyes through, since they cannot be moved once the backs are attached.
The cow rocks or leans instead of standing flat on its base.
An unevenly stuffed oval base, or skipping the slip-stitch-and-chain-one finish on each round, throws the base out of shape; stuff the base evenly and firmly and close it with the finishing method noted for this pattern before attaching the body.
Substituting yarn
- Cotton, DK (UK) / light worsted (US) weight
- Produces a smaller, firmer cow with crisper stitch definition that shows the bobble horns clearly, but needs a smaller 3.5–4 mm hook and slightly less stuffing to avoid visible gaps between stitches.
- Acrylic chenille or velvet, bulky weight
- Gives a softer, fuzzy drape that suits a huggable toy, though the pile blurs the bobble texture of the horns and makes the eye socket reference points harder to see while working.
- Wool-blend, aran weight
- Keeps the finished size close to the original with a 4–4.5 mm hook, but the fibre's natural halo softens stitch definition and may need firmer stuffing to hold the horn shaping.
Washing and care
- Hand wash the finished cow in cool water if needed, since the acrylic yarn specified for this pattern does not felt, and reshape the body and ears while damp before leaving it to air dry flat.
- Store away from direct heat and sustained sunlight, which can flatten the pile and dull the white, black and blush pink colourwork; keep the horns and ears supported rather than compressed during storage.
FAQs
Questions
Does this cow pattern include legs?
No. The pattern notes this cow has no legs; the body sits directly on a flat oval base instead, which simplifies the construction and keeps the toy stable.
What hook and yarn does the pattern call for?
It uses a 4.5 mm (US size 7) hook with Bulky (#5) weight yarn in white, black and blush pink. One skein of each colour is enough for the full toy.
How are the horns made without sewing on separate pieces?
The horns are built straight into Row 4 using bobble (BO) stitches worked in the white base colour, so no colour change or separate horn piece is needed.
Where exactly do the safety eyes go?
They attach between Rounds 8 and 9 at four mapped reference points, Points A–D, which mark the stitches above and below each eye socket. Insert them before the head is fully stuffed, since they lock in place from the inside.
How big is the finished cow, and does size vary?
The finished piece measures roughly 19 cm (7.5 inches) tall. Actual size depends on yarn tension and how tightly the increases and bobble stitches are worked, so results vary a little between makers.
These answers came from whoever first published the pattern, kept word for word.