 EVERY CROCHET
 Accessories 15 rounds No account, no download
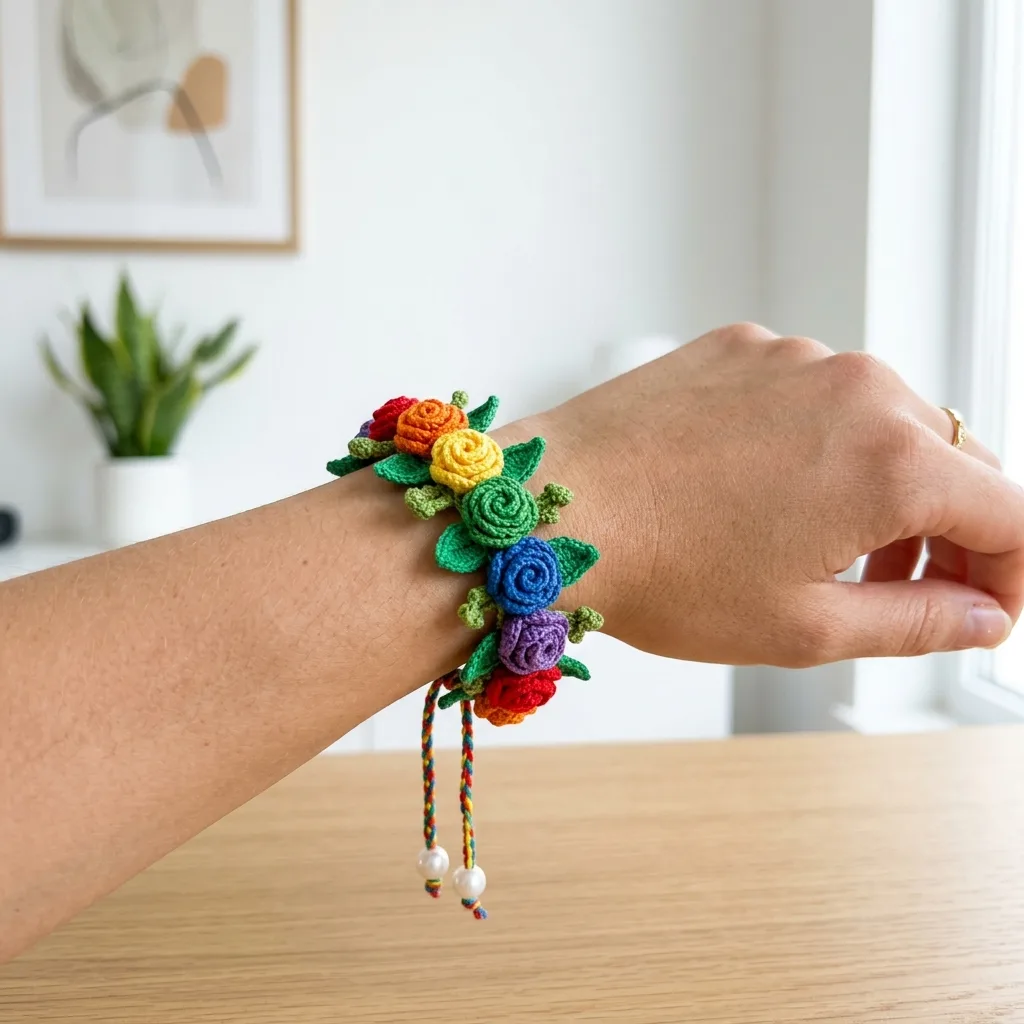
Rainbow rose crochet bracelet with beaded ties
Rainbow rose crochet bracelet made with single crochet and chain stitches in cotton thread, finished with pearl beads and braided ties.
- Skill
- Intermediate
- Time
- 4-6 hours
- Yarn weight
- Lace
- Hook
- 1.65 mm

Intermediate
What the original write-up called it. Nothing here is graded again.

Lace
What the sample was worked in. Any weight works; the size moves with it.

4-6 hours
What the original page reckoned. Your own pace is the one that matters.
About this pattern
This is a crocheted rose bracelet made from seven colours of size 10 cotton thread, worked on a steel hook, with a flared petal strip rolled into a coiled rose, large kelly-green and small light-green leaves worked in rounds, a stem strip holding everything together, pearl beads sewn on by hand, and thread ties or braids finishing the wrist closure. It suits crocheters comfortable with small stitches and hand-sewing finishing work.
This bracelet uses basic single crochet and chain stitches, worked in fine crochet cotton rather than yarn, so every stitch stays small and dense. A ch-1 space foundation row sets up a flared strip of stitch clusters that becomes the rose's petal edge, while a solid stem strip anchors leaves alongside it. The scale asks for a steel hook rather than the usual aluminium sizes, and for close attention rather than speed.
Construction happens in several separate pieces before assembly: a flared petal strip that gets rolled and tacked into a coiled rose (make 7, one per rainbow color), large kelly-green leaves and smaller light-green accent leaves worked in rounds, and a long single-colour chain strip that doubles as the stem. Pearl beads are hand-sewn onto the finished piece, and thread ties or braids close the bracelet around the wrist, so sewing and finishing make up as much of the work as the crochet itself.
Skill Level: Intermediate beginner — if you can single crochet confidently and work in rounds, you can make this bracelet. Finished Measurements: approximately 6.5 inches (16.5 cm) long for the bracelet portion, adjustable to fit 6 to 8 inch wrists with the braided ties.
Materials
Size 10 crochet cotton thread in the following colors
- Red (approximately 5 yards)
- Orange (approximately 5 yards)
- Yellow (approximately 5 yards)
- Green/teal (approximately 5 yards)
- Blue (approximately 5 yards)
- Purple (approximately 5 yards)
- Dark red or burgundy (approximately 5 yards)
- Kelly green (approximately 15 yards for larger leaves and stem)
- Light green or lime (approximately 10 yards for smaller leaves)
- Popular thread brands that work beautifully include Aunt Lydia’s Classic 10, DMC Petra Size 5, or Lizbeth Size 10.
Hook
- Steel crochet hook, size 7 (1.65 mm) or size 8 (1.50 mm)
Notions
- Tapestry needle for weaving ends
- Small sharp scissors
- 4 pearl beads (approximately 6mm) with holes large enough for doubled thread
- Sewing needle and matching thread for attaching beads
- Stitch markers (optional but helpful)
- Fabric stiffener or diluted white glue (optional, for shaping)
The list is the pattern's own wording.
Instructions
Every round is printed as the pattern wrote it, brackets and all. Open the key beside a round to see only the short forms that round uses.
Foundation Row
How to Crochet the Rolled Roses (Make 7). Each rose starts as a simple ruffled strip that you roll into a spiral. Make one rose in each color: red, orange, yellow, green, blue, purple, and dark red.
Ch 26.
- Round 1
Sc in 2nd ch from hook. *Ch 1, skip 1 ch, sc in next ch.* Repeat from * to end. (13 sc, 12 ch-1 spaces)
Key2
- ch
- chain
- sc
- single crochet
- Round 2
Ch 1, turn. Work 3 sc in each ch-1 space across. (36 sc) Fasten off, leaving a 12-inch tail for sewing.
Key2
- ch
- chain
- sc
- single crochet
Rolling the Rose
Starting at one end of the strip, begin rolling tightly. The ruffled edge (Row 2) will naturally fan outward, creating petals. Use the long tail and your tapestry needle to stitch through the base of the roll every few turns, securing it as you go. When you reach the end, stitch through the base several times to lock everything in place. Don’t cut the remaining tail yet.
Tip for beginners The first rose might feel awkward. That’s completely normal. By your third rose, you’ll have the rhythm down. If your rose looks too loose, unroll it and try again with tighter initial tension.
Large Leaves
How to Crochet the Large Leaves (Make 14). These kelly green leaves frame each rose beautifully. You'll need two leaves per rose. Work in continuous rounds; use a stitch marker to track the beginning of each round if needed.
- Round 1
Using kelly green, ch 2. Work 6 sc in the 2nd ch from hook. Do not join. (6 sc)
Key2
- ch
- chain
- sc
- single crochet
- Round 2
Inc in each st around. (12 sc)
Key2
- inc
- increase (work 2 single crochet stitches into the same stitch, adding one stitch)
- sc
- single crochet
- Round 3
*Sc in next st, inc in next st.* Repeat around. (18 sc)
Key2
- inc
- increase (work 2 single crochet stitches into the same stitch, adding one stitch)
- sc
- single crochet
- Round 4
Sc in each st around. (18 sc)
Key1
- sc
- single crochet
- Round 5
*Sc in next st, 2sc-tog.* Repeat around. (12 sc)
Key2
- 2sc-tog
- single crochet two together (decrease; removes one stitch)
- sc
- single crochet
- Round 6
*2sc-tog.* Repeat around. (6 sc)
Key2
- 2sc-tog
- single crochet two together (decrease; removes one stitch)
- sc
- single crochet
- Round 7
*2sc-tog.* Repeat around. (3 sc)Fasten off, leaving a 6-inch tail. Flatten the leaf with your fingers. The natural point from the decreases creates the leaf tip.
Key2
- 2sc-tog
- single crochet two together (decrease; removes one stitch)
- sc
- single crochet
Small Accent Leaves
How to Crochet the Small Accent Leaves (Make 14). These light green leaves add dimension and a two-toned garden effect. You'll need two leaves per rose.
- Round 1
Using light green, ch 2. Work 6 sc in the 2nd ch from hook. (6 sc)
Key2
- ch
- chain
- sc
- single crochet
- Round 2
Inc in each st around. (12 sc)
Key2
- inc
- increase (work 2 single crochet stitches into the same stitch, adding one stitch)
- sc
- single crochet
- Round 3
Sc in each st around. (12 sc)
Key1
- sc
- single crochet
- Round 4
*2sc-tog.* Repeat around. (6 sc)
Key2
- 2sc-tog
- single crochet two together (decrease; removes one stitch)
- sc
- single crochet
- Round 5
*2sc-tog.* Repeat around. (3 sc)Fasten off, leaving a 6-inch tail. These leaves will be noticeably smaller than the kelly green ones, which is exactly what we want.
Key2
- 2sc-tog
- single crochet two together (decrease; removes one stitch)
- sc
- single crochet
Foundation
How to Crochet the Stem. The stem creates the backbone of the bracelet. All components attach to this piece.
Using kelly green, ch 75.
- Round 1
Sc in 2nd ch from hook and in each ch across. (74 sc) Fasten off, leaving a 6-inch tail at each end for attaching ties.The stem should measure approximately 6.5 inches. If your tension differs, adjust the foundation chain to achieve this length.
Key2
- ch
- chain
- sc
- single crochet
For each tie
Making the Braided Ties. The closure system uses four braided cords, two on each end. Each cord gets a pearl bead finish.
Cut six 18-inch strands of thread, using a mix of your rainbow colors. Gather all six strands and fold in half, creating a loop. Attach this loop to one end of the stem with a lark’s head knot. Divide the 12 strands into 3 groups of 4 strands each. Braid tightly for approximately 4 inches.
Tie an overhand knot to secure. Thread a pearl bead onto the braid above the knot. Tie another small knot above the bead to hold it in place. Trim excess thread to about half an inch below the final knot.
Repeat to create four braided ties total, two at each end of the stem.
Assembly
Assembly Instructions. This is where your bracelet comes to life. Take your time with this step.
Step 1: Lay out your components Arrange the stem on a flat surface. Place your seven roses along the stem, evenly spaced, in rainbow order (red, orange, yellow, green, blue, purple, dark red). Position two large leaves and two small leaves around each rose.
Step 2: Attach the roses Using the tail from each rose, stitch through the stem and back through the rose base several times. Pull firmly to secure. Weave in the end through the rose base.
Step 3: Attach the leaves Position each large leaf so it peeks out from behind a rose. Stitch through the leaf base and into the stem. For the small leaves, tuck them between the large leaves and roses, stitching through the stem. Vary the angles slightly for a natural garden look.
Step 4: Final adjustments Once everything is attached, gently shape the roses and leaves with your fingers. If desired, apply a light coat of fabric stiffener to help the bracelet hold its shape. Let dry completely before wearing.
Notes from the pattern
- Work with a steel crochet hook in size 7 (1.65mm) or size 8 (1.50mm) — a standard aluminium hook is too large for size 10 cotton thread and will leave loose, gappy stitches.
- The stem foundation chain is sized to a finished length of about 6.5 inches; if tension runs tighter or looser than this, adjust the starting chain count rather than the stitch count.
- Seven thread colours are used for the rose, each only around 5 yards, so leftover embroidery or crochet thread offcuts are often enough without buying full skeins.
- The four pearl beads need holes wide enough to take doubled sewing thread, so test a scrap of thread through the bead before stitching it to the finished rose.
- Tension matters here: because you're working with fine thread, keep your stitches firm but not so tight that you can't insert your hook. Loose stitches will make floppy roses that won't hold their shape.
- Assembly is where the magic happens: take your time arranging the roses and leaves before stitching them down permanently, and play with the layout until you love it.
The essentials
- Rounds
- 15
- Parts
- 7
- Level
- Intermediate
- Time
- 4-6 hours
- Hook
- 1.65 mm
- Yarn
- Lace
Stitches you will use
- Chain-space foundation row Used in the Foundation Row to build the petal strip; keep the ch-1 spaces even so the second row's 3-sc fan sits flat rather than puckering.
- Rolling and tacking a coiled rose Covered in Rolling the Rose; tension needs to stay snug as the strip winds so the coil holds its shape once stitched down.
- Braiding and tying off ties Needed for each tie that closes the bracelet; keep strands taut while braiding so the ends do not unravel before they're knotted.
- Working leaves in continuous (unjoined) rounds Needed for both the Large and Small Accent Leaf rounds; track the start of each round with a stitch marker since rounds are not joined, and work the increases and decreases evenly to shape the leaf point.
Troubleshooting
The rolled rose won't stay coiled and keeps springing open.
This usually means the petal strip was rolled too loosely or tacked at too few points; re-roll it snugly and anchor the tail thread through several layers of the coil, not just the outer edge.
The leaves curl too much instead of lying flat.
Tight tension in the lime or kelly green thread pulls the leaf edges inward; work the leaf rows slightly looser, or press the finished leaf flat with fingers while damp before it dries.
The braided ties are unravelling at the ends.
Unsecured strand ends slip free during handling; knot each braid firmly at both ends and weave the tail through a few stitches with a tapestry needle before trimming.
Substituting yarn
- Perle cotton, size 5
- A heavier thread than the size 10 called for, so the rose, leaves and stem all come out larger; pair it with a slightly bigger steel hook, around size 5 or 6, to keep the stitches from tightening up.
- Fine crochet cotton, size 20 or 30
- Produces a smaller, more delicate rose with a lacier drape; a finer steel hook, around size 10 to 12, is needed to match the thread, and bead holes may need to be smaller too.
- Cotton-linen blend thread, similar weight to size 10
- Keeps a comparable hook and stitch count but gives a stiffer, less pliable strip, so the rolled rose holds its coil with less tacking while leaves sit flatter and less curled.
Washing and care
- To wear the bracelet, wrap it around your wrist with the roses facing up. Gather two ties from one end with two ties from the opposite end and tie them together in a bow or double knot.
- Hand wash the finished bracelet gently in cool water with mild soap if needed, since crochet cotton holds its shape well but can fray under a washing machine's agitation; reshape the rolled rose gently with fingers while still damp.
- Dry flat away from direct heat and store the bracelet loosely coiled or lying flat rather than folded, so the rose and leaves keep their shape and the beads don't press into the thread. Avoid machine washing, which can distort the roses.
FAQs
Questions
Can the bracelet be made without the pearl beads?
Yes, the beads are decorative rather than structural, so the rose and ties hold together without them. Skipping them simply changes the finished look and removes the need for a sewing needle and matching thread.
Why does the pattern use seven separate colours for just one rose?
Each colour contributes a layer or petal of the coiled rose, so the rainbow sequence builds visible rings as the strip rolls inward. Around 5 yards of each colour is enough since only a short length of strip is needed per shade.
What happens if the stem comes out shorter than 6.5 inches?
This points to tighter-than-expected tension on the foundation chain. Adding a few extra chains to the starting row brings the stem back to length without changing the stitch pattern.
Can a different hook size be used instead of steel size 7 or 8?
A hook outside that range changes how dense the stitches sit against the size 10 thread, altering the finished scale of the rose and leaves. Staying within the steel 7–8 range keeps the stitch gauge matching the amounts of thread listed.
Is this project suitable for a first attempt with crochet thread?
It suits someone who already has basic crochet stitch fluency and chain-space experience, since the thread scale and hand-sewn beading add extra precision. A first project in thread specifically, rather than yarn, may be easier picked elsewhere before attempting this one.
These answers came from whoever first published the pattern, kept word for word.