 EVERY CROCHET
 Bags & Accessories 13 rounds No account, no download
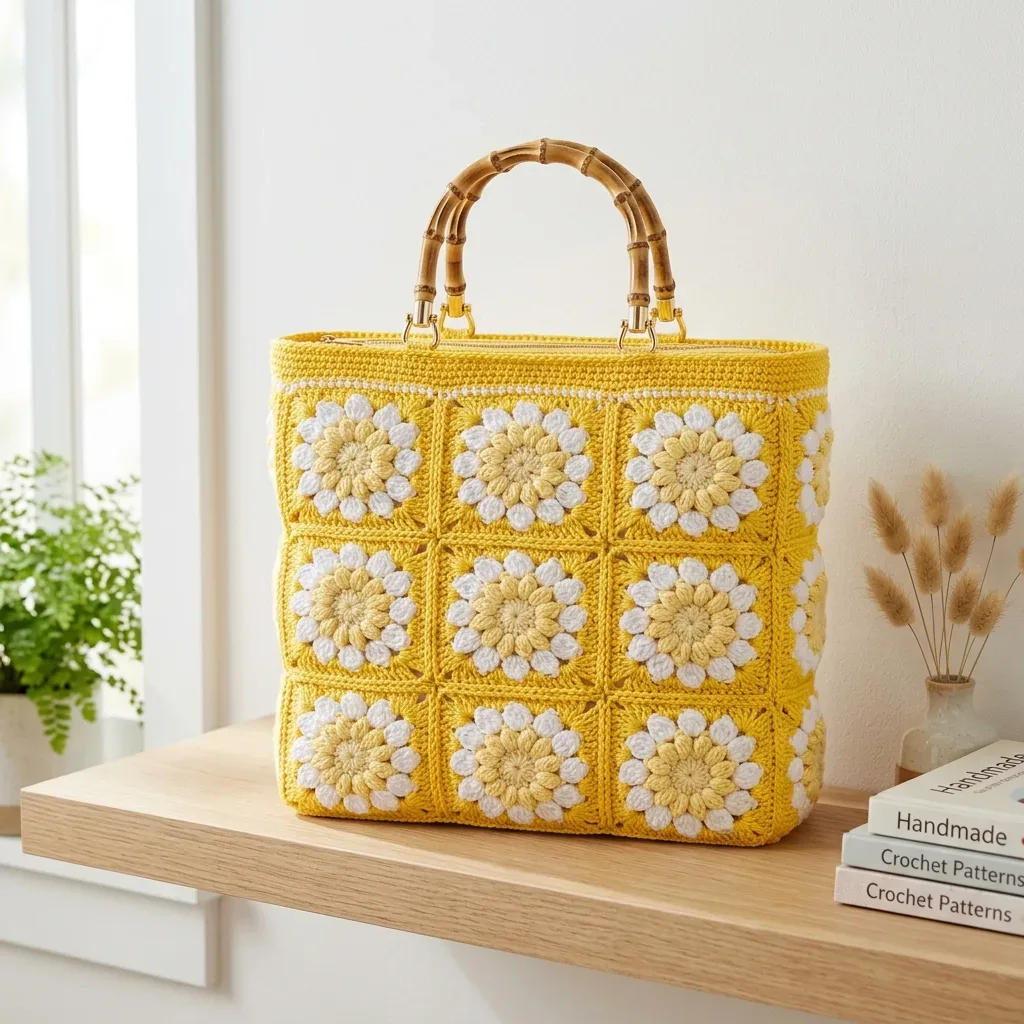
Sunshine granny square bag with puff stitch flowers
Sunflower granny square bag with puff stitch and double crochet (UK treble); both US and UK stitch terms given.
- Skill
- Intermediate
- Time
- 18-24 hours
- Yarn weight
- Worsted
- Hook
- 4.0 mm

Intermediate
What the original write-up called it. Nothing here is graded again.

Worsted
What the sample was worked in. Any weight works; the size moves with it.

18-24 hours
What the original page reckoned. Your own pace is the one that matters.
About this pattern
This intermediate pattern produces a structured 13 by 12 by 4 inch bag made from eighteen cream-and-gold granny squares with puff stitch flower centres, a double crochet base, a top border, and attached handles. It requires comfort with working in the round, granny squares, and the puff stitch, and takes roughly 18 to 24 hours including about 45 to 60 minutes per square.
This sunshine yellow floral granny bag builds on the classic granny square, worked in double crochet (UK: treble crochet) throughout the motif rounds. Eighteen squares combine a cream white puff stitch flower at the centre with a golden yellow granny frame, giving the finished piece its sunny, two-tone character. The puff stitch produces raised petals that sit proud of the flat granny background, so the bag reads as floral rather than purely geometric, even though the underlying structure is entirely traditional granny square work.
Construction proceeds in five stages: eighteen granny square motifs are worked individually, a base rectangle is built in double crochet rows to form the floor, the front and back panels are joined to the base and to each other along the side seams, a top border finishes the upper edge, and handles are attached last. Panels are assembled with whipstitch or slip stitch through matching corner and side spaces rather than seamed invisibly, so edges stay visible and structured once the bag is reshaped and dried.
Materials
- Here’s everything required to make this sunshine yellow floral granny bag from start to finish.
Yarn
- Approximately 800 yards of worsted weight cotton yarn in Color A (golden yellow)
- Approximately 350 yards of worsted weight cotton yarn in Color B (cream white)
Hook
- US size G-6 (4.0 mm) crochet hook, or size needed to obtain gauge
Notions
- Yarn needle for weaving ends
- Stitch markers
- Scissors
Optional
- 1/2 yard of cotton fabric for lining, plus needle and thread
Yarn Suggestions
- Lion Brand 24/7 Cotton works beautifully for this project. You’ll need about 4.5 skeins in a golden shade like Goldenrod or Buttercup for Color A, and about 2 skeins in Ecru for Color B.
- WeCrochet Cotlin is another excellent choice. The linen content adds extra firmness and a slightly rustic texture that pairs wonderfully with the bamboo handles. Plan for about 7 skeins in Canary and 3 skeins in Bare.
- Whatever you choose, avoid acrylic yarns. They won’t give you the structured bag body you see in the finished piece. Stick with cotton or cotton blends for best results.
The list is the pattern's own wording.
Instructions
Every round is printed as the pattern wrote it, brackets and all. Open the key beside a round to see only the short forms that round uses.
Part One: Granny Square Motif
You’ll make 18 granny squares total. Work all rounds on the right side without turning.
- Round 1
, Puff Stitch Flower Center (Color B): Make a magic ring, or chain 4 and slip stitch to form a ring.Chain 1 (does not count as a stitch throughout).Work (puff stitch, chain 1) 8 times into the ring. (8 puff stitches, 8 chain-1 spaces)Pull the magic ring tail to close the center.Slip stitch into the top of the first puff stitch to join. (8 ps)
Key1
- ps
- puff stitch. A cluster of loops pulled up from the same stitch and closed together. Full instructions below.
- Round 2
, Petal Layer (Color B): Chain 1, do not turn. Working into each chain-1 space between puff stitches: (single crochet, chain 2, single crochet) into each chain-1 space around. (16 sc, 8 chain-2 spaces)Slip stitch into the first single crochet to join.
Key1
- sc
- single crochet. Insert hook, yarn over and pull up a loop (2 loops on hook), yarn over and pull through both loops.
- Round 3
, Outer Petal Definition (Color A): Join Color A with a slip stitch into any chain-2 space from Round 2.Chain 3 (counts as first double crochet now and throughout), work 2 double crochet into the same chain-2 space.Chain 1, work 3 double crochet into the next chain-2 space.Repeat (chain 1, 3 double crochet into next chain-2 space) 6 more times.Chain 1, slip stitch into the top of the beginning chain-3 to join. (24 dc in 8 groups of 3, 8 chain-1 spaces)
Key1
- dc
- double crochet. Yarn over, insert hook, yarn over and pull up a loop (3 loops on hook), yarn over and pull through 2 loops, yarn over and pull through remaining 2 loops.
- Round 4
, Granny Square Frame (Color A): Slip stitch into the next 2 double crochet and into the chain-1 space.
This round creates the 4 corners of the square.
Chain 3 (counts as dc), work 2 double crochet into the same chain-1 space.
Chain 1, work 3 double crochet into the next chain-1 space.
Chain 2 (corner), work 3 double crochet into the same chain-1 space.
(Chain 1, 3 double crochet into the next chain-1 space) twice.
Chain 2 (corner), 3 double crochet into the same chain-1 space.
Repeat (chain 1, 3 dc into next chain-1 sp, chain 2, 3 dc into same chain-1 sp) twice more to complete 4 sides and 4 corners.
Chain 1, slip stitch into the top of the beginning chain-3 to join. (12 groups of 3 dc, 4 chain-2 corner spaces, 8 chain-1 side spaces)
Checkpoint: Your motif should measure approximately 3.25 inches across at this stage.
- Round 5
, Final Border Round (Color A): Slip stitch into the next 2 double crochet and into the chain-1 space.Chain 3 (counts as dc), work 2 double crochet into the same chain-1 space.Continue around working: (chain 1, 3 dc) into each chain-1 space along sides, and (3 dc, chain 2, 3 dc) into each chain-2 corner space.Pattern repeat for one side: (3 dc into chain-1 sp, chain 1, 3 dc into next chain-1 sp, chain 1, (3 dc, chain 2, 3 dc) into corner chain-2 sp).Work all 4 sides in this manner.At the end of Round 5, slip stitch into the top of the beginning chain-3. Fasten off Color A and weave in ends. (20 groups of 3 dc, 4 chain-2 corner spaces, 16 chain-1 side spaces)
Key2
- dc
- double crochet. Yarn over, insert hook, yarn over and pull up a loop (3 loops on hook), yarn over and pull through 2 loops, yarn over and pull through remaining 2 loops.
- sp
- space. The gap created by chain stitches in previous rounds.
Checkpoint: Each completed granny square should measure 4 inches by 4 inches after light blocking.
Part Three: Base Rectangle
The base connects the front and back panels and forms the floor of your bag. It measures approximately 13 inches by 4 inches.
With Color A, chain 54.
- Round 1
Double crochet in the 4th chain from hook (the skipped chains count as first dc), double crochet in each chain across. Turn. (52 dc)
Key1
- dc
- double crochet. Yarn over, insert hook, yarn over and pull up a loop (3 loops on hook), yarn over and pull through 2 loops, yarn over and pull through remaining 2 loops.
- Round 2
through 8: Chain 3 (counts as dc), double crochet in each stitch across. Turn. (52 dc)After Row 8, fasten off.
Key1
- dc
- double crochet. Yarn over, insert hook, yarn over and pull up a loop (3 loops on hook), yarn over and pull through 2 loops, yarn over and pull through remaining 2 loops.
Checkpoint: The base rectangle should measure approximately 13 inches wide by 4 inches tall.
Part Four: Assembling the Bag Body
Hold the front panel and the base rectangle with right sides facing outward.
Using Color A and a yarn needle, whipstitch or slip stitch the bottom edge of the front panel to one long edge of the base rectangle. Work one joining stitch per stitch across. (52 sts joined)
Attach the back panel to the opposite long edge of the base rectangle in the same manner. (52 sts joined)
Fold the assembly so the front and back panels stand upright and the base lies flat at the bottom.
At each side of the bag, slip stitch the short left side edge of the front panel to the short left side edge of the back panel. Work through the outermost chain-2 corner spaces and chain-1 side spaces of the border squares on each panel, matching them stitch for stitch. Repeat for the right side. (Approximately 36 to 40 sl sts per side seam)
Close the base corners by working single crochet seam stitches across the corner gaps from the inside of the bag.
Checkpoint: The bag body should now stand upright and measure approximately 13 inches wide by 12 inches tall by 4 inches deep.
Part Five: Top Border
- Round 1
With Color A, join yarn at any top corner of the bag opening using a slip stitch.
- (92)Round 2
Work single crochet evenly around the top edge of the bag. Work approximately 36 single crochet across the front panel top, 8 to 10 single crochet on each short side, and 36 single crochet across the back panel top. Total: approximately 92 single crochet.
- Round 3
Slip stitch to the first single crochet to join. (92 sc)
Key1
- sc
- single crochet. Insert hook, yarn over and pull up a loop (2 loops on hook), yarn over and pull through both loops.
- Round 4
Picot Border Round Join Color B with slip stitch to any single crochet in the top border.
- (46)Round 5
(Single crochet in the next 2 single crochet, picot) repeat around. (46 sc pairs with 46 picots)
Key1
- sc
- single crochet. Insert hook, yarn over and pull up a loop (2 loops on hook), yarn over and pull through both loops.
- Round 6
Slip stitch into the first single crochet to join. Fasten off Color B.
Part Six: Handle Attachment
On the front panel, center the handles over the middle granny square of the top row. The two D-ring attachment points should be placed approximately 3 inches apart and centered left to right over the middle square. Mirror this placement on the back panel.
Thread a 12-inch length of Color A through the D-ring connector. Fold the yarn length in half over the straight bar of the D-ring. Use the two yarn tails to securely whipstitch the D-ring attachment to the inside of the top edge of the bag, working through the single crochet border stitches. Make at least 8 overhand wraps per D-ring, then knot and bury the ends.
Slide the bamboo handle loop through the D-ring and close the handle.
Repeat for all 4 attachment points.
Making up
- Step 1Weave in all remaining yarn ends securely. For cotton yarn, use a locking stitch by threading through the weave two to three times in different directions.
- Step 2Mist the assembled bag lightly with water using a spray bottle. Do not submerge it.
- Step 3Gently reshape the bag to ensure square corners, even sides, and a flat base. Stuff the inside loosely with clean towels or tissue paper to hold the shape while drying.
- Step 4Allow to dry completely, approximately 24 hours, before using or storing.
Notes from the pattern
- A US G-6 (4.0 mm) hook is specified, but swapping hook size changes the finished 13 by 12 by 4 inch dimensions, so adjust only if gauge requires it.
- Stitch markers are useful for tracking the eight puff-stitch-and-chain repeats in Round 1 of each square and the eight double crochet rows of the base rectangle.
- Consistent tension on the puff stitch loops matters more than on the surrounding granny rounds, since uneven loop height shows clearly on the raised petals.
- Colour changes are limited to one per square: Color B is worked only for the flower centre round, with Color A carrying the remaining granny rounds, base rectangle, and seaming.
The essentials
- Rounds
- 13
- Parts
- 5
- Level
- Intermediate
- Time
- 18-24 hours
- Hook
- 4.0 mm
- Yarn
- Worsted
Stitches you will use
- Puff stitch Worked eight times into the ring for Round 1 of each flower centre; watch for pulling each of the three loops to an even 1/2 inch before drawing through all 7 loops together.
- Working in the round without turning Used across all five rounds of each of the eighteen granny squares; watch for even tension on chain-1 spaces so each square lies flat and matches its neighbours.
- Whipstitch or slip stitch seaming through matching spaces Used in Part Four to join panels to the base rectangle and to each other; watch for lining up corner and side spaces stitch for stitch rather than estimating placement.
Troubleshooting
The puff stitch flower centre looks uneven or lopsided.
The three loops were pulled up to different heights before the final yarn over; keep each loop at roughly 1/2 inch before drawing through all 7 loops at once.
The side seams gap or the panels don't line up at the corners.
The chain-2 corner spaces and chain-1 side spaces weren't matched stitch for stitch during assembly; recount both edges before seaming so each space meets its pair.
The base rectangle curls instead of lying flat.
Tension varied across the 52-stitch double crochet rows; mist lightly, stuff with towels or tissue paper, and let the bag dry fully to square the edges as described in the assembly steps.
Substituting yarn
- Mercerised cotton, worsted weight
- Gives similar stitch definition with a slightly crisper sheen on the puff stitch petals; same hook size and yardage apply.
- Cotton-linen blend, worsted weight
- Adds extra firmness and a rustic texture to the granny squares and base; may need a slightly larger hook to match gauge.
- Cotton-blend sport or DK weight
- Produces a lighter, more flexible drape than true worsted; requires a smaller hook, more total yardage, and still avoids pure acrylic to keep the bag structured.
Washing and care
- Hand wash gently in cool water if needed, since the cotton yarn is durable and colourfast; press out excess water in a towel rather than wringing.
- After washing or the final mist-and-reshape step, stuff the bag with towels or tissue paper and leave it to dry flat for about 24 hours to keep square corners and a flat base before storing.
FAQs
Questions
Is the puff stitch the same as a popcorn stitch?
No. The puff stitch builds three loops into the same stitch or space and draws through all 7 loops together, while popcorn stitch groups several complete, separate stitches.
How much yarn does this bag use in total?
The materials list calls for about 800 yards of Color A and 350 yards of Color B, both worsted weight cotton.
Does the finished bag need lining fabric?
Yes, the materials list includes 1/2 yard of cotton fabric plus needle and thread for lining the assembled bag body.
Why does the pattern specify cotton rather than acrylic?
Cotton holds the structured, firm shape shown in the finished bag, while acrylic lacks the stiffness needed and would not give the same body.
These answers came from whoever first published the pattern, kept word for word.