 EVERY CROCHET
 Amigurumi 32 rounds No account, no download
Snow white dragon amigurumi plush crochet pattern
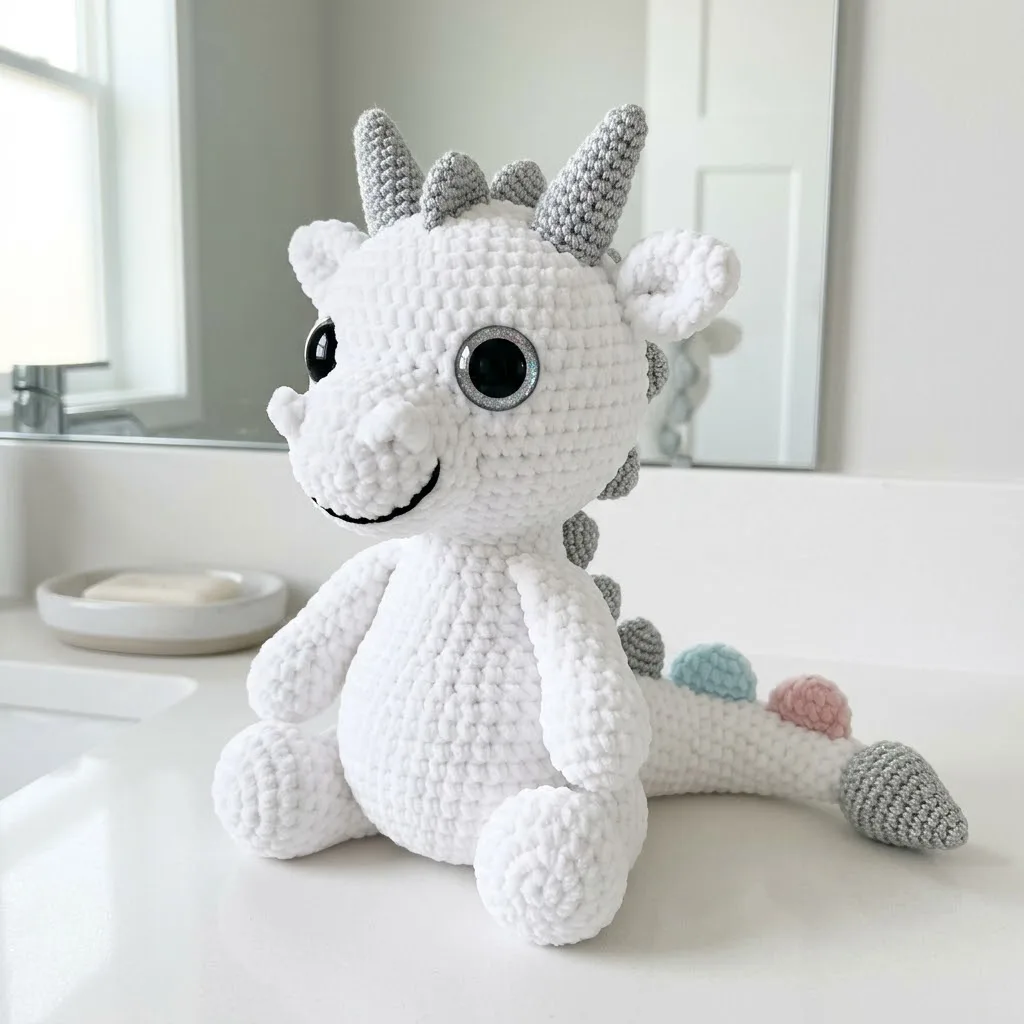
Chenille dragon amigurumi worked in single crochet (UK double crochet), with both US and UK stitch terms given.
- Skill
- Intermediate
- Time
- 4-6 hours
- Yarn weight
- Chunky/Worsted
- Hook
- 5.0 mm

Intermediate
What the original write-up called it. Nothing here is graded again.

Chunky/Worsted
What the sample was worked in. Any weight works; the size moves with it.

4-6 hours
What the original page reckoned. Your own pace is the one that matters.
About this pattern
A dragon amigurumi worked mainly in white chunky chenille yarn on a 5.0mm hook, with gray worsted weight yarn and a 3.5mm hook for horns and small details. The pattern uses single crochet (UK double crochet) throughout, 24mm safety eyes, embroidered mouth, and polyester stuffing. Ears are made flat and unstuffed; the tail carries small light blue and pale pink bobble accents.
This dragon plush belongs to the amigurumi family, built up in continuous rounds of single crochet (UK double crochet) to keep the surface dense and shape-holding. The chunky chenille body gives the finished toy its soft, fur-like texture, while smaller worsted weight pieces such as the horns and ears carry finer stitch definition than chenille alone could manage.
Construction separates by yarn weight and hook size: chenille sections use a 5.0mm hook for the main plush form, while gray worsted weight yarn on a 3.5mm hook handles the horns and other small details. Ears are worked flat and left unstuffed for a floppy finish, then pinched and sewn on, and pale blue and pink bobbles add colour accents to the tail.
Materials
- for Your Dragon Amigurumi
Yarn
- Chunky chenille yarn in white (approximately 200g or 2 skeins)
- Worsted weight yarn in gray (approximately 50g)
- Small amounts of worsted weight yarn in light blue and pale pink for tail bobbles
Hook
- 5.0mm crochet hook for chenille yarn sections
- 3.5mm crochet hook for worsted weight sections
Notions
- One pair of 24mm safety eyes with glitter backing
- Black embroidery thread for mouth
- Polyester fiberfill stuffing
- Yarn needle
- Stitch marker
- Scissors
- A note about yarn choice: Chenille yarn creates that beautiful plush texture you see in the photo. Bernat Blanket or similar chunky chenille works perfectly. The gray sections use regular worsted weight for better stitch definition on the small details.
The list is the pattern's own wording.
Instructions
Every round is printed as the pattern wrote it, brackets and all. Open the key beside a round to see only the short forms that round uses.
Notions
One pair of 24mm safety eyes with glitter backing Black embroidery thread for mouth Polyester fiberfill stuffing Yarn needle
Stitch marker Scissors
A note about yarn choice: Chenille yarn creates that beautiful plush texture you see in the photo. Bernat Blanket or similar chunky chenille works perfectly. The gray sections use regular worsted weight for better stitch definition on the small details.
Abbreviations and Stitch Definitions
Before we dive into the step by step instructions, let’s go over every stitch you’ll use. I’ll define each one so there’s no confusion.
MR = Magic Ring. This is a adjustable loop that you work your first round into, then pull tight to close the hole. ch = Chain. Wrap yarn over hook, pull through loop on hook. This creates a foundation stitch.
sc = Single Crochet. Insert hook into stitch, yarn over and pull up a loop (2 loops on hook), yarn over and pull through both loops.
inc = Increase. Work 2 single crochet stitches into the same stitch. This adds one stitch to your count.
dec = Invisible Decrease. Insert hook through front loops only of next 2 stitches, yarn over and pull through both front loops, yarn over and pull through both loops on hook. This removes one stitch while staying neat. sl st = Slip Stitch. Insert hook, yarn over, pull through stitch and loop on hook in one motion.
FO = Fasten Off. Cut yarn and pull through final loop to secure.
Gauge and Finished Size
For amigurumi, gauge matters less than fabric density. Your stitches should be tight enough that stuffing doesn’t show through. If you can see gaps between stitches, go down a hook size.
Finished dimensions: Approximately 10 inches tall when seated, 8 inches wide including arms.
How to Crochet the Dragon Body
The body is worked from the bottom up in one continuous piece. Use white chenille yarn and your 5.0mm hook.
Step by step: The snout creates that adorable dragon face shape. Use white chenille yarn.
Step by step: These chubby little arms are quick to work up.
- Round 1
MR, 6 sc into ring. (6 sts)
Key3
- sts
- stitches
- sc
- single crochet
- mr
- magic ring
- Round 2
Inc in each st around. (12 sts)Step by step: Sc in each st around. (12 sts); Dec around. (6 sts) Stuff lightly, close hole, leave tail for sewing.
Key5
- sts
- stitches
- inc
- increase
- dec
- decrease
- st
- stitch
- sc
- single crochet
Assembly Instructions Now for the fun part. Putting your dragon together brings it to life.
Step 1: Sew snout to front of head, centered below eyes. Position it so the dragon has a slightly upturned nose.
Step 2: Using black embroidery thread, stitch a curved smile below the snout. A simple curved line works beautifully.
Step by step: Step 3: Attach ears to sides of head, angling them slightly outward and back; Step 4: Sew horns to top of head, positioned behind the ears; Step 5: Attach head to body, with the head tilted slightly to one side for personality; Step 6: Sew arms to sides of body, just below where the head attaches; Step 7: Attach legs to bottom front of body so the dragon sits upright; Step 8: Sew tail to back of body at the bottom.
Step 9: Attach spikes down the center back, starting at the head and continuing onto the tail. Space them evenly.
Step by step: Step 10: Sew bobbles to the tail, clustering them near the gray tip; Tips for a Professional Finish.
Stuffing matters. Firm stuffing in the head and paws helps your dragon hold its shape. Lighter stuffing in the arms and legs allows them to be poseable.
Weave in ends carefully. Chenille yarn can be tricky. Weave through several stitches and trim close.
Eye placement changes everything. Before securing the safety eyes permanently, try different positions. Moving them even one row can dramatically change the expression.
Take photos as you assemble. This helps you remember placement if you make another one later.
Step by step: Customization Ideas.
This beginner friendly pattern (once you’ve made one) becomes a canvas for creativity. Try different eye sizes for a cuter or more dramatic look. Use pastel colors for the whole dragon for a nursery theme. Add wire to the tail for poseability. Embroider nostrils on the snout. The possibilities are endless.
You could also make a whole family by adjusting hook size and yarn weight. Worsted weight yarn with a 4.0mm hook creates a mini version perfect for keychains or ornaments.
I really hope you enjoy making this sweet dragon as much as I enjoyed designing it. If you create one, please save this pattern to your Pinterest boards so you can find it again easily. And I would absolutely love to see your finished dragons, so drop a comment below or tag me on Instagram when yours is complete. Happy crocheting, friend!
- Round 3
*Sc 1, inc* repeat around. (18 sts)*Sc 3, inc* repeat around. (10 sts) Sl st, FO. Do not stuff. Flatten slightly before sewing.Step by step: Sc in each st around. (18 sts); *Sc 1, dec* repeat around. (12 sts).Sc in each st around. (12 sts) Sl st, FO, leave tail for sewing. Stuff paw firmly, upper arm lightly.Sc in each st around. (18 sts) Sl st, FO, leave tail for sewing. Stuff lightly before attaching.
Key7
- sl st
- slip stitch
- sts
- stitches
- inc
- increase
- dec
- decrease
- st
- stitch
- sc
- single crochet
- fo
- finish off
- Round 4
*Sc 2, inc* repeat around. (24 sts)
Key3
- sts
- stitches
- inc
- increase
- sc
- single crochet
- Round 5
*Sc 3, inc* repeat around. (30 sts)
Key3
- sts
- stitches
- inc
- increase
- sc
- single crochet
- Round 6
*Sc 4, inc* repeat around. (36 sts)
Key3
- sts
- stitches
- inc
- increase
- sc
- single crochet
- Round 7
*Sc 5, inc* repeat around. (42 sts)Step by step: Sc in each st around. (42 sts) Work 8 rounds even.
Key4
- sts
- stitches
- inc
- increase
- st
- stitch
- sc
- single crochet
- Rounds 8–14
Sc in each st around. (42 sts) Work 7 rounds even.
Key3
- sts
- stitches
- st
- stitch
- sc
- single crochet
- Round 15
*Sc 5, dec* repeat around. (36 sts)Sc in each st around. (36 sts) Insert safety eyes between rounds 11 and 12, approximately 8 stitches apart. The glitter backing goes behind the eye before securing with the washer.
Key4
- sts
- stitches
- dec
- decrease
- st
- stitch
- sc
- single crochet
- Round 16
Sc in each st around. (36 sts)
Key3
- sts
- stitches
- st
- stitch
- sc
- single crochet
- Round 17
*Sc 4, dec* repeat around. (30 sts)Step by step: *Sc 3, dec* repeat around. (24 sts) Stuff head very firmly; *Sc 2, dec* repeat around. (18 sts); *Sc 1, dec* repeat around. (12 sts) Sl st to next st, FO, leave long tail for sewing.
Key6
- sl st
- slip stitch
- sts
- stitches
- dec
- decrease
- st
- stitch
- sc
- single crochet
- fo
- finish off
- Rounds 18–22
Sc in each st around. (30 sts) Work 5 rounds even. Begin stuffing firmly at this point. Continue adding stuffing as you work.
Key3
- sts
- stitches
- st
- stitch
- sc
- single crochet
- Round 23
*Sc 3, dec* repeat around. (24 sts)
Key3
- sts
- stitches
- dec
- decrease
- sc
- single crochet
- Round 24
Sc in each st around. (24 sts)Step by step: *Sc 2, dec* repeat around. (18 sts); *Sc 1, dec* repeat around. (12 sts).Sc in each st around. (12 sts) Sl st, FO, leave tail. Stuff foot firmly, leg portion lightly.
Key6
- sl st
- slip stitch
- sts
- stitches
- dec
- decrease
- st
- stitch
- sc
- single crochet
- fo
- finish off
- Round 25
*Sc 2, dec* repeat around. (18 sts) Sl st to next st, FO, leave long tail for sewing to head.
Key6
- sl st
- slip stitch
- sts
- stitches
- dec
- decrease
- st
- stitch
- sc
- single crochet
- fo
- finish off
How to Crochet the Dragon Head The head is the star of this crochet tutorial. Work carefully and stuff firmly as you go.
Ears (Make 2)
Small floppy ears add personality. Use white chenille yarn.
- Round 1
MR, 4 sc into ring. (4 sts)
Key3
- sts
- stitches
- sc
- single crochet
- mr
- magic ring
- Round 2
Inc in each st around. (8 sts)
Key3
- sts
- stitches
- inc
- increase
- st
- stitch
- Round 3
*Sc 1, inc* repeat around. (12 sts)
Key3
- sts
- stitches
- inc
- increase
- sc
- single crochet
- Rounds 4–5
Sc in each st around. (12 sts) Sl st, FO. Do not stuff. Pinch flat for sewing.
Key5
- sl st
- slip stitch
- sts
- stitches
- st
- stitch
- sc
- single crochet
- fo
- finish off
Horns (Make 2)
Switch to gray worsted weight yarn and 3.5mm hook for the horns.
- Round 1
MR, 4 sc into ring. (4 sts)
Key3
- sts
- stitches
- sc
- single crochet
- mr
- magic ring
- Round 2
*Sc 1, inc* repeat around. (6 sts)
Key3
- sts
- stitches
- inc
- increase
- sc
- single crochet
- Round 3
*Sc 2, inc* repeat around. (8 sts)
Key3
- sts
- stitches
- inc
- increase
- sc
- single crochet
- Round 4
Sc in each st around. (8 sts)
Key3
- sts
- stitches
- st
- stitch
- sc
- single crochet
- Round 5
*Sc 3, inc* repeat around. (10 sts)
Key3
- sts
- stitches
- inc
- increase
- sc
- single crochet
- Rounds 6–7
Sc in each st around. (10 sts) Sl st, FO. Stuff lightly with fiberfill. Back Spikes (Make 5)These triangular spikes run down the dragon’s back and tail. Use gray yarn and smaller hook.
Key5
- sl st
- slip stitch
- sts
- stitches
- st
- stitch
- sc
- single crochet
- fo
- finish off
Tail
The tail uses white chenille, then transitions to gray at the tip.
With white yarn:
- Round 1
MR, 6 sc into ring. (6 sts)
Key3
- sts
- stitches
- sc
- single crochet
- mr
- magic ring
- Rounds 2–4
Sc in each st around. (6 sts)
Key3
- sts
- stitches
- st
- stitch
- sc
- single crochet
- Round 5
*Sc 1, inc* repeat around. (9 sts)
Key3
- sts
- stitches
- inc
- increase
- sc
- single crochet
- Rounds 6–10
Sc in each st around. (9 sts)
Key3
- sts
- stitches
- st
- stitch
- sc
- single crochet
- Round 11
*Sc 2, inc* repeat around. (12 sts)
Key3
- sts
- stitches
- inc
- increase
- sc
- single crochet
- Rounds 12–16
Sc in each st around. (12 sts) Switch to gray worsted weight for the tail tip.
Key3
- sts
- stitches
- st
- stitch
- sc
- single crochet
- Rounds 17–20
Sc in each st around. (12 sts) Sl st, FO. Stuff tail lightly. Tail Bobbles (Make 3)
Key5
- sl st
- slip stitch
- sts
- stitches
- st
- stitch
- sc
- single crochet
- fo
- finish off
These adorable little bobbles add charm. Make one in gray, one in light blue, one in pale pink.
Notes from the pattern
- Keep a stitch marker in the working round at all times; chenille's texture makes the first and last stitches of a round difficult to spot by eye.
- The 5.0mm hook is sized for the chunky chenille body sections, while the 3.5mm hook is reserved for the gray worsted weight horns and small pieces — swapping hooks between sections is expected, not optional.
- Ears are worked flat over 4 rounds and left unstuffed, then pinched flat before sewing for a floppy rather than rounded finish.
- Stuff the body firmly enough to hold its shape under the weight of the chenille, but check tension regularly since chenille disguises gaps in stitching more easily than smooth yarn.
The essentials
- Rounds
- 32
- Parts
- 4
- Level
- Intermediate
- Time
- 4-6 hours
- Hook
- 5.0 mm
- Yarn
- Chunky/Worsted
Stitches you will use
- Amigurumi shaping with increases and decreases Used throughout the ears and horns, where round-by-round stitch counts (4 to 12 sts on ears, 4 to 8 sts on horns) must be tracked closely to keep the shape symmetrical.
- Working with chenille yarn Chenille handles differently from smooth worsted yarn on the 5.0mm hook sections; stitches can be harder to see, so counting carefully and using a stitch marker matters more than usual.
Troubleshooting
The horns or ears look uneven from one side to the other
This usually comes from missing or doubling a stitch during the increase rounds; count stitches at the end of every round against the numbers given before continuing.
The chenille body looks thin or the stitches show gaps
Chenille yarn has more give than standard worsted, so stitches worked too loosely on the 5.0mm hook will gap once stuffed; tighten tension slightly or size down half a hook size if this happens consistently.
The ears don't sit flat or keep curling
Since the ears are deliberately left unstuffed, pinch the last round firmly flat before sewing rather than trying to shape it after attaching, which locks in a curl.
Substituting yarn
- Chunky acrylic (non-chenille), same weight
- Produces a smoother, less plush surface than chenille but keeps the same finished size on a 5.0mm hook; stitch definition becomes clearer, which some makers prefer for a cleaner look.
- Cotton worsted weight for the gray sections
- Gives the horns and small details a firmer, less stretchy structure than acrylic worsted, which can make them hold their shape with slightly less stuffing.
- DK weight wool blend throughout, sized down
- Shrinks the finished dragon noticeably smaller than the chunky chenille original and requires a smaller hook overall (well below 5.0mm), along with reduced stuffing to match the lighter fabric.
Washing and care
- Hand wash the chenille body gently in cool water and reshape while damp, since chunky chenille and mixed worsted weight sections can dry at different rates if machine washed.
- Air dry flat away from direct heat to protect the chenille's plush texture, and store the finished dragon uncompressed so the fiberfill inside keeps its shape.
FAQs
Questions
What does 'single crochet' mean if the pattern says US terms?
Single crochet is the US name for the stitch that UK crocheters call double crochet. The pattern's stitch counts and instructions work the same regardless of which name is used, so no conversion of the pattern itself is needed.
Why are the ears left unstuffed?
Unstuffed ears pinch flat and sew on with a soft, floppy drape rather than a rounded, stiff shape. This is a deliberate design choice for the character of the dragon, not an omission.
How much chenille yarn does this pattern actually use?
The materials list calls for approximately 200g, or about 2 skeins, of chunky chenille yarn in white for the body. The gray worsted weight yarn needed for horns and details comes to roughly 50g.
What are the light blue and pale pink yarn amounts for?
Small amounts of light blue and pale pink worsted weight yarn are used specifically for bobbles on the tail, worked over the tail's 7 rounds. Only small quantities of each colour are needed since they form accent details rather than a main section.
These answers came from whoever first published the pattern, kept word for word.