 EVERY CROCHET
Garments 19 rounds No account, no download
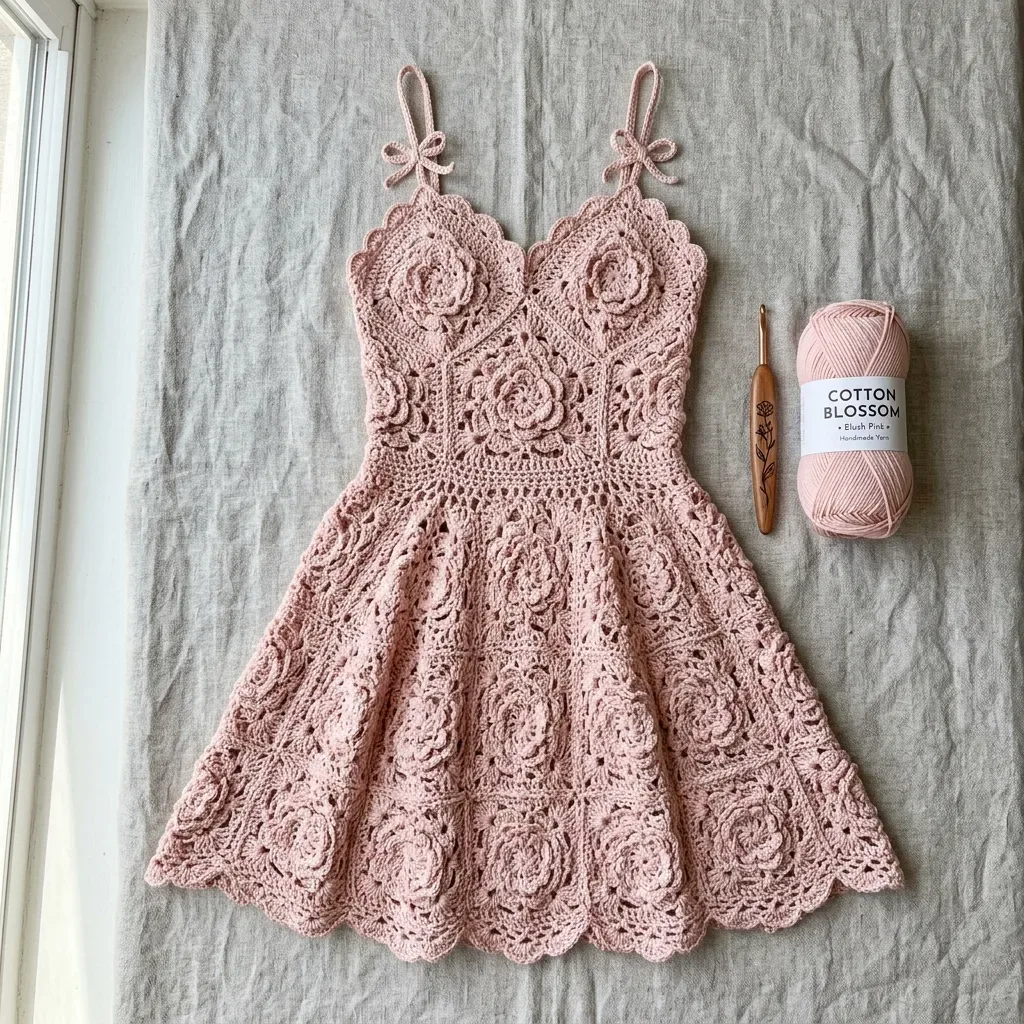
Rose granny square dress with scalloped lace trim
Blush pink granny square dress with rose motifs and scallop shells; US sc is UK dc throughout.
- Skill
- Intermediate
- Time
- 4-6 hours
- Yarn weight
- DK
- Hook
- 3.5 mm

Intermediate
What the original write-up called it. Nothing here is graded again.
DK
What the sample was worked in. Any weight works; the size moves with it.

4-6 hours
What the original page reckoned. Your own pace is the one that matters.
About this pattern
A fitted, sleeveless dress built entirely from blush pink rose granny squares, joined into a sweetheart-neckline bodice and A-line skirt, finished with a ribbed waistband, scalloped shell borders at neckline and hem, and bow-trimmed spaghetti straps. It needs roughly 1,200 to 1,400 yards of DK cotton, a 3.5 mm hook, careful gauge-matching across many identical squares, and several hours of motif-making before assembly begins.
This dress belongs to the granny square family, built from rose-centred motifs worked in single crochet (UK: double crochet) and treble clusters that form the raised, three-dimensional flower at the centre of each square. The result sits closer to lace than to a typical granny blanket square, since the open mesh between rounds and the scalloped shell trim are doing as much visual work as the motif itself.
Construction runs motif-first: a batch of Rose Granny Squares is made to a fixed size, then arranged into a bodice front and back shaped for a sweetheart neckline, joined at the sides into a tube, and finished with a fitted waistband. The skirt extends the same squares in widening rows for the A-line flare, and scalloped shell borders frame both the neckline and hem, with spaghetti straps and small bows added last.
This is an advanced pattern that takes approximately 80 to 120 hours to complete, built entirely in a single blush pink colourway so there are no colour changes to disguise uneven tension across the many squares.
Finished Measurements (Size Small/Medium): Bust 34 to 36 inches (86 to 91 cm); Waist 27 to 29 inches (69 to 74 cm); Hip 36 to 38 inches (91 to 97 cm); total length from shoulder to hem approximately 31 inches (79 cm); bodice length approximately 13 inches (33 cm); skirt length approximately 18 inches (46 cm).
Materials
Yarn
- Approximately 1,200 to 1,400 yards (1,097 to 1,280 meters) of DK weight (light weight, #3) 100 percent mercerized cotton yarn in blush pink
- The sample uses Cotton Blossom Handmade Yarn in Blush Pink. Here are some substitutes that work beautifully:
- Paintbox Yarns Simply DK (100% cotton) in Dusty Rose. You need approximately 9 to 10 balls.
- Lion Brand 24/7 Cotton DK (100% mercerized cotton) in Blush. You need approximately 7 to 8 balls.
- Drops Safran (70% cotton, 30% viscose) in Powder Pink. The viscose adds a lovely subtle sheen. You need approximately 8 to 9 balls.
- Important substitution note: Choose a smooth, tightly spun cotton. Avoid fuzzy or loosely spun yarns because the raised rose details will disappear. The lace openwork needs crisp stitch definition to shine.
Hook
- US size E-4 / 3.5 mm crochet hook. I recommend wood or an ergonomic handle since you will be crocheting for many hours.
Other supplies
- Tapestry needle for weaving ends and joining
- Scissors
- At least 12 stitch markers
- Flexible measuring tape
- Blocking mats and rust-proof pins
- Spray bottle for wet blocking
The list is the pattern's own wording.
Instructions
Every round is printed as the pattern wrote it, brackets and all. Open the key beside a round to see only the short forms that round uses.
Special Stitches Explained: Rose Granny Square & Techniques
Rose Granny Square (Full Size): this square is the building block of the entire dress. It creates a full open rose at the center surrounded by a lace granny frame with corner chain spaces. Work in six rounds.
- Round 1
Rose center Make a magic ring. Ch 1, work 10 sc into the ring. Pull ring closed. Sl st to first sc to join. (10 sc)
Key3
- sl st
- slip stitch: insert hook, yarn over, pull through both loops at once
- ch
- chain: yarn over, pull through loop on hook
- sc
- single crochet: insert hook, yarn over, pull up loop, yarn over, pull through both loops
- Round 2
Inner petals Ch 1. Working in front loops only: (sc, ch 1, dc, ch 1, sc) in each sc around. You will create 10 small petals. Sl st to first sc. (10 petals)
Key4
- sl st
- slip stitch: insert hook, yarn over, pull through both loops at once
- ch
- chain: yarn over, pull through loop on hook
- sc
- single crochet: insert hook, yarn over, pull up loop, yarn over, pull through both loops
- dc
- double crochet: yarn over, insert hook, pull up loop, yarn over, pull through two loops, yarn over, pull through remaining two loops
- Round 3
Back post setup Working behind Round 2 petals, insert hook from the back into the back loop of each Round 1 sc. Ch 1. Work 1 sc in each back loop around. (10 sc)
Key2
- ch
- chain: yarn over, pull through loop on hook
- sc
- single crochet: insert hook, yarn over, pull up loop, yarn over, pull through both loops
- Round 4
Outer petals Ch 1. Working in front loops only: (sc, ch 2, 3 dc, ch 2, sc) in each sc around. You will create 10 larger petals. Sl st to first sc. (10 petals)
Key4
- sl st
- slip stitch: insert hook, yarn over, pull through both loops at once
- ch
- chain: yarn over, pull through loop on hook
- sc
- single crochet: insert hook, yarn over, pull up loop, yarn over, pull through both loops
- dc
- double crochet: yarn over, insert hook, pull up loop, yarn over, pull through two loops, yarn over, pull through remaining two loops
- Round 5
Square frame setup Working behind Round 4 petals, insert hook from the back into the back loop of each Round 3 sc. Ch 3 (counts as first dc). Work 1 dc in next back loop. Ch 2 (corner). (2 dc in next back loop, ch 1, 2 dc in following back loop, ch 2) 4 times to create 4 corners and 4 sides. End with sl st to top of beg ch-3. (8 dc clusters, 4 ch-2 corner spaces, 4 ch-1 side spaces)
Key5
- sl st
- slip stitch: insert hook, yarn over, pull through both loops at once
- beg
- beginning
- ch
- chain: yarn over, pull through loop on hook
- sc
- single crochet: insert hook, yarn over, pull up loop, yarn over, pull through both loops
- dc
- double crochet: yarn over, insert hook, pull up loop, yarn over, pull through two loops, yarn over, pull through remaining two loops
Note: You have 10 back loops distributed into 4 corners. The key structural element is achieving 4 ch-2 corner spaces. Exact stitch placement varies slightly and gets corrected during Round 6 and blocking.
- Round 6
Square frame Sl st into corner ch-2 sp. Ch 3 (counts as dc). Work (2 dc, ch 2, 3 dc) in same corner ch-2 sp. Ch 1. Work 3 dc in next ch-1 side sp. Ch 1. (3 dc, ch 2, 3 dc) in next corner ch-2 sp. Ch 1. 3 dc in next ch-1 side sp. Ch 1. Rep from corner to corner around all 4 sides. Sl st to top of beg ch-3.Completed square has 4 corner ch-2 spaces and 2 ch-1 side spaces per side. Fasten off and weave in ends. Block to 4 inches by 4 inches.Work Rounds 1 through 5 of the Rose Granny Square. On Round 6, work only two sides plus two half-corners. On the flat joining edge, work a row of sc evenly across for a straight edge. Should measure approximately 4 inches wide by 2 inches tall after blocking.Insert hook into designated stitch. Work (sc, hdc, 3 dc, hdc, sc) in same stitch. This forms one scallop shell. Skip 2 stitches between shells unless otherwise noted.Ch 20. Sl st in 10th ch from hook to form a loop. Ch 10. Sl st to base of first loop. Fasten off. Use yarn tail to tie the chain lengths around the center and knot tightly. Trim tails to 0.5 inch. Make 4 bows total.Ch the required length. Turn. Sl st in second ch from hook and in every ch across for a firm rounded strap. Fasten off.When working Round 6 of a new square adjacent to a completed square, replace each ch-2 of a shared corner with (ch 1, sl st into corresponding corner ch-2 sp of completed square, ch 1). Replace each ch-1 of a shared side with a sl st into the corresponding ch-1 sp of the completed square. This creates a flat, invisible join.
Key8
- sl st
- slip stitch: insert hook, yarn over, pull through both loops at once
- hdc
- half double crochet: yarn over, insert hook, pull up loop, yarn over, pull through all three loops
- rep
- repeat
- beg
- beginning
- ch
- chain: yarn over, pull through loop on hook
- sc
- single crochet: insert hook, yarn over, pull up loop, yarn over, pull through both loops
- dc
- double crochet: yarn over, insert hook, pull up loop, yarn over, pull through two loops, yarn over, pull through remaining two loops
- sp
- space
Section 1: Make Your Rose Granny Squares
Following the Rose Granny Square instructions above, make the following quantities. Block each square before joining.
Bodice front: 8 full squares, 4 half squares Bodice back: 6 full squares Skirt front: 18 full squares Skirt back: 18 full squares
Total: 50 full squares, 4 half squares
Take your time with these. The consistency of your squares directly affects how well the dress fits together.
Section 2: Bodice Front
The bodice front is 4 squares wide and 2 full squares tall, with modifications for the sweetheart neckline.
Step 1: Lower bodice row
Join 4 full squares in a horizontal row (Row 1, the waist row) using JAYG. Label them B1, B2, B3, B4 from left to right.
Join B2 to B1 by working Round 6 of B2 while joining its left side to the right side of B1. Continue with B3 joining to B2, then B4 joining to B3.
Completed Row 1 measures approximately 16 inches wide by 4 inches tall.
Step 2: Upper bodice row
Join 4 full squares in Row 2 above Row 1, also joining their bottom edges to the top of Row 1 squares. Label them B5, B6, B7, B8.
Completed bodice block measures approximately 16 inches wide by 8 inches tall.
Step 3: Sweetheart shaping
Place one half square on the upper left of B5 with the straight edge forming the inner V. Place one half square on the upper right of B8 symmetrically. Sew or sl st them to the top edges.
The center positions above B6 and B7 remain partially open for the V of the sweetheart neckline. The neckline edging completes this shaping later.
Checkpoint: Bodice front should measure approximately 16 inches wide and 10 inches tall. The center top has an open V approximately 8 inches wide at its base.
Section 3: Bodice Back
The bodice back is 3 squares wide and 2 full squares tall for the open-back silhouette.
Step 1: Join 3 squares in Row 1 (K1, K2, K3). Measures approximately 12 inches wide by 4 inches tall.
Step 2: Join 3 squares in Row 2 (K4, K5, K6) above Row 1. Measures approximately 12 inches wide by 8 inches tall.
Step 3: Add one half square above K4 upper left and one above K6 upper right. Center above K5 stays open.
Checkpoint: Bodice back should measure approximately 12 inches wide by 10 inches tall.
Section 4: Waistband
The waistband joins front and back into a tube and creates the fitted waist.
Step 1: Hold bodice front and back with wrong sides together at side edges. The front wraps partially around the sides. Sc the left side edges together through the corner ch-2 spaces. Repeat for right side. You now have a tube.
Step 2: With RS facing, attach yarn to any point along the bottom edge of the joined bodice tube.
- Round 1
Work sc evenly around the entire bottom edge. Work approximately 3 sc across each side of every square and 1 sc into each corner sp. Target: 140 sc . Adjust to reach a multiple of 4 if needed.
Key2
- sc
- single crochet: insert hook, yarn over, pull up loop, yarn over, pull through both loops
- sp
- space
- Round 2
Ch 1. Sc in each sc around. Sl st to beg sc. (140 sc)
Key4
- sl st
- slip stitch: insert hook, yarn over, pull through both loops at once
- beg
- beginning
- ch
- chain: yarn over, pull through loop on hook
- sc
- single crochet: insert hook, yarn over, pull up loop, yarn over, pull through both loops
- Round 3
Ch 1. Sc in each st around. Sl st to beg sc. (140 sc)
Key4
- sl st
- slip stitch: insert hook, yarn over, pull through both loops at once
- beg
- beginning
- ch
- chain: yarn over, pull through loop on hook
- sc
- single crochet: insert hook, yarn over, pull up loop, yarn over, pull through both loops
- Round 4
Decrease round Ch 1. (Sc in 33 sc, sc2tog) 4 times. Sl st to beg sc. (136 sc)
Key5
- sc2tog
- single crochet two together (a decrease)
- sl st
- slip stitch: insert hook, yarn over, pull through both loops at once
- beg
- beginning
- ch
- chain: yarn over, pull through loop on hook
- sc
- single crochet: insert hook, yarn over, pull up loop, yarn over, pull through both loops
- Round 5
Ch 1. Sc in each st around. Sl st to beg sc. (136 sc)
Key4
- sl st
- slip stitch: insert hook, yarn over, pull through both loops at once
- beg
- beginning
- ch
- chain: yarn over, pull through loop on hook
- sc
- single crochet: insert hook, yarn over, pull up loop, yarn over, pull through both loops
- Round 6
Ch 1. Sc in each st around. Sl st to beg sc. (136 sc)
Key4
- sl st
- slip stitch: insert hook, yarn over, pull through both loops at once
- beg
- beginning
- ch
- chain: yarn over, pull through loop on hook
- sc
- single crochet: insert hook, yarn over, pull up loop, yarn over, pull through both loops
- Round 7
Decrease round Ch 1. (Sc in 32 sc, sc2tog) 4 times. Sl st to beg sc. (132 sc)
Key5
- sc2tog
- single crochet two together (a decrease)
- sl st
- slip stitch: insert hook, yarn over, pull through both loops at once
- beg
- beginning
- ch
- chain: yarn over, pull through loop on hook
- sc
- single crochet: insert hook, yarn over, pull up loop, yarn over, pull through both loops
- Round 8
Ch 1. Sc in each st around. Sl st to beg sc. (132 sc)
Key4
- sl st
- slip stitch: insert hook, yarn over, pull through both loops at once
- beg
- beginning
- ch
- chain: yarn over, pull through loop on hook
- sc
- single crochet: insert hook, yarn over, pull up loop, yarn over, pull through both loops
- Round 9
Ch 1. Sc in each st around. Sl st to beg sc. Do not fasten off. (132 sc) Checkpoint: Waistband should measure approximately 26 to 28 inches in circumference and 1.75 inches tall. It should feel snug but not tight.
Key4
- sl st
- slip stitch: insert hook, yarn over, pull through both loops at once
- beg
- beginning
- ch
- chain: yarn over, pull through loop on hook
- sc
- single crochet: insert hook, yarn over, pull up loop, yarn over, pull through both loops
Section 5: Skirt
The skirt expands downward from the waistband in rows of rose squares.
Skirt Row 1 (12 squares around):
Attach 12 rose squares evenly around the waistband. Distribute 6 across front, 6 across back. Each square top edge spans approximately 11 waistband stitches (132 divided by 12). Attach by sl st through the top corner ch-2 sp and ch-1 side spaces into waistband stitches. Join adjacent squares along vertical edges using JAYG or sl st seaming.
Circumference: 12 squares x 4 inches = 48 inches.
Skirt Row 2 (14 squares around):
Work 14 squares, joining to the bottom of Row 1. To expand from 12 to 14, insert 2 extra squares at evenly spaced intervals, joining them to shared corners between Row 1 squares.
Circumference: 14 squares x 4 inches = 56 inches.
Skirt Row 3 (18 squares around): Work 18 squares, joining to the bottom of Row 2. Add 4 expansion squares distributed evenly.
Circumference: 18 squares x 4 inches = 72 inches.
Checkpoint: Skirt measures approximately 12 inches tall. Hem circumference is approximately 72 inches for that beautiful A-line flare.
Section 6: Hem Scallop Border
With RS facing, attach yarn to any corner ch-2 sp along the bottom of the skirt.
- Round 1
Ch 1. Work sc evenly around entire bottom edge, picking up 3 sc across each square side edge, 1 sc into each corner sp. Total: 144 sc . Sl st to beg sc.
Key5
- sl st
- slip stitch: insert hook, yarn over, pull through both loops at once
- beg
- beginning
- ch
- chain: yarn over, pull through loop on hook
- sc
- single crochet: insert hook, yarn over, pull up loop, yarn over, pull through both loops
- sp
- space
- Round 2
(scallops): Work (sk 2 sc, shell in next sc, sk 2 sc, sl st in next sc) 24 times around. (24 scallop shells)Fasten off. Weave in ends.
Key3
- sl st
- slip stitch: insert hook, yarn over, pull through both loops at once
- sc
- single crochet: insert hook, yarn over, pull up loop, yarn over, pull through both loops
- sk
- skip
Section 7: Neckline Scallop Border
With RS facing, attach yarn to the upper left outer corner of the bodice front.
- Round 1
Work sc evenly across entire neckline edge including half squares, center V, and back neckline. Work 3 sc per square side, 1 sc at each corner. Target: approximately 96 sc . Sl st to beg sc.
Key3
- sl st
- slip stitch: insert hook, yarn over, pull through both loops at once
- beg
- beginning
- sc
- single crochet: insert hook, yarn over, pull up loop, yarn over, pull through both loops
- Round 2
Work (sk 2 sc, shell in next sc, sk 2 sc, sl st in next sc) around neckline. (16 scallop shells)Fasten off. Weave in ends.
Key3
- sl st
- slip stitch: insert hook, yarn over, pull through both loops at once
- sc
- single crochet: insert hook, yarn over, pull up loop, yarn over, pull through both loops
- sk
- skip
Section 8: Straps
Make 4 identical straps.
For each strap: Ch 61. Turn. Sl st in 2nd ch from hook and in each ch across. (60 sl sts)
Fasten off leaving a 12-inch tail.
Attaching straps: Sew front strap ends to outer top corners of upper front bodice squares
Cross straps at back (left strap to right back corner, right strap to left back corner) for the crisscross effect
Work two strap chains per shoulder, attaching them side by side 0.25 inch apart for the doubled strap look
Section 9: Bows
Make 4 bows following the Bow Embellishment instructions.
Attach one bow to front of each double strap set (2 bows on front). Attach one bow where each strap meets the back bodice (2 bows on back). Sew through bow center into strap join point.
Making up
- Step 1If gaps exist at side seams, work sc along each edge and sl st together. Or sew with mattress stitch for invisible seams.
- Step 2Weave in all remaining ends, running tails through several stitches in different directions to secure.
Notes from the pattern
- least 12 stitch markers are called for; use them to mark corner ch-2 spaces on every square before joining, since a missed corner is hard to spot once dozens of squares are assembled.
- Because the whole garment is one colour, there are no colour changes to disguise an uneven tension — block at least two test squares to the 4 inch by 4 inch target before committing to the full set.
- The waistband gauge (20 sc and 22 rows per 4 inches) only holds if the joined bodice tube's stitch count is adjusted to a multiple of 4 on Round 1 of Section 4; recount rather than assume the 140 sc target will land exactly.
- Gauge: one completed Rose Granny Square measures 4 inches by 4 inches (10 cm by 10 cm) after blocking. For the waistband, 20 sc and 22 rows equals 4 inches (10 cm). Make at least two test squares before starting; block them and measure carefully. Go up a hook size if your square is smaller than 4 inches, down if it is larger — even a quarter-inch difference per square multiplied across 50 squares will throw off the finished size significantly.
- Finished Measurements (Size Small/Medium): Bust 34 to 36 inches (86 to 91 cm); Waist 27 to 29 inches (69 to 74 cm); Hip 36 to 38 inches (91 to 97 cm); total length from shoulder to hem approximately 31 inches (79 cm); bodice length approximately 13 inches (33 cm); skirt length approximately 18 inches (46 cm).
The essentials
- Rounds
- 19
- Parts
- 10
- Level
- Intermediate
- Time
- 4-6 hours
- Hook
- 3.5 mm
- Yarn
- DK
Stitches you will use
- Raised three-dimensional rose centre Worked in the opening rounds of each Rose Granny Square; keep tension even so the petals stand up rather than lying flat against the mesh.
- Joining squares into shaped garment panels Used throughout the Bodice Front, Bodice Back and Skirt sections; half-corners and partial Round 6 edges must be worked accurately so panels fit together without distortion.
- Shell stitch scallop border Used on both the Hem Scallop Border and Neckline Scallop Border; the skip-shell-skip-slip stitch repeat needs the base stitch count to divide evenly or the final shell will sit off-centre.
Troubleshooting
A finished rose granny square comes out
This is a hook-tension mismatch rather than a stitch-count error; go down a hook size if squares run large, up a size if they run small, and re-block a fresh test square before continuing.
The waistband feels loose or tight
The Round 1 stitch total on the waistband was not adjusted to a multiple of 4, which throws off the rib pattern across the remaining rows; unpick to Round 1 and recount in multiples of 4 before repeating Round 2 onward.
The scalloped shells along the hem or
The foundation sc round was not worked to the stated target (144 sc for the hem, 96 sc for the neckline), so the skip-2 repeat does not divide evenly; recount the foundation round and adjust by a stitch or two at a side seam before starting Round 2.
Substituting yarn
- 100% mercerized cotton, DK weight
- Closest match to the sample; keeps stitch definition crisp for the rose centres and holds the 3.5 mm hook size and stated gauge without changes.
- Cotton-viscose blend, DK weight
- Adds a subtle sheen and slightly softer drape to the skirt flare, but the viscose content can relax over time, so block firmly and expect a touch more stretch in the waistband.
- Bamboo-cotton blend, DK weight
- Gives a cooler, more fluid drape suited to warm-weather wear, but the fibre is less crisp than pure cotton, so size down the hook slightly if the rose centres lose definition.
Washing and care
- Hand wash the finished dress in cool water with a mild detergent, since mercerized cotton holds its colour and shape best without machine agitation; reshape the scalloped edges and rose centres by hand while damp.
- Dry flat on blocking mats away from direct heat and sunlight to prevent the A-line skirt from stretching out of shape, and store folded rather than hung so the straps and bodice keep their fit.
FAQs
Questions
How many Rose Granny Squares does this dress actually need?
The exact count is not given in the overview, but it depends on bust, waist and hip measurements plus the skirt's widening rows of squares. Make and block two test squares first to confirm gauge before calculating totals for the Bodice Front, Bodice Back and Skirt sections.
Can the dress be resized beyond the Small/Medium measurements given?
Resizing works by adding or removing whole squares and rows rather than changing stitch counts within a square. Since each square must stay at 4 inches by 4 inches after blocking, any size change should be planned in whole-square increments before starting Section 2.
Why does the pattern specify a 3.5 mm hook when DK yarn often uses a larger hook?
The smaller 3.5 mm (US E-4) hook keeps the stitches dense enough for the raised rose centres and scalloped shells to hold their shape. A larger hook would loosen the fabric and flatten the three-dimensional texture the pattern relies on.
What happens if the waistband Round 1 count does not land exactly on 140 sc?
The target of 140 sc is adjustable; the key requirement is reaching a multiple of 4 so the rib pattern in the following rows lines up evenly. Add or remove a stitch or two at a side seam rather than across the whole round.
Is blocking really necessary for every square, or just the finished garment?
Each square should be blocked individually to confirm it measures 4 inches by 4 inches before joining, since even a small size difference multiplied across many squares changes the final fit. The assembled dress then needs a final wet block to set the scalloped borders and straighten the hem.
These answers came from whoever first published the pattern, kept word for word.