 EVERY CROCHET
Garments 36 rounds No account, no download
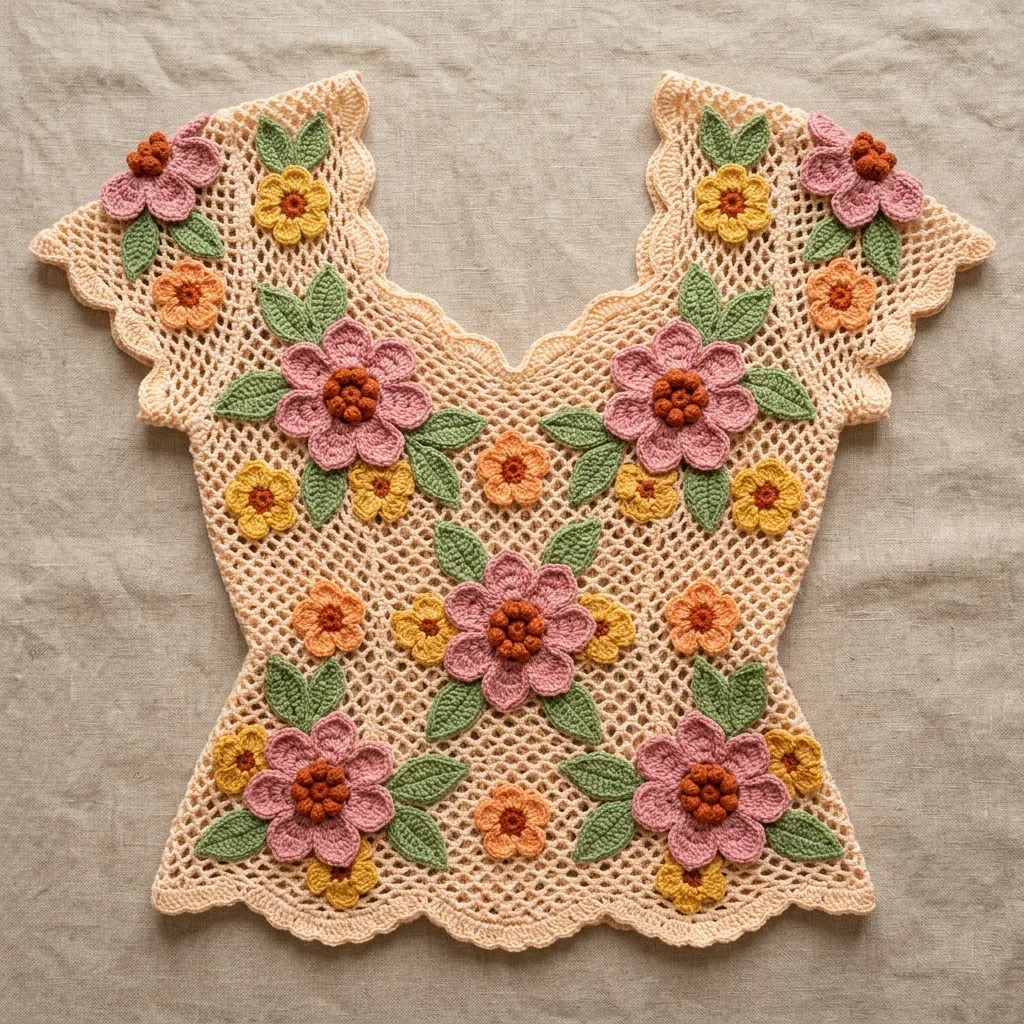
Filet mesh floral blouse with dimensional crochet flowers
A filet mesh (trellis stitch) blouse with 3D crochet flowers. US and UK stitch terms given throughout.
- Skill
- Intermediate
- Time
- 25-40 hours
- Yarn weight
- DK
- Hook
- 3.5 mm

Intermediate
What the original write-up called it. Nothing here is graded again.
DK
What the sample was worked in. Any weight works; the size moves with it.
25-40 hours
What the original page reckoned. Your own pace is the one that matters.
About this pattern
This is a DK-weight crochet blouse worked in filet mesh, finished with three sizes of three-dimensional flowers, a leaf motif and a scallop edging. Construction uses two shaped panels seamed at the shoulders and sides, then blocked to exact measurements. Expect 25 to 40 hours total, spread across mesh panels, floral motifs, seaming and blocking, and suited to a confident advanced beginner or intermediate maker.
This blouse belongs to the filet mesh family, the open lattice stitch built from double crochet (UK treble crochet) separated by chain-2 spaces. Here the mesh forms the entire body fabric, giving the garment its breathable, lace-like structure, while three sizes of three-dimensional flowers and a leaf motif are worked separately and appliqued on afterward for the garden effect named in the title.
Construction runs on two flat panels, a front and a back, each shaped through waist, hip and bust increases before the armhole and neckline shaping splits the front into left and right V-neck shoulders. The panels are blocked individually to fixed measurements, then seamed at the shoulders and up the sides with whipstitch, leaving the armholes open, before the scallop edging is worked around every finished edge.
Materials
- Main Color (MC): Cream or light peach, approximately 600 yards (549 meters)
Color A
- Dusty rose or mauve pink, approximately 90 yards (82 meters)
Color B
- Golden yellow or mustard, approximately 60 yards (55 meters)
Color C
- Soft peach or coral, approximately 50 yards (46 meters)
Color D
- Burnt orange or terracotta for flower centers, approximately 30 yards (27 meters)
Color E
- Sage green for leaves, approximately 80 yards (73 meters)
- Paintbox Yarns Simply DK works wonderfully here. It is 100% acrylic, affordable, comes in all the colors you need, and holds its shape beautifully after blocking.
- Drops Safran is another excellent choice if you prefer cotton. It gives that authentic vintage look with a slight sheen. Just know that cotton has less stretch, so swatching is extra important.
- Any smooth DK weight yarn will work. Avoid fuzzy or bouclé yarns since they will obscure the pretty mesh openwork.
- US size E-4 (3.5 mm) crochet hook for body panels and edging
- US size D-3 (3.25 mm) crochet hook for flower and leaf motifs
- The smaller hook keeps your flowers firm and dimensional.
- Yarn needle for weaving ends and sewing appliques
- Scissors
- At least 6 stitch markers
- Rust-proof pins for blocking
- Blocking mat or clean towels
Optional
- small amount of polyester fiberfill to lightly pad large flower centers
The list is the pattern's own wording.
Instructions
Every round is printed as the pattern wrote it, brackets and all. Open the key beside a round to see only the short forms that round uses.
Three-Dimensional Large Flower
- Round 1
Using D-3 hook and petal color, make a magic ring. Ch 1. Work 10 sc into ring. Join with sl st to first sc. Pull ring closed. (10 sc)
Key3
- sl st
- slip stitch
- ch
- chain
- sc
- single crochet
- Round 2
Ch 1. Work 2 sc into each st around. Join with sl st to first sc. (20 sc)
Key3
- sl st
- slip stitch
- ch
- chain
- sc
- single crochet
- Round 3
Inner petal layer [Ch 4, skip 1 st, sl st into next st] 10 times. (10 ch-4 loops)
Key2
- sl st
- slip stitch
- ch
- chain
- (10)Round 4
Inner petals For each ch-4 loop, work (sc, hdc, 3 dc, hdc, sc) into the loop. (10 petals completed)
Key4
- hdc
- half double crochet
- ch
- chain
- dc
- double crochet
- sc
- single crochet
- Round 5
Outer petal base Working behind the inner petals, insert hook into the skipped sts of Round 2 from RS to WS, sl st into each of the 10 skipped sts to establish outer petal anchors. (10 sl sts)
Key3
- sl st
- slip stitch
- RS
- right side
- WS
- wrong side
- Round 6
Outer petal loops [Ch 6, sl st into next outer anchor] 10 times. (10 ch-6 loops)
Key2
- sl st
- slip stitch
- ch
- chain
- Round 7
Outer petals For each ch-6 loop, work (sc, hdc, 2 dc, 3 tr, 2 dc, hdc, sc) into the loop. (10 outer petals completed)Fasten off leaving a 12-inch tail for sewing.
Key4
- hdc
- half double crochet
- ch
- chain
- dc
- double crochet
- sc
- single crochet
Three-Dimensional Medium Flower
- Round 1
Using D-3 hook and petal color, make a magic ring. Ch 1. Work 8 sc into ring. Join with sl st. Pull ring closed. (8 sc)
Key3
- sl st
- slip stitch
- ch
- chain
- sc
- single crochet
- Round 2
Ch 1. [2 sc into next st] 8 times. Join with sl st. (16 sc)
Key3
- sl st
- slip stitch
- ch
- chain
- sc
- single crochet
- Round 3
Petal loops [Ch 4, skip 1 st, sl st into next st] 8 times. (8 ch-4 loops)
Key2
- sl st
- slip stitch
- ch
- chain
- Round 4
Petals For each ch-4 loop, work (sc, hdc, 3 dc, hdc, sc). (8 petals) Fasten off leaving a 10-inch tail. Add a small Color D center bobble or a cluster of 3 French knots.
Key4
- hdc
- half double crochet
- ch
- chain
- dc
- double crochet
- sc
- single crochet
Three-Dimensional Small Flower
- Round 1
Using D-3 hook, make a magic ring. Ch 1. Work 6 sc into ring. Join with sl st. Pull ring closed. (6 sc)
Key3
- sl st
- slip stitch
- ch
- chain
- sc
- single crochet
- Round 2
Petal loops [Ch 3, sl st into next st] 6 times. (6 ch-3 loops)
Key2
- sl st
- slip stitch
- ch
- chain
- Round 3
Petals For each ch-3 loop, work (sc, 3 dc, sc). (6 petals) Fasten off leaving a 10-inch tail.
Key3
- ch
- chain
- dc
- double crochet
- sc
- single crochet
Leaf Motif
Using D-3 hook and Color E, ch 12.
- (22)Round 1
Sc into 2nd ch from hook, hdc into next ch, dc into next 3 ch, hdc into next ch, sc into next ch, hdc into next ch, dc into next 2 ch. Now working along the opposite side of the foundation chain: dc into next 2 ch, hdc into next ch, sc into next ch, hdc into next ch, dc into next 3 ch, hdc into next ch, sc into last ch. Join with sl st to first sc. (22 sts around)
Key5
- sl st
- slip stitch
- hdc
- half double crochet
- ch
- chain
- dc
- double crochet
- sc
- single crochet
- Round 2
Raised vein Ch 1. Surface sl st up the center spine of the leaf by inserting hook through the center of each stitch. Fasten off leaving a 10-inch tail.
Key2
- sl st
- slip stitch
- ch
- chain
Finished leaf measures approximately 2.25 inches (5.75 cm) long and 1 inch (2.5 cm) wide.
Front Panel
Foundation Chain: Using MC and E-4 hook, ch 91.
- Round 1
(RS): Dc into 7th ch from hook (counts as first mesh unit including the t-ch as first dc and 2 skipped chs). [Ch 2, skip 2 ch, dc into next ch] across. Turn. (29 mesh units / 30 dc posts including t-ch dc)
Key4
- t-ch
- turning chain
- ch
- chain
- dc
- double crochet
- RS
- right side
- Round 2
Ch 5 (counts as dc + ch 2). Skip first ch-2 sp. Dc into next dc. [Ch 2, dc into next dc] across, ending with dc into the 3rd ch of t-ch. Turn. (29 mesh units)
Key3
- t-ch
- turning chain
- ch
- chain
- dc
- double crochet
- Round 3
through 6: Rep Row 2. (29 mesh units each row) After Row 6 your piece should measure approximately 3 inches (7.5 cm) from the foundation chain edge.
Key1
- rep
- repeat
Waist Shaping
You will decrease 1 mesh unit at each side edge every other row.
To decrease at the beginning of a row: Sl st across the first dc and the ch-2 space (3 sl sts total). Sl st into the next dc. Ch 5, and continue in mesh pattern across, stopping 1 mesh unit before the last dc. Work dc into the last dc before the final mesh unit. Turn.
- Round 7
Decrease row Decrease 1 mesh unit at each edge. (27 mesh units)Row 8: Rep Row 2. (27 mesh units)
Key1
- rep
- repeat
- Round 9
Decrease row Decrease 1 mesh unit at each edge. (25 mesh units)Row 10: Rep Row 2. (25 mesh units)
Key1
- rep
- repeat
- Round 11
Decrease row Decrease 1 mesh unit at each edge. (23 mesh units)Row 12: Rep Row 2. (23 mesh units)
Key1
- rep
- repeat
- Round 13
Decrease row Decrease 1 mesh unit at each edge. (21 mesh units)Row 14: Rep Row 2. (21 mesh units) After Row 14 your piece should measure approximately 7 inches (18 cm) tall and 13 to 14 inches (33 to 35.5 cm) wide.
Key1
- rep
- repeat
Hip and Bust Shaping
Now you will increase back to full width.
To increase at the beginning of a row: Ch 8 (counts as ch 5 turn + 3 extra chs for 1 new mesh unit). Work dc into the 6th ch from hook (establishing 1 new mesh unit), then ch 2, and dc into the first dc of the previous row, and continue across in pattern. At the end of the row, after the last dc of the pattern, ch 2, and work dc into the top of the t-ch from the previous row, then ch 2 and work dc into the 3rd ch of the same t-ch. Turn.
- Round 15
Increase row Increase 1 mesh unit at each edge. (23 mesh units)Row 16: Rep Row 2. (23 mesh units)
Key1
- rep
- repeat
- Round 17
Increase row Increase 1 mesh unit at each edge. (25 mesh units)Row 18: Rep Row 2. (25 mesh units)
Key1
- rep
- repeat
- Round 19
Increase row Increase 1 mesh unit at each edge. (27 mesh units)Row 20: Rep Row 2. (27 mesh units)
Key1
- rep
- repeat
- Round 21
Increase row Increase 1 mesh unit at each edge. (29 mesh units)Row 22: Rep Row 2. (29 mesh units) After Row 22 your piece should measure approximately 11 inches (28 cm) tall and 17 inches (43 cm) wide.Rows 23 through 26: Continue even in mesh pattern. (29 mesh units each row) After Row 26 your piece should measure approximately 13 inches (33 cm) from the cast-on edge.
Key1
- rep
- repeat
Armhole Shaping
- Round 27
Armhole setup row Sl st across 3 mesh units (9 sl sts total into dc posts and ch spaces). Sl st into the next dc to anchor. Ch 5. Continue in mesh pattern across until 3 mesh units remain. Work dc into last dc before those 3 rem units. Turn. (23 mesh units)Row 28: Rep Row 2. (23 mesh units)
Key5
- sl st
- slip stitch
- rem
- remaining
- rep
- repeat
- ch
- chain
- dc
- double crochet
- Round 29
(armhole row 2): Sl st across 1 mesh unit (3 sl sts). Ch 5. Continue in mesh pattern across until 1 mesh unit remains. Dc into last dc before remaining unit. Turn. (21 mesh units)Rows 30 through 32: Rep Row 2. (21 mesh units each row) After Row 32 your piece should measure approximately 16 inches (40.5 cm) from the cast-on edge.
Key4
- sl st
- slip stitch
- rep
- repeat
- ch
- chain
- dc
- double crochet
Back Neckline Shaping
Row 33 (left back shoulder): Work 8 mesh units. Leave remaining 13 mesh units unworked. Turn. (8 mesh units)
Rows 34 through 40: Rep Row 2 across 8 mesh units. (8 mesh units) Fasten off MC.
- Round 33
Right back shoulder With RS facing, skip the center 5 mesh units of Row 32 and attach MC to the dc at the start of the 14th mesh unit. Ch 5. Work 8 mesh units. Turn. (8 mesh units)Rows 34 through 40: Rep Row 2 across 8 mesh units. (8 mesh units) Fasten off MC.
Key5
- rep
- repeat
- ch
- chain
- dc
- double crochet
- MC
- main color
- RS
- right side
V-Neckline Shaping: Left Shoulder
Row 33 (left shoulder, RS): Work 10 mesh units in pattern. Leave remaining sts unworked for right shoulder. Turn. (10 mesh units)
Row 34: Rep Row 2 across 10 mesh units. (10 mesh units)
- Round 35
Neck decrease Ch 5. Work 9 mesh units. Turn, leaving last mesh unit unworked at neck edge. (9 mesh units)Row 36: Rep Row 2 across 9 mesh units. (9 mesh units)
Key2
- rep
- repeat
- ch
- chain
- Round 37
Neck decrease Ch 5. Work 8 mesh units. (8 mesh units)Row 38: Rep Row 2. (8 mesh units)
Key2
- rep
- repeat
- ch
- chain
- Round 39
Neck decrease Ch 5. Work 7 mesh units. (7 mesh units)Row 40: Rep Row 2. (7 mesh units) Fasten off MC.
Key3
- rep
- repeat
- ch
- chain
- MC
- main color
V-Neckline Shaping: Right Shoulder
With RS facing, skip the center dc of Row 32. Attach MC with sl st to the dc that begins the 11th mesh unit.
Row 33 (right shoulder, RS): Ch 5. Work 10 mesh units across to the panel edge. Turn. (10 mesh units)
Row 34: Rep Row 2. (10 mesh units)
- Round 35
Neck decrease Work 9 mesh units, ending before the last unit at the neck edge. Turn. (9 mesh units)Row 36: Rep Row 2. (9 mesh units)
Key1
- rep
- repeat
- Round 37
Neck decrease Work 8 mesh units. Turn. (8 mesh units)Row 38: Rep Row 2. (8 mesh units)
Key1
- rep
- repeat
- Round 39
Neck decrease Work 7 mesh units. Turn. (7 mesh units)Row 40: Rep Row 2. (7 mesh units) Fasten off MC. Front panel is complete.
Key2
- rep
- repeat
- MC
- main color
Back Panel
Work identically to the front panel through Row 32. (21 mesh units)
Making up
- Step 1Step 1: Block each panel separately before seaming. Pin to measurements: 17 inches wide at bust, 14 inches wide at waist, 18 inches long. Allow to dry completely.
- Step 2Step 2: Hold front and back panels with RS together. Seam each shoulder using a whipstitch, spanning 7 mesh units of width.
- Step 3Step 3: With RS together, seam from the hem edge upward to the armhole using a whipstitch. Leave the armhole opening un-seamed. The side seam spans Rows 1 through 26.
Notes from the pattern
- Place stitch markers at the start of each shaping round in the waist, hip, bust and armhole sections; with at least 6 markers on hand there is no need to re-count the whole mesh to find a shaping row again.
- Block each panel to the stated 17 inches at bust, 14 inches at waist and 18 inches long before seaming, not after, since filet mesh relaxes and tightens unevenly if blocked once the panels are already joined.
- Pad the large flower centre lightly with polyester fiberfill before sewing the bobble in place; too much filling will bulge the petals outward instead of letting them cup around the centre.
The essentials
- Rounds
- 36
- Parts
- 12
- Level
- Intermediate
- Time
- 25-40 hours
- Hook
- 3.5 mm
- Yarn
- DK
Stitches you will use
- Filet mesh construction Forms both body panels; each unit is a double crochet, chain 2, skip 2 — losing count here throws off the waist and bust shaping rows that follow.
- Three-dimensional petal layering Used across all three flower sizes, where ch-4 or ch-3 loops are worked behind an earlier round of single crochet; keep the loops loose enough to turn the petals forward cleanly.
- Shaped panel seaming with whipstitch Joins shoulders across 7 mesh units and sides along Rows 1 through 26; match mesh units row for row so the scallop edging sits evenly afterward.
Troubleshooting
The mesh panel bows or ripples instead of lying flat
This usually means a mesh unit was miscounted somewhere in the waist or hip shaping rounds. Lay the dry panel flat and recount the dc-to-ch-2 units row by row against the shaping instructions before blocking again.
The three-dimensional petals lie flat against the flower instead of standing up
The ch-4 or ch-3 loops in Round 2 or 3 were likely worked too tightly, or the wrong hook was used. Rework with the D-3 hook and leave the chain loops slightly slack so the petal round has room to curl forward.
The scallop edging puckers or pulls the hem inward
This happens when fewer than 2 sc were worked across a ch-2 space, shortchanging the shell count. Check that every dc post gets 1 sc and every ch-2 space gets 2 sc before starting the 5-dc shells.
Substituting yarn
- 100% acrylic DK
- Closest match to the suggested main yarn; holds the mesh openwork crisply after blocking and keeps cost down, with no hook change needed from the E-4/D-3 pairing.
- 100% cotton DK
- Gives the vintage sheen the pattern notes mention but has far less stretch, so swatch the mesh first and expect to block more aggressively to open the ch-2 spaces fully.
- Wool-blend DK
- Adds drape and warmth to the mesh body but will relax further with wear than acrylic or cotton; size down to the D-3 hook for the flowers if the blend is loosely spun, to keep petals firm.
Washing and care
- acrylic or cotton DK as listed, hand wash in cool water and lay flat to dry; do not tumble dry, since heat can flatten the dimensional petals permanently.
- Re-pin and block gently if the mesh or flowers lose their shape after wear, using rust-proof pins on a blocking mat, and store the finished blouse folded flat rather than on a hanger to avoid stretching the open lattice.
FAQs
Questions
Can the blouse be made without the three-dimensional flowers?
The mesh panels, shaping and scallop edging all stand on their own as a complete garment. Skipping the large, medium and small flowers and the leaf motif simply removes the applique step, saving roughly 6 to 8 hours.
Why does the pattern use two different hook sizes?
The E-4 (3.5 mm) hook keeps the mesh panels and edging open and drapey, while the smaller D-3 (3.25 mm) hook tightens the flower and leaf stitches so the petals hold their three-dimensional shape instead of sagging.
How much yarn is needed for the floral colours versus the main colour?
The main colour (cream or light peach) takes the largest share at around 600 yards for the mesh body. The floral colours are much smaller amounts: roughly 90 yards of dusty rose, 60 yards of golden yellow, 50 yards of soft peach, 30 yards of burnt orange and 80 yards of sage green.
Is the filet mesh the same as the UK 'trellis' stitch?
Yes. Filet mesh is built from US double crochet, which is UK treble crochet, separated by chain-2 spaces, and the UK name for this open lattice fabric is trellis or filet crochet. The stitch mechanics are identical regardless of which name is used.
Why block each panel separately before seaming?
The front and back panels need to reach the exact 17-inch bust, 14-inch waist and 18-inch length measurements independently, and mesh fabric shifts unevenly once two panels are whipstitched together. Blocking first keeps both panels symmetrical before the shoulder and side seams lock the shape in.
These answers came from whoever first published the pattern, kept word for word.