 EVERY CROCHET
 Amigurumi 6 rounds No account, no download
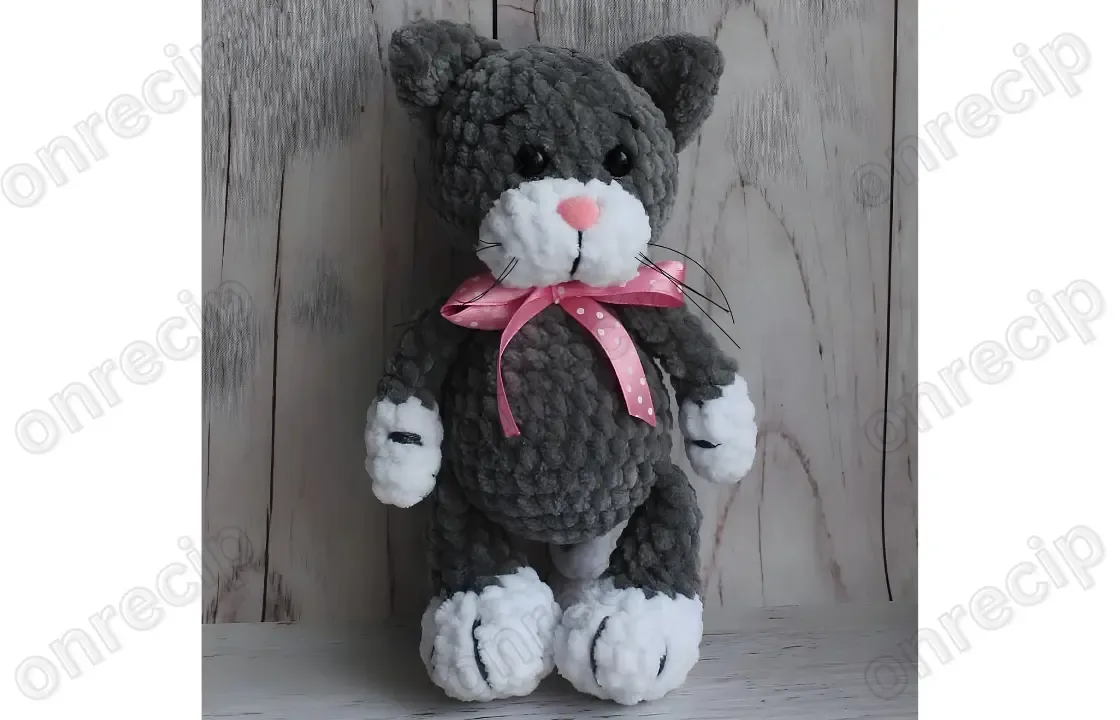
How to crochet a plush kitten amigurumi toy
A plush kitten amigurumi worked in single crochet (double crochet UK terms), with both US and UK stitch names given.
- Skill
- Intermediate
- Time
- 4-6 hours
- Yarn weight
- DK/Sport (plush)
- Hook
- 3.5 mm

Intermediate
What the original write-up called it. Nothing here is graded again.

DK/Sport (plush)
What the sample was worked in. Any weight works; the size moves with it.

4-6 hours
What the original page reckoned. Your own pace is the one that matters.
About this pattern
A stuffed amigurumi kitten worked mainly in single crochet (double crochet UK) in continuous rounds, with head, body, arms and legs made as separate pieces. The body runs to round 28, the head to round 18, and legs join the body at round 6 to restore a 30-stitch count. A 3.5mm or 4.0mm hook, 10mm safety eyes, a 12x14mm nose and embroidery floss finish the piece.
This plush kitten is a small amigurumi figure built mainly from single crochet (double crochet in UK terms), with a short section of half double crochet (half treble) forming the increase round at R3, where six extra stitches bring the count to 18. The dense, tightly worked fabric typical of this stitch family is what keeps the fiberfill from peeking through once the pieces are stuffed and shaped.
The kitten is built from five separate pieces: a head and body worked as one continuous shape through to round 18 and round 28, plus two arms and two legs made individually. Each arm is stuffed only half full, then folded flat and closed with three single crochet worked through both layers across rounds 6 to 9. The legs are joined to the body at round 6, where four stitches are worked together on each side to bring the round back to 30 stitches before the body continues upward for stuffing, eyes, nose and embroidered features.
Materials
Yarn
- YarnArt Dolce or Himalaya Dolphin Baby
Hook size
- 3.5 mm or 4.0 mm
- 12х14 mm safety nose
- Black embroidery floss
- Grey embroidery floss or cotton yarn
Tools
- 10 mm safety eyes
- Tapestry needle
- Scissors
- Fiberfill
The list is the pattern's own wording.
Instructions
Every round is printed as the pattern wrote it, brackets and all. Open the key beside a round to see only the short forms that round uses.
R 2
- Round 3
(2 hdc in one st) х 3, 3 sc, (2 hdc in one st) х 3, 3 sc (18)
Key3
- hdc
- half double crochet
- st
- stitch
- sc
- single crochet
R 5
- Rounds 6–9
6 sc (4 rows) Stuff ½ full. Fold top of the arm and 3 sc through both sides across.
Key1
- sc
- single crochet
F.o.
R 5
- Round 6
Attach legs: 5 sc, 4 sc together with sc of the 1st leg, 11 sc, 4 sc together with sc of the 2nd leg, 6 sc (30)
Key1
- sc
- single crochet
R 11
- Round 12
2 sc only Stuff with fiberfill. Fold top of the leg and 4 sc through both sides across.
Key1
- sc
- single crochet
F.o.
Body-head (one piece)
R 12
- Round 13
Attach arms on the sides of the body (crochet sc of the body together with sc of the arm): (5 sc, dec) х 3 (18)
Key2
- dec
- decrease
- sc
- single crochet
R 18
- Rounds 19–23
36 sc (5 rows) Insert safety eyes between R 21 and R 22 at the distance of 4 st from each other.
Key3
- st
- stitch
- sc
- single crochet
- R
- round
Arms (make 2)
With white yarn:
R 3-4
9 sc (2 rows) Change to grey yarn:
Legs (make 2)
With white yarn:
R 6
4 dec, 8 sc, dec (13)
Change to grey yarn:
R 28
F.o.
Ready to Learn More? Open the next page for Further Guidance!
Pages: 1 2
Notes from the pattern
- Two hook sizes are listed, 3.5mm and 4.0mm; choose the smaller for a plush yarn that already has loft and the larger for a thinner strand, and keep the same hook throughout one piece so the head, body, arms and legs match in density.
- Because every part is worked in continuous rounds with no slip stitch join, place a stitch marker in the first stitch of each round and move it up as work progresses - this matters most on the longer rounds, such as 11, 12, 18 and 28.
- Work stitches snugly rather than loosely; fabric that is too open will let fiberfill show through around the safety eye and nose openings once they are inserted.
- Stuff the arms only half full before folding and seaming flat at rounds 6-9, but pack the head and body firmly before closing at rounds 18 and 28 so the finished kitten holds its shape.
The essentials
- Rounds
- 6
- Parts
- 11
- Level
- Intermediate
- Time
- 4-6 hours
- Hook
- 3.5 mm
- Yarn
- DK/Sport (plush)
Stitches you will use
- Amigurumi increasing and decreasing Round 3 mixes half double crochet (half treble) increases with single crochet to shape the head outward from 18 stitches; keep each increase in its marked stitch so the round stays symmetrical.
- Continuous spiral rounds The whole kitten - head, body, arms and legs - is worked without joining or turning; a stitch marker at the start of each round prevents drift, especially through longer stretches like rounds 11, 12 and 18.
- Piece assembly and closing Legs are joined into the body at round 6 by working four stitches together on each side, and arms are folded flat and closed with three single crochet across rounds 6-9; keep tension even so the seam sits flush.
Troubleshooting
The arms look flat or twisted at the fold instead of sitting smoothly.
This happens when stuffing is uneven or pushed to one side before the fold; redistribute the fiberfill evenly through the tube first, then fold and work the 3 single crochet across rounds 6-9 with the seam centred.
One leg sits higher or looser than the other after joining.
This points to an uneven decrease at round 6, where four stitches should be worked together on each side to bring the round back to 30 stitches; recount the stitches around the join before continuing.
The head or body puckers rather than curving smoothly outward.
Puckering at the increase round (R3) usually means the half double crochet and single crochet stitches were not spaced as instructed; check that increases fall exactly where marked rather than bunched together.
Substituting yarn
- Cotton, DK weight
- Gives crisper stitch definition and a firmer, less plush surface than the original velvet-style yarn; a slightly smaller hook than the 3.5mm option keeps the fabric dense enough to hide stuffing.
- Acrylic chenille or velvet-style, light worsted weight
- Closest match to the yarn named in the materials list, keeping the same soft pile and drape; the 3.5mm-4.0mm hook range and stuffing amount can be used as given.
- Wool-blend, fingering weight held double
- Produces a denser, slightly heavier fabric with a warmer handle; drop to a smaller hook than 3.5mm to keep the gauge tight enough to hold the safety eyes and nose securely.
Washing and care
- Hand wash in cool water only, without wringing, since the plush fibre in yarns of this type can flatten or mat under heat and agitation; reshape the kitten gently while damp and lay flat to dry away from direct heat.
- Store the finished piece somewhere it will not be compressed for long periods, and brush the pile lightly with fingers after storage to lift the fibre back into place; keep out of direct sunlight to protect colour.
FAQs
Questions
Why does the pattern list two hook sizes, 3.5mm and 4.0mm?
The two sizes account for slight differences between the two named plush yarns; use whichever gives a fabric tight enough to hold the fiberfill without gaps. Keep the same hook for a whole piece so tension stays consistent.
What stitch joins the legs to the body?
round 6, four stitches are worked together on each side where a leg meets the body, bringing the round back to 30 stitches. This decrease pulls the leg into place while keeping the body round even.
How full should the arms be stuffed?
Only half full, before the top is folded flat and closed with three single crochet across rounds 6-9. Overstuffing at this stage will stop the fold from lying flat.
When should the safety eyes and nose go in?
They are inserted before the head is closed and stuffed firmly, since safety eyes and a nose of this kind need to be fastened from the inside while the opening is still accessible. Embroidered features are usually added afterwards with black and grey floss.
Is the whole kitten worked in one continuous piece?
No - the head and body form one main piece worked through to round 28, while two arms and two legs are made separately and joined during assembly. A stitch marker is useful throughout since every round is worked continuously without a join.
These answers came from whoever first published the pattern, kept word for word.