 EVERY CROCHET
 Amigurumi 47 rounds No account, no download
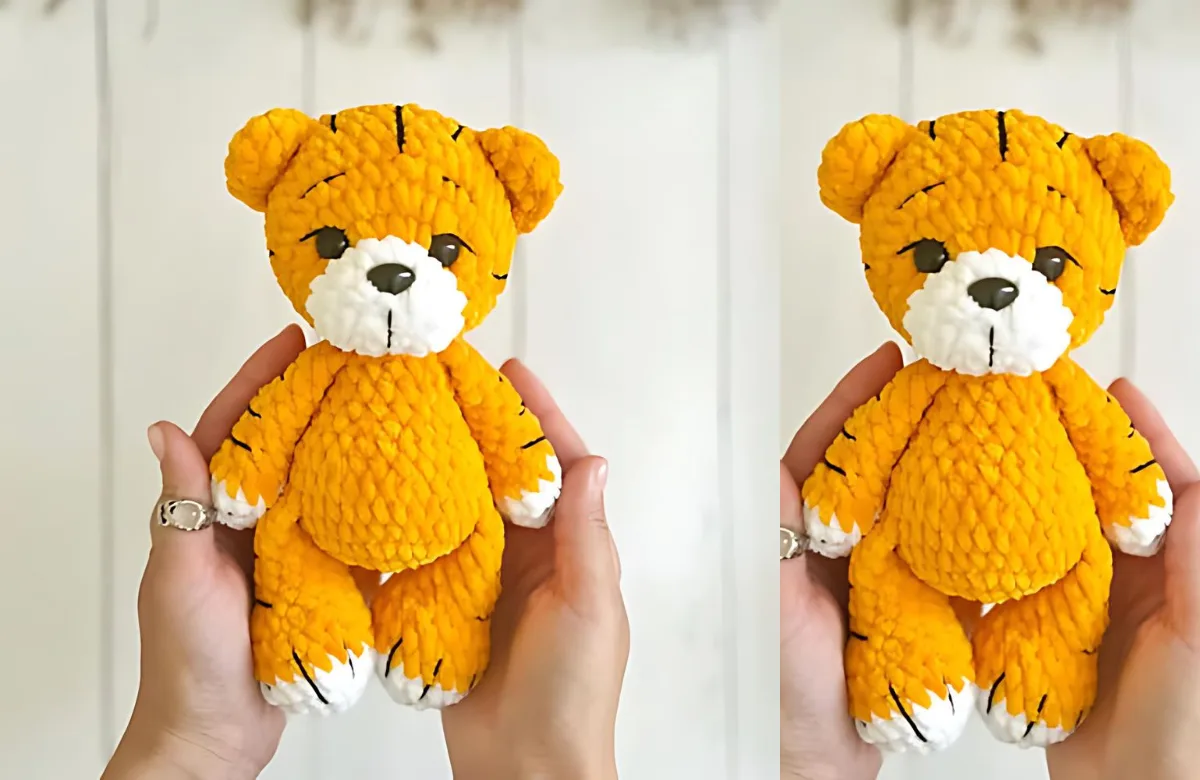
Crochet tiger cub amigurumi pattern with plush stripes
Amigurumi tiger worked in single crochet (UK double crochet), rounds throughout. US and UK stitch terms both given.
- Skill
- Intermediate
- Time
- 4-6 hours
- Yarn weight
- Worsted
- Hook
- 4 mm

Intermediate
What the original write-up called it. Nothing here is graded again.

Worsted
What the sample was worked in. Any weight works; the size moves with it.

4-6 hours
What the original page reckoned. Your own pace is the one that matters.
About this pattern
This is a small amigurumi tiger, about 20 cm tall, worked in single crochet (UK double crochet) rounds with a 4 mm hook. It is made from plush orange and white yarn with black cotton stripes and head decoration added separately. The pattern has six parts — head, two legs, two arms, body, two ears and tail — each stuffed and stitched together by hand, finished with safety eyes and a safety nose.
This pattern makes a small stuffed tiger, worked entirely in single crochet (UK double crochet) in continuous spiral rounds. Each part begins with a magic ring, and the round-by-round increase sequences build the rounded head, tapering legs and barrel-shaped body typical of amigurumi construction, where shaping comes from stitch count changes rather than from separate pattern pieces.
The toy is built from six separate sections worked flat in the round: a 17-round head, two 13-round legs, two 12-round arms, a 15-round body, two 3-round ears and a 12-round tail. Each piece is stuffed before closing, then joined by hand with a sewing needle, and black stripes plus facial detailing are added afterwards using a separate cotton yarn over the plush orange and white base.
Materials
- Plush yarn – orange, white
- 4 mm crochet hook
- Safety nose 15 мм
- Safety eyes 12 мм
- Yarnart Jeans 53 (or any other black cotton yarn) for head decoration and stripes.
- Toy stuffing material
- Sewing needle, scissors
- Stitch Markers
- The height of the toy is approximately 20 cm.
The list is the pattern's own wording.
Instructions
Every round is printed as the pattern wrote it, brackets and all. Open the key beside a round to see only the short forms that round uses.
Head
Start with white color.
- Round 1
6 sc in MR (6)
Key2
- MR
- Magic ring
- Sc
- Single crochet
- Round 2
6 inc (12)
Key1
- Inc
- Increase
- Round 3
(1sc,inc)x6 (18)
Key1
- Inc
- Increase
- Round 4
18 sc (18)Change color to orange.
Key1
- Sc
- Single crochet
- Round 5
6 sc, 6 inc, 6 sc (24)
Key2
- Inc
- Increase
- Sc
- Single crochet
- Round 6
6 sc, (inc,1sc)x6, 6 sc (30)
Key2
- Inc
- Increase
- Sc
- Single crochet
- Round 7
(inc,4sc)x6 (36)
Key1
- Inc
- Increase
- Rounds 8–12
36 sc (36)Insert safety eyes between rounds 5 and 6, 4 inc apart.Insert safety nose between rounds 2 and 3.
Key2
- Inc
- Increase
- Sc
- Single crochet
- Round 13
(4sc,dec)x6 (30)
Key1
- Dec
- Decrease
- Round 14
(3sc,dec)x6 (24)
Key1
- Dec
- Decrease
- Round 15
(2sc,dec)x6 (18)
Key1
- Dec
- Decrease
- Round 16
(1sc,dec)x6 (12)
Key1
- Dec
- Decrease
- Round 17
6 dec (6)Make head decoration.
Key1
- Dec
- Decrease
Legs (make 2)
Start with white color.
- Round 1
6 sc in MR
Key2
- MR
- Magic ring
- Sc
- Single crochet
- Round 2
(inc)x6 (12)
Key1
- Inc
- Increase
- Round 3
(1sc,inc)x6 (18)
Key1
- Inc
- Increase
- Round 4
(5sc,inc)x3 (21)Change color to orange.
Key1
- Inc
- Increase
- Rounds 5–6
21 sc (21)
Key1
- Sc
- Single crochet
- Round 7
1 sc, (1sc,dec)x6, 2 sc (15)
Key2
- Dec
- Decrease
- Sc
- Single crochet
- Round 8
3 sc, (1sc,dec)x3, 3 sc (12)
Key2
- Dec
- Decrease
- Sc
- Single crochet
- Rounds 9–13
12 sc (12)Fold in half and crochet 5 sc through both sides.
Key1
- Sc
- Single crochet
We’ve completed the tiger’s legs, now its arms are next.
Arms (make 2)
Start with white color.
- Round 1
6 sc in MR
Key2
- MR
- Magic ring
- Sc
- Single crochet
- Round 2
(inc)x6 (12)
Key1
- Inc
- Increase
- Round 3
12 sc (12)Change color to orange.
Key1
- Sc
- Single crochet
- Round 4
12 sc (12)
Key1
- Sc
- Single crochet
- Round 5
3 dec, 6 sc (9)
Key2
- Dec
- Decrease
- Sc
- Single crochet
- Rounds 6–12
9 sc (9)Fold in half and crochet 4 sc through both sides.
Key1
- Sc
- Single crochet
Body
- Round 1
6 sc in MR (6)
Key2
- MR
- Magic ring
- Sc
- Single crochet
- Round 2
(inc)x6 (12)
Key1
- Inc
- Increase
- Round 3
(1sc,inc)x6 (18)
Key1
- Inc
- Increase
- Round 4
(1sc,inc)x9 (27)
Key1
- Inc
- Increase
- Round 5
(2sc,inc)x9 (36)
Key1
- Inc
- Increase
- Round 6
36 sc (36)
Key1
- Sc
- Single crochet
- Round 7
5 sc with leg, 12 sc, 5 sc with leg, 14 sc (36)
Key1
- Sc
- Single crochet
- Round 8
36 sc (36)
Key1
- Sc
- Single crochet
- Round 9
(2sc,dec)x9 (27)
Key1
- Dec
- Decrease
- Round 10
27 sc (27)
Key1
- Sc
- Single crochet
- Round 11
(1sc,dec)x9 (18)
Key1
- Dec
- Decrease
- Rounds 12–13
18 sc (18)
Key1
- Sc
- Single crochet
- Round 14
(4sc,dec)x3 (15)
Key1
- Dec
- Decrease
- Round 15
1 sc, 4 sc with hand, 4 sc, 4 sc with hand, 2 sc (you may have a different offset of the loops, so make sure that the feet are knitted symmetrically)Leave a long tail for sewing.Sew head to the body. Make stripes. Sew the tail in rnd 8.
Key1
- Sc
- Single crochet
Having completed her body, we embroider her ears and fix them on her head.
Ears (make 2)
- Round 1
6 sc in MR
Key2
- MR
- Magic ring
- Sc
- Single crochet
- Round 2
(inc)x6 (12)
Key1
- Inc
- Increase
- Round 3
12 sc (12)Fold in half and crochet 6 sc through both sides.Leave long tail for sewing.
Key1
- Sc
- Single crochet
Finally, let’s make the crochet tiger’s tail and pin it to its body. Thus, we will have completed the cute tiger.
Tail
- Round 1
6 sc in MR
Key2
- MR
- Magic ring
- Sc
- Single crochet
- Rounds 2–3
6 sc (6)Change color to orange.
Key1
- Sc
- Single crochet
- Rounds 4–12
6 sc (6)Fold in half and crochet 3 sc through both sides.
Key1
- Sc
- Single crochet
Designer: fennec_toys
Notes from the pattern
- Use the 4 mm hook with the plush yarn at a slightly tighter tension than usual so the stuffing does not show through the fabric between stitches.
- Place a stitch marker in the first stitch of each round on the head (17 rounds) and body (15 rounds), since it is easy to lose the round start over a long stretch of plain single crochet.
- Plan the black stripe and head-decoration placement before starting, since Yarnart Jeans (or another black cotton) is a different fibre and weight from the plush base yarn and behaves differently under tension.
- Stuff firmly and evenly, particularly the legs and head, before closing the final rounds, so the toy holds its 20 cm proportions and the legs can support the body once assembled.
The essentials
- Rounds
- 47
- Parts
- 6
- Level
- Intermediate
- Time
- 4-6 hours
- Hook
- 4 mm
- Yarn
- Worsted
Stitches you will use
- Magic ring (MR) start Used at round 1 of the head, each leg, each arm, the body, each ear and the tail; pull the centre closed firmly so no hole shows once stuffed.
- Standard increase (inc) Drives the shaping in every part's early rounds; check the stitch count given at the end of each round rather than guessing spacing by eye.
- Colour change with a separate yarn The black cotton yarn for the stripes and head decoration is worked over the plush base after the main pieces are complete; keep tension even so the plush yarn does not show through.
Troubleshooting
The head or body curls inward instead
One or more increase rounds have missed a stitch. Count stitches at the end of each round against the number given and unpick back to the last correct round if it does not match.
The black stripes show gaps or the
This happens when the first stitch after a colour change is left loose. Pull the new colour snug on its first stitch and weave ends into stitches of the same colour on the wrong side.
The legs feel soft and the finished
The legs are underfilled. Add stuffing in small firm amounts as the rounds progress rather than packing it all in just before closing.
Substituting yarn
- Cotton, DK weight
- Gives crisper stitch definition and a smaller finished toy than the plush yarn; try a 3.5 mm hook to keep the fabric dense enough to hold stuffing.
- Acrylic, worsted weight
- Produces a lighter, softer toy with less structure than plush; the 4 mm hook still works but the fabric will drape more and stitches show more clearly.
- Velvet or chenille, worsted weight
- Keeps the plush texture of the original with a similar 4 mm hook, though the pile can obscure fine stripe detail more than a smoother yarn.
Washing and care
- Hand wash the finished toy in cool water if it needs cleaning, since plush yarn and cotton stripe yarn respond differently to heat and machine agitation; press out excess water in a towel rather than wringing.
- Reshape the head, legs and tail gently while still damp and let the toy air dry flat away from direct heat or sunlight, then store it out of strong light to keep the orange and black colours from fading.
FAQs
Questions
What hook size does this pattern need?
The pattern uses a 4 mm hook throughout the head, legs, arms, body, ears and tail. The same hook size works for the plush base yarn and the black cotton yarn used for stripes.
Why does the pattern call for two different yarns?
The plush orange and white yarn forms the main body of the toy, while Yarnart Jeans or another black cotton yarn is used separately for the head decoration and stripes. Using a firmer cotton for the stripes keeps the detail crisp against the softer plush background.
How tall is the finished tiger?
The finished toy measures approximately 20 cm tall. This depends on tension staying fairly tight with the plush yarn, as looser stitches will produce a larger, softer result.
Can safety eyes and nose be swapped for embroidered features?
Yes, embroidered features can replace the 12 mm safety eyes and 15 mm safety nose if preferred for a toy intended for very young children. Add any embroidery before the head is fully stuffed and closed, since access becomes difficult afterwards.
Do the legs need any internal support to stand upright?
The pattern does not call for wire or extra armature in the 13-round legs. Firm, even stuffing throughout each leg is what allows the finished tiger to sit or stand.
These answers came from whoever first published the pattern, kept word for word.