 EVERY CROCHET
 Amigurumi 51 rounds No account, no download
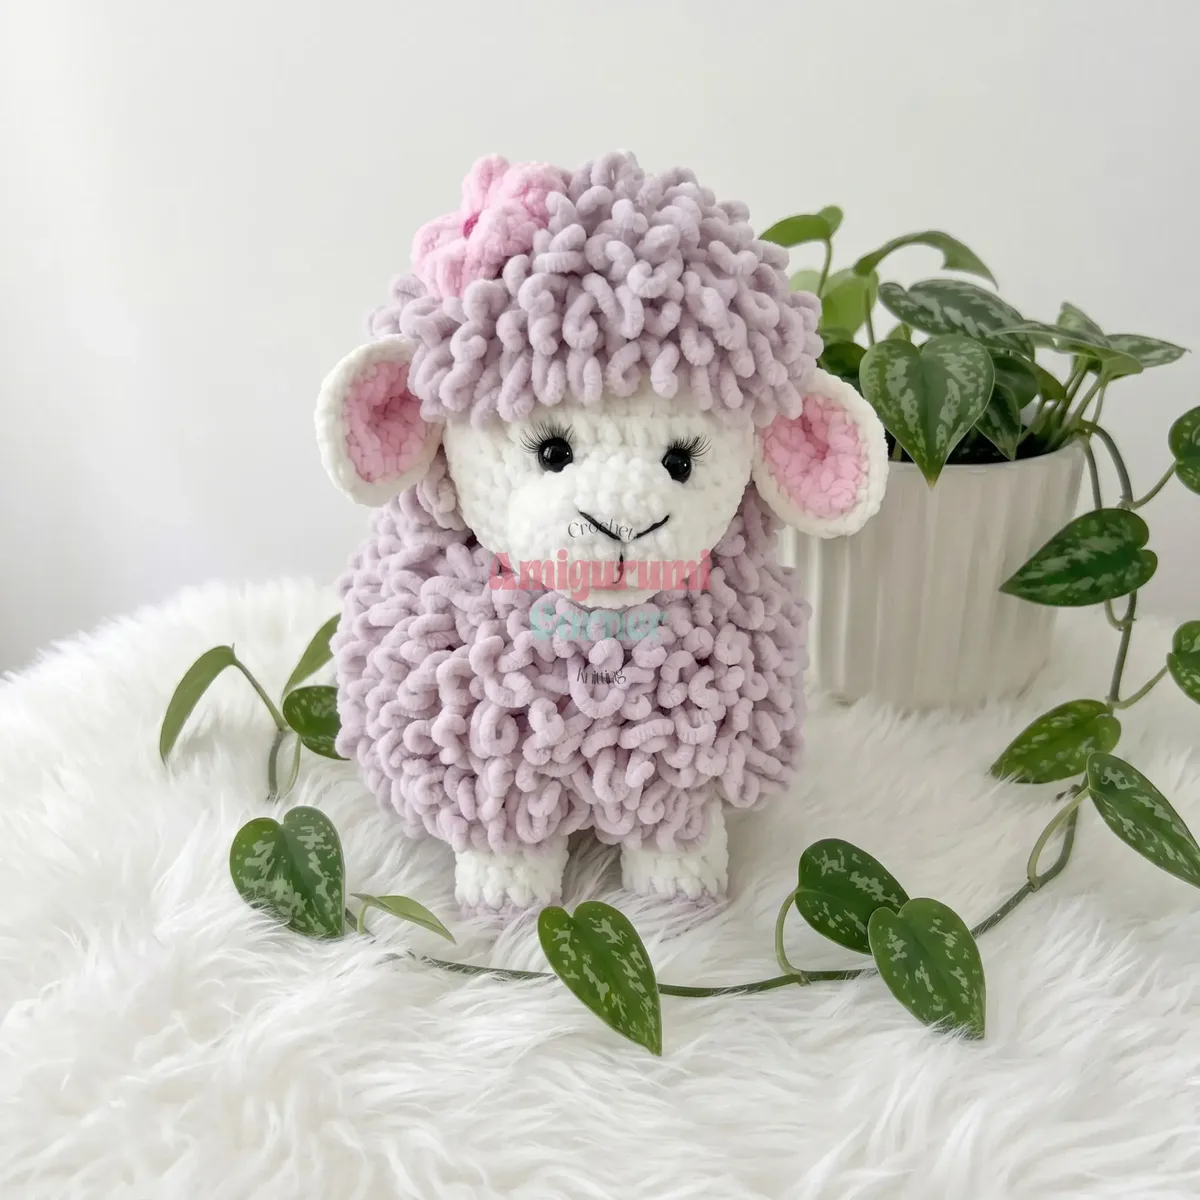
Crochet lamb amigurumi with a loop stitch fleece coat
A loop stitch fleece coat lamb amigurumi, worked in US crochet terms with UK equivalents given.
- Skill
- Intermediate
- Time
- 4-6 hours
- Yarn weight
- Worsted
- Hook
- 3.75 mm

Intermediate
What the original write-up called it. Nothing here is graded again.

Worsted
What the sample was worked in. Any weight works; the size moves with it.

4-6 hours
What the original page reckoned. Your own pace is the one that matters.
About this pattern
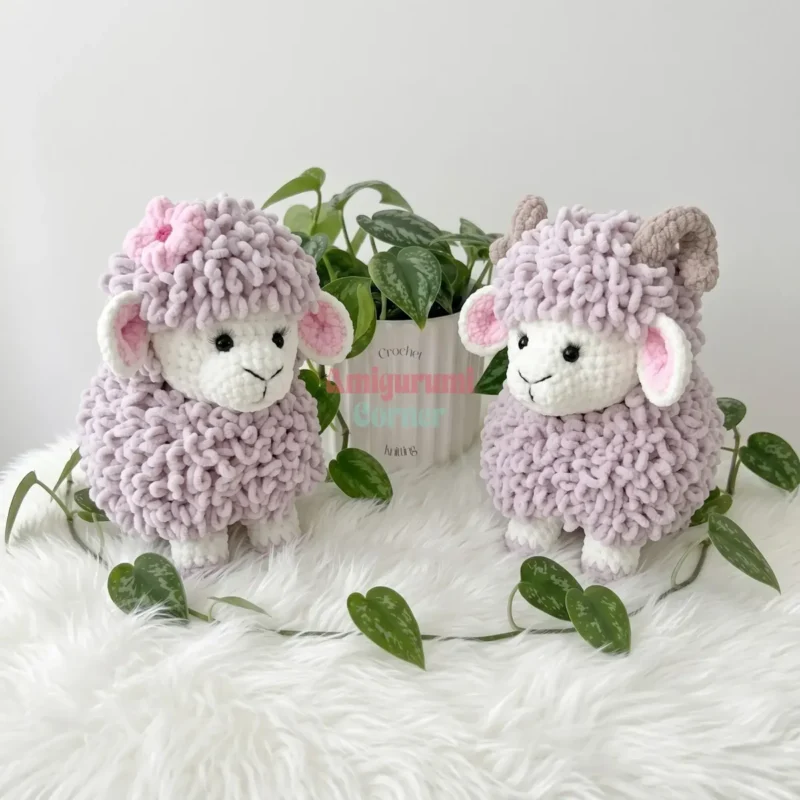
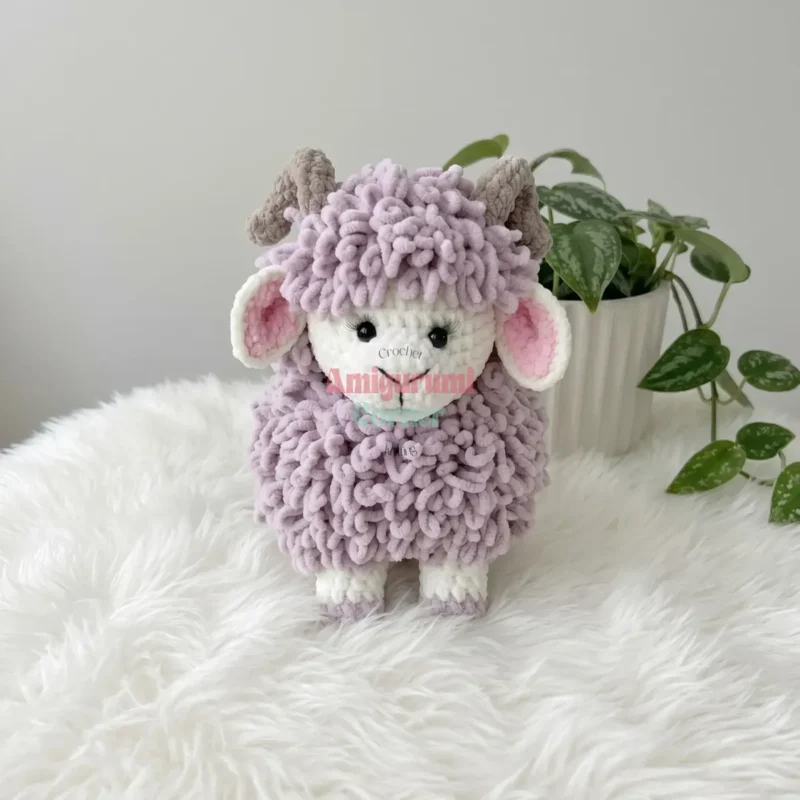
A plush lamb amigurumi made in chenille-type yarn, combining continuous-spiral single crochet parts with a loop stitch fleece coat applied as surface texture. Legs, a belly panel, body, head, muzzle and ears form the standard parts, with an optional horned ram version. Suited to an intermediate crocheter comfortable with amigurumi shaping and surface stitch work, taking roughly four to six hours.
This lamb amigurumi belongs to the single crochet (UK: double crochet) family that forms the basis of most amigurumi work, built here in continuous spirals rather than joined rounds. Its most distinctive feature is a fleece coat worked in loop stitch, a raised-pile technique that stands proud of the base fabric to suggest a woolly texture. The pattern is written throughout in US terminology, so UK readers should read every US stitch name one rung down the ladder: sc as dc, dc as tr, and so on.
Construction starts with four legs worked in the round with back-loop-only stitches to define a hoof ridge, followed by a separately crocheted oval belly panel that joins to the body's underside stitch-for-stitch. The body continues upward in two stages before the head and muzzle are shaped and attached. Ears, worked flat with a pink panel, and optional ram horns are added afterwards, and the whole piece is finished with the loop stitch fleece coat applied as a surface layer once all parts are assembled and stuffed.
Standing just under ten inches tall when stuffed firmly, this plush amigurumi lamb is built from chenille yarn with a separately layered loop-stitch coat — a rewarding intermediate project with a finished look more advanced than its technique level.
Materials
Yarn
- Plush / chenille yarn — Himalaya Dolphin Baby, Yarnart DOLCE, or equivalent
- 1 skein main body color
- 1 skein fleece/coat color
- Small amount pink yarn, for ears
- Small amount light brown yarn, for ram horns (optional)
Hook
- US F-5 / 3.75 mm (acceptable range: US D-3 / 3.0 mm to US H-8 / 5.0 mm)
Safety eyes
- 11 mm plastic safety eyes, 2
Stuffing
- Polyester fiberfill
- Stitch markers
- Tapestry needle
- Scissors
- Black embroidery thread for facial details
- Hot glue gun or small bead for flower center (optional)
The list is the pattern's own wording.
Instructions
Every round is printed as the pattern wrote it, brackets and all. Open the key beside a round to see only the short forms that round uses.
Legs — Make 4
Work with brown yarn.
- Round 1
Ch 3, sl st to first ch to form ring. 3 inc. (6)
Key3
- sl st
- Slip Stitch
- inc
- Increase (2 sc in same stitch)
- ch
- Chain
- Round 2
6 inc. (12)
Key1
- inc
- Increase (2 sc in same stitch)
- Round 3
12 sc BLO. (12) Working through back loops only creates the hoof ridge.
Key2
- BLO
- Back Loop Only
- sc
- Single Crochet
- Round 4
12 sc. (12)Change to main body color.
Key1
- sc
- Single Crochet
- Rounds 5–9
12 sc. (12)Fasten off Legs 1, 2, and 3. Do NOT fasten off Leg 4 — continue with live yarn directly into the body.
Key1
- sc
- Single Crochet
Body
Leg 4 with live yarn is the starting point for Rnd 10. Attach each remaining leg by drawing up a loop and working 1 sc to join before continuing the round.
- Round 10
1 ch, 10 sc across Leg 1, 6 ch, 10 sc across Leg 2, 1 ch, 10 sc across Leg 3, 6 ch, 10 sc across Leg 4. (54) 2 stitches on each leg remain unworked at the inner edge — these will anchor the belly panel.
Key2
- ch
- Chain
- sc
- Single Crochet
- Round 11
54 sc. (54)
Key1
- sc
- Single Crochet
- Round 12
(inc, 5 sc) × 9. (63)
Key2
- inc
- Increase (2 sc in same stitch)
- sc
- Single Crochet
- Rounds 13–17
63 sc. (63)
Key1
- sc
- Single Crochet
- Round 18
(dec, 3 sc) × 12, dec, 1 sc. (50)
Key2
- dec
- Decrease (invisible decrease)
- sc
- Single Crochet
- Round 19
50 sc. (50)
Key1
- sc
- Single Crochet
Set body aside and complete the belly panel before continuing.
Belly Panel
Work with main body color yarn. This flat oval panel is crocheted separately, then attached to the underside of the body.
- Round 1
Foundation oval Ch 8. Begin in 3rd ch from hook: 5 sc along top of foundation ch, 4 sc in last ch (pivot point), 5 sc along opposite side of foundation ch, inc in first ch. (17)
Key3
- inc
- Increase (2 sc in same stitch)
- ch
- Chain
- sc
- Single Crochet
- Round 2
inc, 6 sc, inc, inc, 7 sc, inc. (21)
Key2
- inc
- Increase (2 sc in same stitch)
- sc
- Single Crochet
- Round 3
inc, 8 sc, inc, inc, 9 sc, inc. (25)Do NOT fasten off. Place belly panel face down (WS up) against the underside of the body, aligning with the unworked leg stitches. Using the live yarn, join panel to body by working 1 sc through each corresponding edge stitch of both pieces simultaneously around the full perimeter. Resume body rounds once attached.
Key3
- inc
- Increase (2 sc in same stitch)
- sc
- Single Crochet
- WS
- Wrong Side
Body — Continued
- Round 20
(dec, 3 sc) × 10. (40)
Key2
- dec
- Decrease (invisible decrease)
- sc
- Single Crochet
- Round 21
(dec, 2 sc) × 10. (30)
Key2
- dec
- Decrease (invisible decrease)
- sc
- Single Crochet
- Round 22
30 sc. (30)Stuff body firmly with fiberfill now while the opening is still wide. Pack tightly for stability.
Key1
- sc
- Single Crochet
- Round 23
(dec, 1 sc) × 10. (20)
Key2
- dec
- Decrease (invisible decrease)
- sc
- Single Crochet
- Round 24
20 sc. (20)
Key1
- sc
- Single Crochet
- Round 25
dec × 10. (10)Fasten off. Weave tail end to inside.
Key1
- dec
- Decrease (invisible decrease)
Head
Work with main body color yarn.
- Round 1
Ch 4, sl st to first ch to form ring. 4 inc. (8)
Key3
- sl st
- Slip Stitch
- inc
- Increase (2 sc in same stitch)
- ch
- Chain
- Round 2
8 inc. (16)
Key1
- inc
- Increase (2 sc in same stitch)
- Round 3
(1 sc, inc) × 8. (24)
Key2
- inc
- Increase (2 sc in same stitch)
- sc
- Single Crochet
- Round 4
(2 sc, inc) × 8. (32)
Key2
- inc
- Increase (2 sc in same stitch)
- sc
- Single Crochet
- Round 5
(3 sc, inc) × 8. (40)
Key2
- inc
- Increase (2 sc in same stitch)
- sc
- Single Crochet
- Rounds 6–12
40 sc. (40)
Key1
- sc
- Single Crochet
- Round 13
(dec, 3 sc) × 8. (32)
Key2
- dec
- Decrease (invisible decrease)
- sc
- Single Crochet
- Round 14
(dec, 2 sc) × 8. (24)
Key2
- dec
- Decrease (invisible decrease)
- sc
- Single Crochet
- Round 15
(dec, 1 sc) × 8. (16)
Key2
- dec
- Decrease (invisible decrease)
- sc
- Single Crochet
- Round 16
16 sc. (16)Stuff head firmly with fiberfill, shaping into a smooth, even sphere.
Key1
- sc
- Single Crochet
- Round 17
dec × 8. (8)Fasten off. Weave tail end to inside. Sew head to body.
Key1
- dec
- Decrease (invisible decrease)
Muzzle
Work with off-white / cream yarn.
- Round 1
Foundation oval Ch 8. Begin in 3rd ch from hook: 5 sc along top of foundation ch, 4 sc in last ch (pivot), 5 sc along opposite side, inc. (17)
Key3
- inc
- Increase (2 sc in same stitch)
- ch
- Chain
- sc
- Single Crochet
- Round 2
inc, 6 sc, inc, inc, 7 sc, inc. (21)
Key2
- inc
- Increase (2 sc in same stitch)
- sc
- Single Crochet
- Round 3
21 sc. (21)
Key1
- sc
- Single Crochet
- Round 4
inc, 8 sc, inc, inc, 9 sc, inc. (25)
Key2
- inc
- Increase (2 sc in same stitch)
- sc
- Single Crochet
- Round 5
25 sc. (25)Fasten off, leaving a long sewing tail. Lightly stuff muzzle and sew to the front center of the head. Position safety eyes above the muzzle and mark mouth placement with pins. Install safety eye washers, pulling the thread slightly inward through the muzzle fabric to create a subtle smile indent.Mouth: Secure black embroidery thread at the marked mouth position. Work sc, hdc, 2 dc, hdc, sc along the smile line — this low-to-high-to-low stitch progression forms a gentle curve. Fasten off and weave end to inside.
Key3
- hdc
- Half Double Crochet
- dc
- Double Crochet
- sc
- Single Crochet
Ears — Make 2
Each ear has two halves: one in main body color, one in pink. Both halves are worked from the same instructions. Crochet both pink halves first, then both body-color halves.
- Round 1
Ch 2, 2 sc in first ch from hook. (3)Turn work at the beginning of every row.
Key3
- Row
- Flat row (back and forth, with turn)
- ch
- Chain
- sc
- Single Crochet
- Round 2
Ch 1 (counts as sc), turn; 3 sc. (4)
Key2
- ch
- Chain
- sc
- Single Crochet
- Round 3
Ch 1 (counts as sc), turn; 4 sc. (5)
Key2
- ch
- Chain
- sc
- Single Crochet
- Round 4
Ch 1 (counts as sc), turn; 5 sc. (6)
Key2
- ch
- Chain
- sc
- Single Crochet
- Round 5
Ch 1 (counts as sc), turn; 6 sc. (7)Begin decrease. For Rows 6–10, insert hook into the 2nd stitch of the previous row, skipping the first stitch.
Key3
- Row
- Flat row (back and forth, with turn)
- ch
- Chain
- sc
- Single Crochet
- Round 6
Ch 1 (counts as sc), turn; skip first st, 5 sc. (6)
Key2
- ch
- Chain
- sc
- Single Crochet
- Round 7
Ch 1 (counts as sc), turn; skip first st, 4 sc. (5)
Key2
- ch
- Chain
- sc
- Single Crochet
- Round 8
Ch 1 (counts as sc), turn; skip first st, 3 sc. (4)
Key2
- ch
- Chain
- sc
- Single Crochet
- Round 9
Ch 1 (counts as sc), turn; skip first st, 2 sc. (3)
Key2
- ch
- Chain
- sc
- Single Crochet
- Round 10
Ch 1 (counts as sc), turn; skip first st, 1 sc. (2)Fasten off the pink half. Do NOT fasten off the body-color half.Joining: Hold both halves together with pink side facing inward. Using the live body-color yarn, sc through corresponding edge stitches of both pieces simultaneously around the full perimeter. At the narrow tip, work 2 sc to close. Fasten off and weave in ends.Sew ears to sides of head. Use black embroidery thread to add any remaining facial details.
Key2
- ch
- Chain
- sc
- Single Crochet
Fleece Coat — Loop Stitch Surface Covering
Work with fleece/coat color yarn. Each loop is 4–5 cm (approx. 1.5–2 in) long.
Loop stitch: Insert hook into stitch; draw up a loop of desired length (4–5 cm); complete as sc. Repeat across.
Work in continuous surface spirals directly over the assembled toy. Fasten off and weave in end after completing each section.
Head top: Attach yarn at the crown. Work loop stitches spiraling outward and downward, covering the top and back of the head. Stop where the face area begins; leave the face unworked. Fasten off.
Body and back: Attach yarn at the upper back. Work loop stitches downward across the back and sides. 8 clear rounds must remain visible between the dark hoof section of each leg and the start of the fleece coat. Fasten off.
Back of head (ear to ear): Attach yarn at one ear base. Work loop stitches across the back of the head to the opposite ear base. Fasten off.
Decorative Flower — Lamb Version, Optional
- Round 1
Ch 4, sl st to first ch to form ring. 4 inc. (8)
Key3
- sl st
- Slip Stitch
- inc
- Increase (2 sc in same stitch)
- ch
- Chain
- Round 2
(sc, dc, tr, tr, dc) × 5. 5 petals total.Fasten off. Pull the starting tail to the same side as the working tail; trim both close. Turn flower over — petals appear raised on the reverse (now RS). Attach a small bead or pompom to the center by sewing or with hot glue.
Key3
- dc
- Double Crochet
- sc
- Single Crochet
- tr
- Treble Crochet
Horns — Ram Version Only, Make 2
Work with light brown yarn.
- Round 1
Ch 3, sl st to first ch to form ring. 3 inc. (6)
Key3
- sl st
- Slip Stitch
- inc
- Increase (2 sc in same stitch)
- ch
- Chain
Right horn:
- Rounds 2–14
3 hdc, 3 sc. This horn curls naturally during work.
Key2
- hdc
- Half Double Crochet
- sc
- Single Crochet
Left horn:
- Rounds 2–14
3 sc, 3 hdc. Guide this horn to curl in the opposite direction while working. Lightly stuff if desired. Sew both horns to the top of the head.
Key2
- hdc
- Half Double Crochet
- sc
- Single Crochet
Making up
- Step 1Sew the completed head to the top of the body, centered above the front legs.
- Step 2Sew both ears to the sides of the head with the pink panels facing forward.
- Step 3Embroider nostrils or any remaining facial details with black thread.
- Step 4Lamb: Sew or attach the decorative flower between the ears on top of the head.
- Step 5Ram: Sew both horns to the top of the head, one on each side, angled outward.
- Step 6Weave in all remaining ends.
Notes from the pattern
- The pattern calls for a US F-5 / 3.75 mm hook but works within a range from US D-3 / 3.0 mm to US H-8 / 5.0 mm, so size can be adjusted for tighter or looser stitch definition without altering the pattern.
- Because all 3D parts are worked in continuous spirals with no joining slip stitch, a stitch marker at the start of each round is essential to avoid losing track of the round count.
- Chenille or plush yarn hides minor tension irregularities but firm stitches are still needed; loose stitches let fibrefill show through, particularly on the head and body.
- The main body colour and the fleece coat colour are worked as separate elements rather than stripes — the coat colour is added afterwards as a loop stitch surface layer, so no colour-change join is needed mid-round.
- Gauge is not critical for this pattern; work your tension firm enough that stuffing does not show through the stitches. Stitch counts at the end of each round or row are given in parentheses, e.g. (##).
- Install safety eyes before fully closing the piece they sit in, and stuff each part firmly to maintain shape and help the toy stand independently.
The essentials
- Rounds
- 51
- Parts
- 10
- Level
- Intermediate
- Time
- 4-6 hours
- Hook
- 3.75 mm
- Yarn
- Worsted
Stitches you will use
- Continuous spiral amigurumi crochet Used throughout the legs, body and head; mark the start of each round with a stitch marker since rounds are not joined or chained, and the marker must move up each round.
- Back loop only (BLO) shaping Applied on Leg Round 3 to create a raised hoof ridge; working through both loops instead of the back loop only will flatten the detail.
- Loop stitch surface covering Worked over the finished body as the fleece coat; keep loop length and tension even across the piece so the pile lies uniformly.
Troubleshooting
The belly panel does not sit flush against the body.
This happens when the edge stitch count on the panel does not match the unworked leg stitches on the body; recount both edges before joining and ease any excess evenly around the perimeter rather than at one point.
The loop stitch fleece looks patchy or uneven in length.
Uneven loops usually come from inconsistent finger or tool tension while pulling up each loop; work loops over a consistent gauge, using a finger, ruler or loop tool, and trim afterwards to even the pile.
The leg lacks a visible hoof ridge.
This means Round 3 was worked through both loops instead of the back loop only; the ridge relies on the front loop being left exposed, so BLO must be followed exactly on that round.
Substituting yarn
- Acrylic chenille, worsted weight
- Closest match to the original plush/chenille yarn; keep the same F-5 / 3.75 mm hook and finished size, though pile softness will vary slightly by fibre blend.
- Cotton-blend, DK weight
- Produces a smaller, firmer finished lamb with crisper stitch definition; drop to a D-3 to E-4 / 3.0-3.5 mm hook and expect the loop stitch coat to sit flatter with less loft.
- Polyester plush, bulky weight
- Gives a larger, softer finished piece with a fuller loop stitch coat; move up to an H-8 / 5.0 mm hook or beyond and increase fibrefill quantity to support the larger stitches.
Washing and care
- Hand wash gently in cool water if the plush yarn becomes soiled, since machine agitation can flatten the loop stitch pile and distort the chenille fibres; avoid wringing.
- Reshape the piece while damp, fluff the fleece coat loops with fingers, and dry flat away from direct heat to keep the pile raised and the body from sagging out of shape.
The photographs taken while this was being made
Every one was taken by whoever published the pattern, in the order the source listed them.
FAQs
Questions
What hook size does this pattern need?
The recommended hook is a US F-5 / 3.75 mm, though anything from US D-3 / 3.0 mm to US H-8 / 5.0 mm will work depending on desired stitch tightness. Smaller hooks give firmer, more defined stitches, while larger hooks give a softer, looser fabric.
Can the horns be left off?
Yes, the horns are listed as optional and only apply to the ram version of the lamb. Leaving them off and adding the decorative flower instead produces the standard lamb finish.
When is the loop stitch fleece coat added?
The fleece coat is worked as a surface covering after the main body, head and other 3D parts are complete and stuffed. It sits over the finished shape rather than being built into the base rounds.
Why is the belly panel made separately instead of being part of the body?
Working the oval belly panel flat and then joining it stitch-for-stitch to the underside gives a defined, slightly flatter belly shape than continuing the body rounds straight through. It also makes it easier to align the panel with the leg openings before continuing the body.
Is this pattern written in US or UK crochet terms?
The pattern uses US terminology throughout, so US single crochet corresponds to UK double crochet, and other stitch names shift one step in the same way. UK crocheters should convert stitch names before starting rather than mid-pattern.
These answers came from whoever first published the pattern, kept word for word.