 EVERY CROCHET
 Amigurumi 55 rounds No account, no download
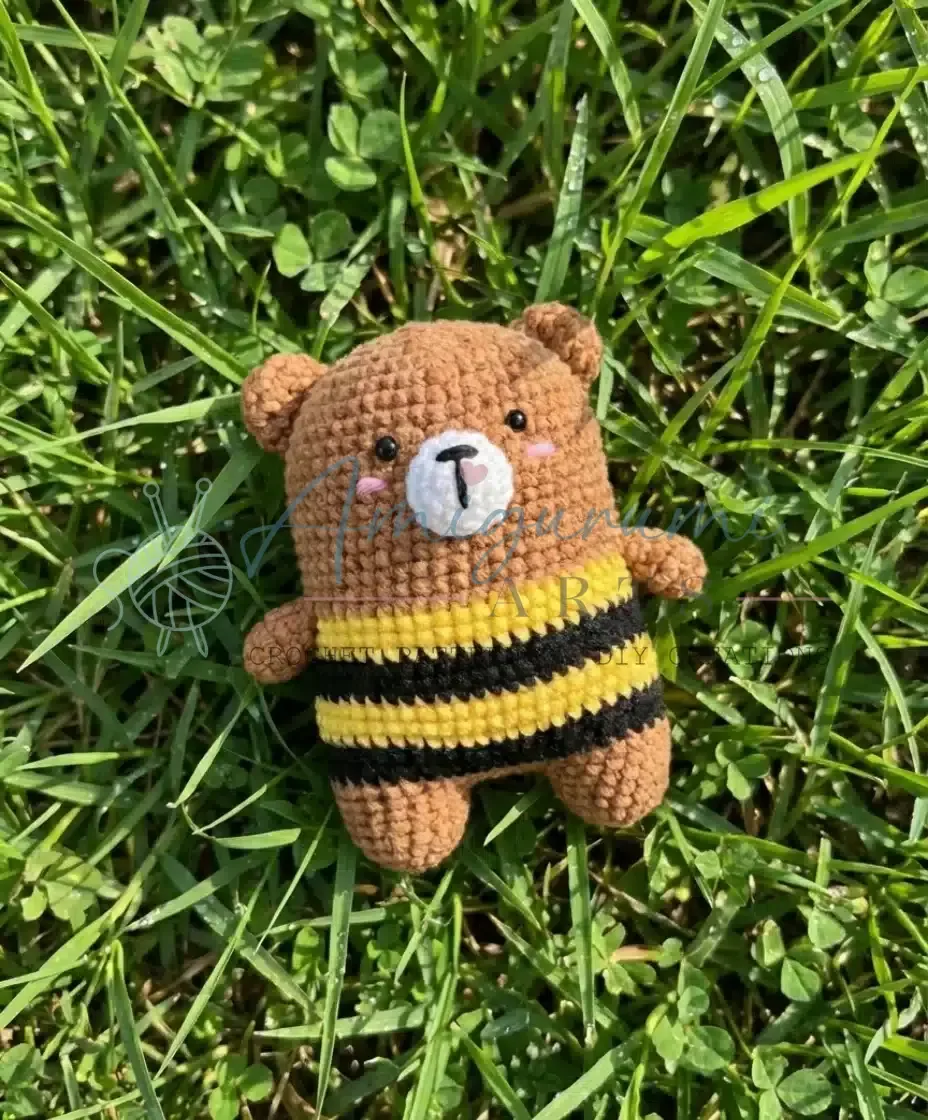
Crochet bear amigurumi with a striped bee sweater
Amigurumi bear pattern in single crochet with a striped bee sweater; both US and UK stitch terms given.
- Skill
- Intermediate
- Time
- 4-6 hours
- Yarn weight
- Worsted
- Hook
- 3.5 mm

Intermediate
What the original write-up called it. Nothing here is graded again.

Worsted
What the sample was worked in. Any weight works; the size moves with it.

4-6 hours
What the original page reckoned. Your own pace is the one that matters.
About this pattern
This is a written amigurumi pattern for a small crocheted bear finished with a striped bee-style sweater worked directly onto the body. It calls for worsted weight yarn, a 3.5mm (E-4) hook, 8mm or 9mm black safety eyes and stuffing, with pieces built in continuous spiral single crochet from a magic ring. The finished bear measures approximately 4.5-5 inches (11-13cm) tall once the head, body, arms and sweater stripes are assembled.
This pattern makes a small amigurumi bear wearing a striped bee-style sweater, built from single crochet (UK: double crochet) throughout. The head, body and arms are each worked as separate amigurumi pieces before assembly, with the sweater's yellow and black stripes crocheted directly onto the body rather than added afterwards. At roughly 4.5-5 inches (11-13cm) tall, it suits a worsted weight yarn and a 3.5mm (E-4) hook, with 8mm or 9mm black safety eyes giving the face its scale.
Each piece starts from a magic ring and is worked in a continuous spiral rather than joined rounds, so a stitch marker is needed to track the start of every round. The head takes 12 rounds, the body 22, and each arm 6, with increases and decreases shaping the curves while stuffing is added gradually as the piece closes. Because the sweater stripes are crocheted straight onto the body, colour changes happen mid-piece rather than at a seam, which affects how yarn ends are managed during assembly.
Materials
Brown
- 50g of worsted weight yarn (approximately 100 yards) for head, body, arms, legs, and ears
White
- Small amount (10g) for snout/muzzle
Yellow
- 20g for striped sweater section
Black
- 15g for striped sweater section and nose embroidery
Pink
- Small amount for cheek embroidery
Crochet hook
- 3.5mm (E-4)
Safety eyes
- 8mm or 9mm black
- Fiberfill stuffing
- Yarn needle for sewing
- Stitch markers
- Scissors
- Pins (for assembly)
The list is the pattern's own wording.
Instructions
Every round is printed as the pattern wrote it, brackets and all. Open the key beside a round to see only the short forms that round uses.
Head
Make 1 in brown
- Round 1
6 sc in magic ring (6)
Key1
- sc
- single crochet
- Round 2
Inc in each st (12)
Key1
- inc
- increase (2 sc in one stitch)
- Round 3
[Sc 1, inc] × 6 (18)
Key3
- inc
- increase (2 sc in one stitch)
- sc
- single crochet
- ×
- repeat X times
- Round 4
[Sc 2, inc] × 6 (24)
Key3
- inc
- increase (2 sc in one stitch)
- sc
- single crochet
- ×
- repeat X times
- Round 5
[Sc 3, inc] × 6 (30)
Key3
- inc
- increase (2 sc in one stitch)
- sc
- single crochet
- ×
- repeat X times
- Round 6
[Sc 4, inc] × 6 (36)
Key3
- inc
- increase (2 sc in one stitch)
- sc
- single crochet
- ×
- repeat X times
- Rounds 7–13
Sc in each st (36) [7 rounds] Insert 8-9mm safety eyes between rounds 10 and 11, approximately 6-7 stitches apart. Position them slightly closer together for a cuter expression.
Key1
- sc
- single crochet
- Round 14
[Sc 4, dec] × 6 (30)
Key3
- dec
- invisible decrease
- sc
- single crochet
- ×
- repeat X times
- Round 15
[Sc 3, dec] × 6 (24)
Key3
- dec
- invisible decrease
- sc
- single crochet
- ×
- repeat X times
- Round 16
[Sc 2, dec] × 6 (18)Stuff head firmly
Key3
- dec
- invisible decrease
- sc
- single crochet
- ×
- repeat X times
- Round 17
[Sc 1, dec] × 6 (12)
Key3
- dec
- invisible decrease
- sc
- single crochet
- ×
- repeat X times
- Round 18
Dec × 6 (6)Fasten off, leaving a long tail for sewing. Use yarn needle to close remaining hole by weaving through front loops of remaining 6 stitches and pulling tight.
Key2
- dec
- invisible decrease
- ×
- repeat X times
Body
Make 1 in brown, then switch to yellow and black for stripes
- Round 1
6 sc in magic ring (6)
Key1
- sc
- single crochet
- Round 2
Inc in each st (12)
Key1
- inc
- increase (2 sc in one stitch)
- Round 3
[Sc 1, inc] × 6 (18)
Key3
- inc
- increase (2 sc in one stitch)
- sc
- single crochet
- ×
- repeat X times
- Round 4
[Sc 2, inc] × 6 (24)
Key3
- inc
- increase (2 sc in one stitch)
- sc
- single crochet
- ×
- repeat X times
- Round 5
[Sc 3, inc] × 6 (30)
Key3
- inc
- increase (2 sc in one stitch)
- sc
- single crochet
- ×
- repeat X times
- Rounds 6–8
Sc in each st (30) [3 rounds in brown] Now begin the bee sweater stripes. Change colors in last yarn over of previous round.
Key1
- sc
- single crochet
- Round 9
With yellow, sc in each st (30)
Key1
- sc
- single crochet
- Round 10
With yellow, sc in each st (30)
Key1
- sc
- single crochet
- Round 11
With yellow, sc in each st (30)
Key1
- sc
- single crochet
- Round 12
With black, sc in each st (30)
Key1
- sc
- single crochet
- Round 13
With black, sc in each st (30)
Key1
- sc
- single crochet
- Round 14
With yellow, sc in each st (30)
Key1
- sc
- single crochet
- Round 15
With yellow, sc in each st (30)
Key1
- sc
- single crochet
- Round 16
With yellow, sc in each st (30)
Key1
- sc
- single crochet
- Round 17
With black, sc in each st (30)
Key1
- sc
- single crochet
- Round 18
With black, sc in each st (30)
Key1
- sc
- single crochet
- Round 19
With yellow, sc in each st (30)
Key1
- sc
- single crochet
- Round 20
With yellow, sc in each st (30)Switch back to brown yarn
Key1
- sc
- single crochet
- Round 21
With brown, [sc 3, dec] × 6 (24)
Key3
- dec
- invisible decrease
- sc
- single crochet
- ×
- repeat X times
- Round 22
[Sc 2, dec] × 6 (18)Stuff body firmly
Key3
- dec
- invisible decrease
- sc
- single crochet
- ×
- repeat X times
- Round 23
[Sc 1, dec] × 6 (12)
Key3
- dec
- invisible decrease
- sc
- single crochet
- ×
- repeat X times
- Round 24
Dec × 6 (6)Fasten off, leaving a long tail for sewing. Close remaining hole.
Key2
- dec
- invisible decrease
- ×
- repeat X times
Arms (Make 2)
Make 2 in brown
- Round 1
6 sc in magic ring (6)
Key1
- sc
- single crochet
- Round 2
Inc in each st (12)
Key1
- inc
- increase (2 sc in one stitch)
- (12)Rounds 3–4
Sc in each st (12) [2 rounds]
Key1
- sc
- single crochet
- Round 5
[Sc 2, dec] × 3 (9)
Key3
- dec
- invisible decrease
- sc
- single crochet
- ×
- repeat X times
- Rounds 6–10
Sc in each st (9) [5 rounds] Stuff lightly – arms should be soft and flexible
Key1
- sc
- single crochet
- Round 11
Flatten opening and sc through both layers (4-5 sc) Fasten off, leaving a long tail for sewing to body.
Key1
- sc
- single crochet
Legs (Make 2)
Make 2 in brown
- Round 1
6 sc in magic ring (6)
Key1
- sc
- single crochet
- Round 2
Inc in each st (12)
Key1
- inc
- increase (2 sc in one stitch)
- Round 3
[Sc 1, inc] × 6 (18)
Key3
- inc
- increase (2 sc in one stitch)
- sc
- single crochet
- ×
- repeat X times
- (18)Round 4
BLO sc in each st (18) [This creates a ridge for the foot]
Key2
- BLO
- back loop only
- sc
- single crochet
- (18)Rounds 5–6
Sc in each st (18) [2 rounds]
Key1
- sc
- single crochet
- Round 7
[Sc 1, dec] × 6 (12)
Key3
- dec
- invisible decrease
- sc
- single crochet
- ×
- repeat X times
- (12)Rounds 8–10
Sc in each st (12) [3 rounds]Stuff firmly, especially the foot portion
Key1
- sc
- single crochet
- Round 11
Flatten opening and sc through both layers (6 sc)Fasten off, leaving a long tail for sewing to body.
Key1
- sc
- single crochet
Ears (Make 2)
Make 2 in brown
- Round 1
6 sc in magic ring (6)
Key1
- sc
- single crochet
- Round 2
Inc in each st (12)
Key1
- inc
- increase (2 sc in one stitch)
- Round 3
[Sc 1, inc] × 6 (18)Fasten off, leaving a long tail for sewing. Do not stuff. Flatten the ear into a half-circle shape and sew to head.
Key3
- inc
- increase (2 sc in one stitch)
- sc
- single crochet
- ×
- repeat X times
Snout/Muzzle
Make 1 in white
- Round 1
6 sc in magic ring (6)
Key1
- sc
- single crochet
- Round 2
Inc in each st (12)
Key1
- inc
- increase (2 sc in one stitch)
- Round 3
[Sc 1, inc] × 6 (18)
Key3
- inc
- increase (2 sc in one stitch)
- sc
- single crochet
- ×
- repeat X times
- (18)Rounds 4–5
Sc in each st (18) [2 rounds]Fasten off, leaving a long tail for sewing. Stuff very lightly (just enough to give slight dimension) and sew to face.
Key1
- sc
- single crochet
Color Variations
Different Sweater Styles: Red and White: Classic candy cane look Blue and White: Sailor style Pink and Purple: Sweet feminine look
Rainbow: Use multiple colors for each stripe Single Color: Skip stripes for a solid sweater Different Bear Colors: Light brown/tan for a teddy bear look
Grey for a koala-inspired version White for a polar bear Black for a stylish modern look
Accessory Ideas
❶ Add a Scarf: Chain 60, sc in 2nd ch from hook and across
Making up
- Attach Head to BodyPin the head to the top of the body, ensuring it's centered. The neck should align where the body begins to decrease. Using the long tail from the head and whip stitch, sew securely all the way around. Add extra stuffing to both head and body before closing completely if needed.
- Position and Attach ArmsPlace arms on either side of the body at approximately round 10-11 (just above the first yellow stripe). Arms should point slightly downward. Pin in place to check positioning. Sew securely using whip stitch, making sure they're symmetrical. Sew through all layers for extra strength.
- Attach LegsPosition legs at the bottom of the body, slightly angled outward. The flat part of each leg should face downward. Pin in place. Sew securely to the bottom of the body using whip stitch. Make sure bear can sit upright when legs are properly positioned.
- Attach EarsPosition ears on top of head, approximately rounds 4-6. Space them about 8-10 stitches apart. Flatten the bottom edge of each ear. Pin in place to ensure symmetry. Sew the flattened edge to the head using whip stitch. Fold ears slightly forward for a more natural look.
- Attach SnoutPosition the white snout on the face, centered between and slightly below the eyes. The snout should cover approximately rounds 11-14 on the head. Pin in place. Sew around the edges using white yarn and whip stitch. Leave the top edge slightly loose for a more dimensional look.
- Embroider Facial FeaturesNose (Black Yarn): Using black yarn and yarn needle, embroider an inverted Y shape or triangle on the snout. Start at the bottom center of the snout. Create a vertical line going up about 3-4 stitches. From the top of this line, create two diagonal lines going down and outward. Go over the lines 2-3 times to make them bold and visible. Cheeks (Pink Yarn): Using pink yarn, embroider 3-4 diagonal lines on each cheek. Position them just below and slightly to the side of each eye. Lines should be about 2-3 stitches long. Space them evenly for a blushing effect. You can also make small "X" marks instead of lines.
- Final TouchesWeave in all loose ends. Gently reshape the bear if needed. Brush or pick at any yarn fuzz for a cleaner look. Give your bear a final check to ensure all parts are secure.
Notes from the pattern
- Use a 3.5mm (E-4) hook; amigurumi pieces this size rely on a tight gauge to stop stuffing from showing through the fabric.
- Place a stitch marker at the start of every round before moving on, since the whole bear is worked in continuous spiral with no joining round to mark the boundary.
- Stuff the head, body and arms firmly as each one is worked rather than waiting until the piece is finished, since later rounds close up quickly and leave little room to add filling afterwards.
- The sweater stripes are crocheted straight onto the body in brown, yellow and black, so plan colour carries before starting rather than cutting and rejoining yarn at every stripe.
- Count stitches after each round to avoid mistakes before moving on to the next one.
- Keep tension consistent throughout for even shaping. If the bear comes out too loose and shows stuffing, drop to a smaller hook; for a larger bear, use bulky yarn with a 5mm hook, and for a smaller bear, use sport weight yarn with a 2.5mm hook.
- To avoid a visible jog in the sweater stripes, use the jogless join method: always change colors in the last yarn over of the previous round, and carry the yarn inside the work rather than cutting it if stripes are close together, weaving in ends as you go.
The essentials
- Rounds
- 55
- Parts
- 8
- Level
- Intermediate
- Time
- 4-6 hours
- Hook
- 3.5 mm
- Yarn
- Worsted
Stitches you will use
- Magic ring starts and spiral shaping Used at the first round of the head, body and each arm; keep the centre loop pulled fully closed and count stitches after every round so increases land correctly.
- Colour changes for the striped sweater Worked directly on the body where the yellow and black stripes begin; keep tension even on the first stitch of a new colour to stop the join from puckering.
- Invisible decreasing to close curved pieces Used in the later rounds of the head and arms as stitch counts drop; work decreases evenly around the round rather than bunching them to keep the shape symmetrical.
Troubleshooting
The head wobbles or sits unevenly once sewn to the body
This usually comes from under-stuffing or pinning before checking alignment; stuff firmly, pin both pieces in place first, and only sew once the head sits centred and level.
The bee stripes on the body look wavy instead of straight
This happens when tension tightens or loosens on the first stitch after a colour change; keep that stitch at the same tension as the rest of the round and avoid pulling the new colour too snug.
A small hole remains at the centre of the head or an arm
This is left by a magic ring that was not pulled fully closed before working into it; tighten the loop firmly at the start, and weave the tail back through the centre stitches once the piece is finished.
Substituting yarn
- Cotton, worsted weight
- Stitches sit more crisply and the fabric is less stretchy, so stuffing shows less through gaps; the 3.5mm (E-4) hook still works but the finished bear feels firmer to hold.
- Acrylic, DK weight
- A lighter yarn than the worsted called for will produce a bear smaller than the stated 4.5-5 inches (11-13cm); dropping to roughly a 3mm hook helps keep the gauge tight enough to hold stuffing.
- Wool-blend, worsted weight
- Gives a softer, warmer drape but a slight fibre halo can blur the edges between the stripe colours on the body; stuff a little more firmly, as wool relaxes more than acrylic over time.
Washing and care
- Hand wash the finished bear in cool water with a mild detergent, then press out excess water in a towel rather than wringing, since twisting can distort the stuffed shape.
- Reshape the head, body and arms while still damp and lay flat to dry away from direct heat; once dry, store the bear somewhere it will not be compressed, so the amigurumi shaping holds.
FAQs
Questions
How much yarn does the whole bear use?
The main brown pieces take about 50g, with a small 10g amount for the snout. The sweater section uses 20g plus a further 15g, which also covers the nose embroidery, alongside a small amount for the cheeks.
What hook size is needed for this pattern?
The pattern is written for a 3.5mm (E-4) hook. This size keeps the stitches tight enough that stuffing does not show through the amigurumi fabric.
What size eyes does the bear use?
The pattern calls for 8mm or 9mm black safety eyes. Either size works with the stated finished height of roughly 4.5-5 inches (11-13cm).
How is the bee sweater made?
The sweater is not a separate piece; its yellow and black stripes are crocheted directly onto the body as part of the main construction. This means colour changes are managed mid-round rather than sewn on afterwards.
How long does this project usually take?
Most makers finish the bear, including assembly and embroidery, in around 4-6 hours. Pieces with more rounds, such as the 22-round body, take proportionally longer than the shorter arms.
These answers came from whoever first published the pattern, kept word for word.