 EVERY CROCHET
 Amigurumi 33 rounds No account, no download
Amigurumi chick and duckling crochet pattern
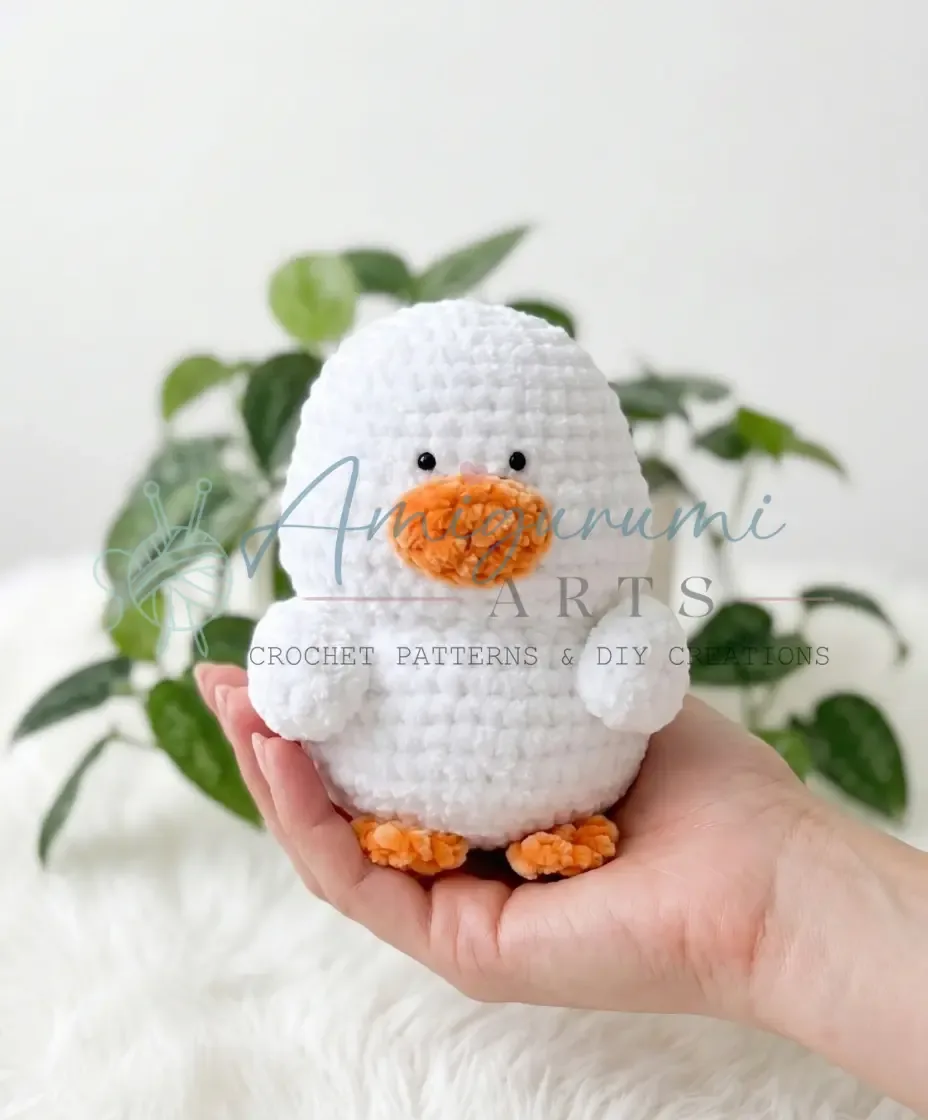
A worsted-weight amigurumi chick and duckling worked in single crochet (UK double crochet); both US and UK terms given.
- Skill
- Intermediate
- Time
- 4-6 hours
- Yarn weight
- Bulky
- Hook
- 6.0 mm

Intermediate
What the original write-up called it. Nothing here is graded again.

Bulky
What the sample was worked in. Any weight works; the size moves with it.

4-6 hours
What the original page reckoned. Your own pace is the one that matters.
About this pattern
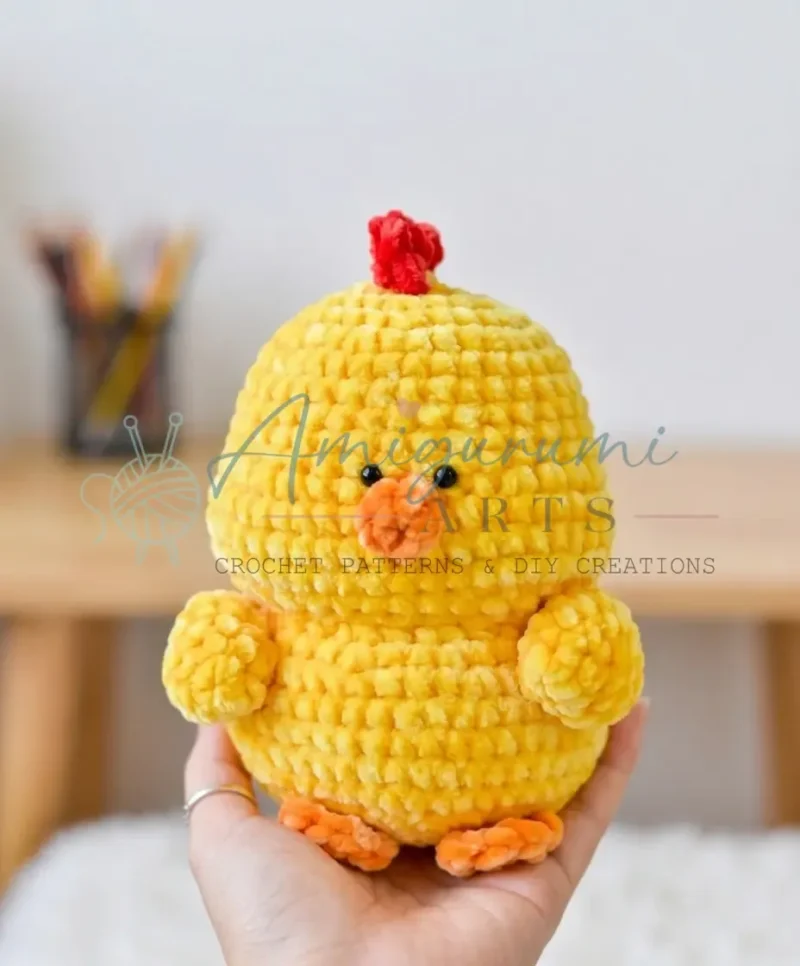
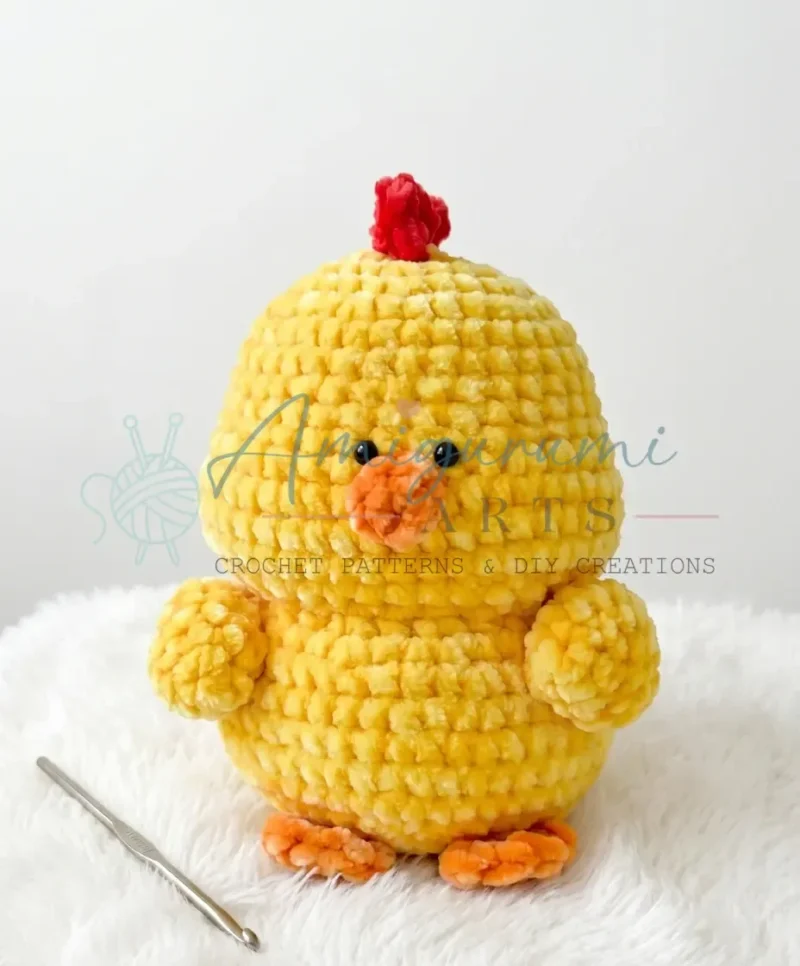
This pattern covers two amigurumi figures, a chick and a duckling, worked in single crochet (UK double crochet) with bulky plush yarn and a 6 mm hook. Pieces are made separately in continuous spiral rounds — head and body, arms, legs, beak, and comb — then stuffed, closed, and whipstitched together with 6 mm safety eyes set into the face. The sample measures about 6 inches (15 cm) tall.
This pattern makes a pair of small amigurumi figures, a chick and a duckling, built from basic single crochet (called double crochet in the UK). The stitch sits at the centre of nearly every round on both figures, so a maker needs to be comfortable with it before starting. Increases and decreases shape the rounded head and body, the stubby arms, and the small beak and comb pieces, all worked at the same bulky gauge with the plush yarn and 6 mm hook given in the materials list.
Each piece — arms, head and body, legs, beak, and comb — is worked separately in continuous spiral rounds, without joining, and finished with a long tail for sewing. The head and body is the longest piece at twenty-eight rounds, shaping from a flat magic ring start through increases to a stuffed, rounded form before closing the base opening. Safety eyes are inserted partway through the body shaping, and the smaller pieces are whipstitched on once everything is stuffed and closed, so planning placement before sewing keeps the finished figure symmetrical.
Materials
Yarn
- Plush / velvet yarn (bulky weight); yellow for the Chick, white for the Duckling, plus a coordinating color for the Chick’s comb and beak
Hook
- US J-10 / 6.0 mm
Safety eyes
- 6 mm, 2 per figure
Stuffing
- Polyester fiberfill
Stitch markers
- At least 1 (to mark the beginning of each round)
- Yarn needle / tapestry needle
- Scissors
- Craft glue or hot glue gun (for securing the comb, or as an alternative to sewing small pieces)
The list is the pattern's own wording.
Instructions
Every round is printed as the pattern wrote it, brackets and all. Open the key beside a round to see only the short forms that round uses.
Arms (Make 2)
- Round 1
6 sc in MR. (6)
Key2
- MR
- Magic Ring
- sc
- Single Crochet
- Round 2
sc, inc repeat 3 times. (9)
Key2
- inc
- Increase (2 sc in the same stitch)
- sc
- Single Crochet
- Round 3
2 sc, inc repeat 3 times. (12)
Key2
- inc
- Increase (2 sc in the same stitch)
- sc
- Single Crochet
- Rounds 4–5
sc in each st around. (12)
Key1
- sc
- Single Crochet
- Round 6
2 sc, dec repeat 3 times. (9)
Key2
- dec
- Decrease (invisible decrease recommended)
- sc
- Single Crochet
- Round 7
sc in each st around. (9)
Key1
- sc
- Single Crochet
- Round 8
sc, dec repeat 3 times, sl st. (6)Fasten off, leaving a long yarn tail for sewing. Do not stuff.
Key3
- sl st
- Slip Stitch
- dec
- Decrease (invisible decrease recommended)
- sc
- Single Crochet
Head and Body
- Round 1
8 sc in MR. (8)
Key2
- MR
- Magic Ring
- sc
- Single Crochet
- Round 2
inc in each st around. (16)
Key1
- inc
- Increase (2 sc in the same stitch)
- Round 3
sc, inc repeat 8 times. (24)
Key2
- inc
- Increase (2 sc in the same stitch)
- sc
- Single Crochet
- Round 4
3 sc, inc repeat 6 times. (30)
Key2
- inc
- Increase (2 sc in the same stitch)
- sc
- Single Crochet
- Round 5
2 sc, inc, 2 sc repeat 6 times. (36)
Key2
- inc
- Increase (2 sc in the same stitch)
- sc
- Single Crochet
- Rounds 6–10
sc in each st around. (36)Insert safety eyes between Rnds 10–11 before closing.
Key1
- sc
- Single Crochet
- Round 11
10 sc, 5 inc, 6 sc, 5 inc, 10 sc. (46)
Key2
- inc
- Increase (2 sc in the same stitch)
- sc
- Single Crochet
- Rounds 12–14
sc in each st around. (46)
Key1
- sc
- Single Crochet
- Round 15
10 sc, 5 dec, 6 sc, 5 dec, 10 sc. (36)
Key2
- dec
- Decrease (invisible decrease recommended)
- sc
- Single Crochet
- Round 16
10 sc, 3 dec, 4 sc, 3 dec, 10 sc. (30)
Key2
- dec
- Decrease (invisible decrease recommended)
- sc
- Single Crochet
- Round 17
9 sc, sc, inc repeat 6 times, 9 sc. (36)
Key2
- inc
- Increase (2 sc in the same stitch)
- sc
- Single Crochet
- Round 18
5 sc, inc repeat 6 times. (42)
Key2
- inc
- Increase (2 sc in the same stitch)
- sc
- Single Crochet
- Round 19
6 sc, inc repeat 6 times. (48)
Key2
- inc
- Increase (2 sc in the same stitch)
- sc
- Single Crochet
- Rounds 20–23
sc in each st around. (48)
Key1
- sc
- Single Crochet
- Round 24
4 sc, dec repeat 8 times. (40)
Key2
- dec
- Decrease (invisible decrease recommended)
- sc
- Single Crochet
- Round 25
3 sc, dec repeat 8 times. (32)
Key2
- dec
- Decrease (invisible decrease recommended)
- sc
- Single Crochet
- Round 26
2 sc, dec repeat 8 times. (24)
Key2
- dec
- Decrease (invisible decrease recommended)
- sc
- Single Crochet
- Round 27
sc, dec repeat 8 times. (16)
Key2
- dec
- Decrease (invisible decrease recommended)
- sc
- Single Crochet
- Round 28
dec 8 times. (8)Stuff firmly but not too tightly, then close the opening and weave in the end.
Key1
- dec
- Decrease (invisible decrease recommended)
Legs (Make 2)
- Round 1
6 sc in MR. (6)
Key2
- MR
- Magic Ring
- sc
- Single Crochet
- Round 2
(sc, hdc in 1 st), (ch 1, hdc, sc in 1 st) repeat 2 times, 3 sl st. (6)Fasten off, leaving a long yarn tail for sewing.
Key4
- sl st
- Slip Stitch
- hdc
- Half Double Crochet
- ch
- Chain
- sc
- Single Crochet
Beak
- Round 1
5 sc in MR. (5)
Key2
- MR
- Magic Ring
- sc
- Single Crochet
- Round 2
5 sc, sl st. (5)Fasten off, leaving a long yarn tail for sewing.
Key2
- sl st
- Slip Stitch
- sc
- Single Crochet
Duckling Beak
- Round 1
Ch 4. Starting from the 2nd chain from the hook: inc, sc, 3 sc in 1 st, 2 sc. (8)
Key3
- inc
- Increase (2 sc in the same stitch)
- ch
- Chain
- sc
- Single Crochet
- Round 2
2 inc, sc, 3 inc, sc, inc. (14)
Key2
- inc
- Increase (2 sc in the same stitch)
- sc
- Single Crochet
- Round 3
14 sc, sl st. (14)Fasten off, leaving a long yarn tail for sewing.
Key2
- sl st
- Slip Stitch
- sc
- Single Crochet
Comb
Ch 5. Starting from the 3rd chain from the hook: (2 hdc + ch 1 + sl st in 1 st), sl st in the next st, (hdc + dc + hdc + ch 2 + sl st in 1 st).
Fasten off, leaving a yarn tail for sewing or use craft glue to secure.
Making up
- Step 1Safety eyes: Insert the 6 mm safety eyes between Rnds 10–11 on the Head and Body piece, spaced evenly on either side of the face. Secure the backings firmly from the inside before stuffing.
- Step 2Close the body: After stuffing, use the yarn tail to close the 8-stitch opening at the base with a whipstitch. Weave in the end.
- Step 3Attach the beak: Pin the beak centered on the face between Rnds 11–14. Sew it on using the yarn tail and a whipstitch around the opening edge.
- Step 4Attach the comb (Chick only): Position the comb on the top of the head and sew or glue it securely in place.
- Step 5Attach the arms: Sew one arm to each side of the body between Rnds 17–19, using the yarn tail and a whipstitch. Make sure both arms sit at the same height before fastening off.
- Step 6Attach the legs: Sew the legs to the base of the body, positioning them evenly so the figure sits upright and balanced.
- Step 7Weave in all remaining ends.
Notes from the pattern
- The pattern calls for a US J-10 / 6 mm hook, sized for bulky plush yarn; swapping to a smaller hook with the same yarn tightens stitches and shrinks the finished chick or duckling.
- least one stitch marker is needed to track the start of each round, since both figures are worked in a continuous spiral with no joining slip stitch between rounds.
- Gauge is not critical for this project; finished size will vary slightly based on yarn and tension. The sample measures approximately 6 inches (15 cm) tall using plush yarn and a 6.0 mm hook. Do not overstuff — a firm but slightly squishy result looks and feels best with plush yarn.
- A coordinating colour is used only for the Chick's beak and comb; these are worked as separate small pieces in the contrast yarn rather than changed mid-round, so no colour-change technique is needed within a round.
The essentials
- Rounds
- 33
- Parts
- 6
- Level
- Intermediate
- Time
- 4-6 hours
- Hook
- 6.0 mm
- Yarn
- Bulky
Stitches you will use
- Magic ring (MR) start Used to begin every separate piece — arms, legs, head and body, beak — keeping the centre of each round closed without a visible hole; pull the tail firm before the first round of single crochet.
- Continuous spiral single crochet Both figures are worked without joining rounds, so a stitch marker is essential on the head and body's twenty-eight rounds to track where each new round begins.
- Increasing to shape rounds The head and body builds from 8 to 36 stitches over the first five rounds through evenly spaced increases; a missed increase shows as an uneven curve by the later rounds.
Troubleshooting
The head and body looks lopsided once stuffed
Uneven stuffing density pushes the shape off to one side, especially around the safety eye rounds. Add fibrefill in small amounts, checking the roundness from several angles before closing the base opening.
Safety eyes end up uneven or at the wrong height
The eyes are set between Rounds 10–11 without obvious landmarks for left-right spacing. Count stitches across the face before pushing the posts through, and secure the backings only once both eyes look level from the front.
Rounds drift and the piece spirals
Losing track of the round start in continuous spiral work lets stitch counts creep. Move the stitch marker up every round and recount stitches at the end of each round against the number given in the pattern.
Substituting yarn
- DK or worsted-weight cotton or acrylic
- Produces a noticeably smaller chick or duckling than the plush bulky original, needs a smaller hook (around 3.5–4 mm) to keep stitches tight enough to hide the stuffing, and shows stitch definition clearly instead of a soft, fuzzy surface.
- Smooth bulky-weight acrylic (non-plush)
- Keeps the finished size close to the original at the same 6 mm hook, but the surface shows each stitch rather than blending into a soft pile, so tension needs to be a little tighter to fully hide the fibrefill.
- Chenille or velvet-style bulky yarn, different range
- Behaves closest to the yarn specified, holding drape and softness at the same 6 mm hook, though thickness varies between ranges, so a quick swatch against the stated stitch counts is worth checking before starting the head and body.
Washing and care
- Hand wash the finished chick or duckling in cool water, since the plush/velvet yarn is polyester and reacts to heat by flattening its pile; avoid machine washing or wringing.
- Reshape gently while damp and lay flat to air dry, away from direct heat; store stuffed and unflattened rather than packed under other items, so the plush texture and rounded shape hold.
The photographs taken while this was being made
Every one was taken by whoever published the pattern, in the order the source listed them.
FAQs
Questions
Is this pattern written in US or UK crochet terms?
The pattern uses US terminology throughout, so single crochet refers to what is called double crochet in the UK. Keep this in mind if cross-referencing UK stitch charts or tutorials.
How tall is the finished chick or duckling?
The sample measures approximately 6 inches (15 cm) tall. Because gauge is not treated as critical, actual size will vary slightly with yarn thickness and tension.
What size hook and safety eyes does the pattern use?
A US J-10 / 6 mm hook is used throughout, with 6 mm safety eyes, two per figure. The same hook size works for both the chick and the duckling.
Can the chick and duckling be made from the same set of pieces?
Both figures share the same overall construction — head and body, arms, legs — worked in yellow for the chick and white for the duckling. The duckling has its own beak worked over three rounds rather than the chick's two-round beak.
Does this pattern require joining at the end of each round?
No, both figures are worked in a continuous spiral throughout, so rounds are not joined with a slip stitch. A stitch marker is needed to keep track of where each round begins.
These answers came from whoever first published the pattern, kept word for word.