 EVERY CROCHET
 Amigurumi 39 rounds No account, no download
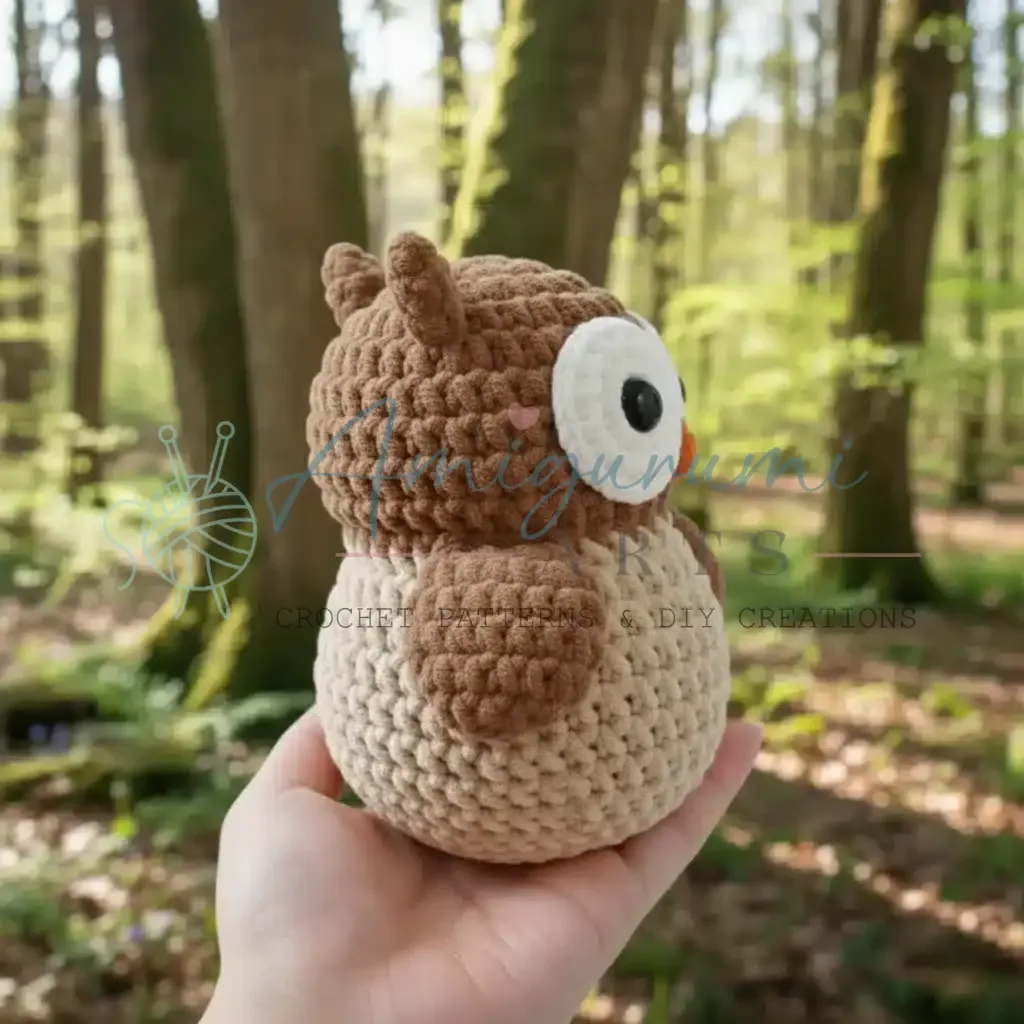
A cuddly amigurumi owl worked in single crochet
A sitting amigurumi owl in single crochet (UK: double crochet), with both US and UK stitch terms given throughout.
- Skill
- Intermediate
- Time
- 4-6 hours
- Yarn weight
- Worsted
- Hook
- 4.5 mm

Intermediate
What the original write-up called it. Nothing here is graded again.

Worsted
What the sample was worked in. Any weight works; the size moves with it.

4-6 hours
What the original page reckoned. Your own pace is the one that matters.
About this pattern
This pattern produces a small amigurumi owl worked in single crochet (UK: double crochet), finished at approximately 19cm (7.5 inches) tall with an oval sitting body and no separate legs. The head and body are crocheted as one continuous piece using a magic ring start, increases and decreases, and a front-loop-only round; eyes, beak, ears and wings are worked separately and sewn on afterwards.
This cuddly owl amigurumi is worked entirely in single crochet (UK: double crochet), the dense stitch family that gives amigurumi its firm, stuffable fabric and hides fibrefill without gaps. Finished, the owl stands approximately 19cm (7.5 inches) tall, with a rounded head, an oval sitting body and no separate legs — the flat oval base lets it sit upright unaided. Brown yarn forms the main head and body, with beige/cream marking the belly, white and orange for the eyes and beak, and a touch of black for embroidered facial details.
Construction starts at the crown of the head and continues down through the body without a seam, the two sections joined in a single continuous piece rather than crocheted separately and stitched together. A front-loop-only round marks the shift from head to body, leaving a visible ridge that reads as the owl's neckline. The eyes, beak, ears and wings are each worked as separate small pieces, stuffed lightly where needed, and sewn on once the main body is complete and firmly stuffed.
Materials
Yarn
- Bernat #5 Bulky Yarn – Brown (head and body)
- Bernat #5 Bulky Yarn – Beige/Cream (belly accent)
- Bernat #5 Bulky Yarn – White (eyes)
- Bernat #5 Bulky Yarn – Orange (beak)
- Bernat #5 Bulky Yarn – Black (small amount, for embroidery details)
Tools and Supplies
- 4.5mm (7) Crochet Hook
- Stitch marker
- Sewing needle
- Scissors
- Fiberfill stuffing
- 12mm plastic safety eyes
The list is the pattern's own wording.
Instructions
Every round is printed as the pattern wrote it, brackets and all. Open the key beside a round to see only the short forms that round uses.
Starting the Head
This section creates the main structure of your owl, combining the head and body into one continuous piece. Use brown yarn as your primary color, switching to beige/cream when indicated in bold.
- Round 1
6SC in MR (6)
Key1
- mr
- magic ring
- Round 2
6INC (12)
- Round 3
(SC, INC) 6 times (18)
Key2
- inc
- increase
- sc
- single crochet
- Round 4
(SC, INC) 9 times (27)
Key2
- inc
- increase
- sc
- single crochet
- Round 5
27SC (27)
- Round 6
(8SC, INC) 3 times (30)
Key1
- inc
- increase
- Round 7
30SC (30)
- Round 8
7SC, 3INC, 10SC, 3INC, 7SC (36)
- Round 9
36SC (36)Use a different colored yarn to mark the eye position: Between rows 8 and 9 First eye between stitches 14 and 15 Second eye between stitches 21 and 22
- Round 10
(2SC, DEC) 9 times (27)
Key1
- dec
- decrease
- Round 11
(SC, DEC) 9 times (18)*Stuffing*Creating professional eye sockets: this step is crucial for achieving that authentic owl appearance. Thread yarn from the neck area through designated points to create natural-looking indentations where the eyes will sit. Thread yarn from neck through point A to C, then from point B to D. Pull yarn tight and tie securely to create eye sockets. Hide excess yarn inside the head. Attach plastic safety eyes between R8-9 at the marked points.
Key2
- dec
- decrease
- sc
- single crochet
Eyes (Make 2)
The white eye bases frame your safety eyes and give your owl that signature wide-eyed look. Use White yarn.
- Round 1
6SC in MR (6)
Key1
- mr
- magic ring
- Round 2
6INC (12)
- Round 3
(SC, INC) 6 times (18)
Key2
- inc
- increase
- sc
- single crochet
- Round 4
(SC, INC) 9 times (27)Cut yarn and leave long tail for sewing.Eye Assembly: Position the white eye pieces on the face between R8-9. Ensure plastic safety eyes are perfectly centered. Sew the white eyes firmly around the plastic eyes. Create a slight oval shape as you sew (owl eyes are characteristically wide).
Key2
- inc
- increase
- sc
- single crochet
Beak
The small orange beak adds personality to your owl’s face.
Use Orange yarn
- Round 1
4SC in MR (4)
Key1
- mr
- magic ring
- Round 2
4INC (8)
- Round 3
8SC (8)
- Round 4
(2SC, DEC) 2 times (6)
Key1
- dec
- decrease
- Round 5
6SC (6)
- Round 6
(SC, DEC) 2 times (4)Cut yarn and leave long tail for assemblyBeak Assembly: Position the beak between the eyes, directly below them. Stuff very lightly to maintain the shape. Sew in an inverted triangle shape for realistic appearance.
Key2
- dec
- decrease
- sc
- single crochet
Ears/Horns (Make 2)
These characteristic tufts give your owl its distinctive silhouette. Use Brown yarn.
- Ears/Horns
Attach Brown yarn to R4 of head; (Chain 2, DC, chain 2 and slst) in the same stitch; Cut yarn and hide endsEar Positioning: Right ear: Attach to R4 beside right eye. Left ear: Attach to R4 beside left eye. Distance: About 4-5 stitches from eyes for balanced appearance.
Key2
- slst
- slip stitch
- dc
- double crochet
Wings (Make 2)
Use Brown yarn
- Round 1
6SC in MR (6)
Key1
- mr
- magic ring
- Round 2
6INC (12)
- Round 3
(SC, INC) 6 times (18)
Key2
- inc
- increase
- sc
- single crochet
- Round 4
18SC (18)
- Round 5
(SC, DEC) 6 times (12)
Key2
- dec
- decrease
- sc
- single crochet
- Round 6
6DEC (6)Flatten then 3SC through both sides to close. Cut yarn and leave long tail for sewing.Wing Assembly: Position wings on sides of body between R14-R16. Angle them slightly outward and downward for natural appearance. Sew firmly along the top edge to ensure they stay in place.
Continuing to Body
- Round 12
3SC, 2DEC, 4SC, 2DEC, 3SC (14)
- Round 13
FLO for all sts: (SC, INC) 7 times (21)Work in front loop only
Key4
- sts
- stitches
- inc
- increase
- flo
- front loops only
- sc
- single crochet
- Round 14
21SC (21)
- Round 15
(INC, 2SC) 7 times (28)
Key1
- inc
- increase
- Rounds 16–17
28SC (28)
Creating the Oval Body Shape
- Round 18
6SC , HDC, DC-INC, HDC, 3SC, BO (4 loops), 3SC, BO (4 loops), 3SC, HDC, DC-INC, HDC, 5SC (30)Bold text indicates use Beige/Cream yarn for those stitches Note: The BO (bobbles) stitches create a beautiful feather texture on the belly
Key5
- dc-inc
- double crochet increase
- hdc
- half double crochet
- inc
- increase
- dc
- double crochet
- BO
- bobble stitch
- Round 19
28SC, 2SC (30)Continue alternating colors as indicated
- Round 20
BLO for all sts: (SC, DEC) 10 times (20)*Stuffing*
Key4
- sts
- stitches
- dec
- decrease
- blo
- back loops only
- sc
- single crochet
- Round 21
(2SC, DEC) 5 times (15)
Key1
- dec
- decrease
- Round 22
(SC, DEC) 5 times (10)
Key2
- dec
- decrease
- sc
- single crochet
- Round 23
5DEC (5)Cut yarn and use sewing needle to close the opening
Embroidery Details
Using black yarn, add these finishing touches to bring your owl to life.
Eyelashes Draw 2-3 short lines above each eye. Curve lashes upward for a friendly expression.
Eyebrows (optional) Short curved line above each eye creates an even cuter expression.
Eye highlights You can add small white dots for light reflection.
Making up
- Follow these tips to achieve a professional-looking finished product:
- Step 2Shape the body by gently manipulating it with your hands to enhance the oval shape
- Step 3Fluff the stuffing and distribute filling evenly throughout
- Step 4Weave in all yarn ends securely and hide them inside
- Step 5Steam gently if desired to even out stitches (optional)
- Step 6Ensure wings are positioned symmetrically
Notes from the pattern
- Work with a 4.5mm (US size 7) hook throughout; a firmer gauge than usual amigurumi practice helps stitches close up tightly around the fibrefill stuffing.
- Each round finishes with a slip stitch and a chain 1 rather than a continuous spiral, so a stitch marker is most useful for marking the join point after each round rather than for tracking spiral progress.
- Colour changes fall at clear points — white to brown on the head, orange for the beak — so weave in ends as they occur rather than leaving several to sort out at finishing.
- Stuff the oval body firmly and evenly before closing the final rounds, since this shape, rather than legs, supports the whole finished owl in a sitting position.
- Try different color combinations for variety: a Snowy Owl in white with light gray accents, a Barn Owl in cream with light brown markings, a traditional dark brown owl with a beige belly, or bright, fun colors for a children's toy.
- Approximate finished dimensions: head width about 7cm, body width about 8cm, total height about 19cm, and wing length about 6cm; size may vary based on yarn tension and hook size.
The essentials
- Rounds
- 39
- Parts
- 8
- Level
- Intermediate
- Time
- 4-6 hours
- Hook
- 4.5 mm
- Yarn
- Worsted
Stitches you will use
- Magic ring (MR) start Used to begin the head, beak and other rounded pieces; pull the tail tight so no hole shows at the centre once stuffed.
- Increases and decreases (INC/DEC) Used throughout the head, body and beak to shape curves; check the stitch count in brackets after each round to catch a missed repeat early.
- Working in the front loop only (FLO) Used at the join between head and body; leaves the back loops free to create a visible ridge, so keep tension even to avoid a loose gap at that round.
Troubleshooting
Eyes are not symmetrical
Use stitch markers carefully and measure the distance from center before attaching.
Body not oval enough
Add more BO (bobble) stitches in the front and stuff more firmly in the bottom section.
Wings are drooping
Sew along the entire edge using strong, hidden stitching techniques.
Head appears too large
Try using a smaller 4mm hook for the head section only.
Substituting yarn
- DK-weight cotton
- Produces a smaller, firmer owl with sharper stitch definition, though the lower loft needs slightly more stuffing to fill the same shape; drop to a 3.5-4mm hook.
- Worsted-weight acrylic
- Closest match to the pattern's finished size of 19cm; the yarn's spring keeps stitches even and helps the oval body hold its shape without extra shaping.
- Chunky-weight velvet or chenille yarn
- Produces a noticeably larger, softer owl with stitch definition mostly hidden under the plush surface, requiring a larger hook and giving less visible detail on the ears and beak edges.
Washing and care
- Hand wash in cold water with mild detergent, then air dry flat on a towel. Do not machine wash, tumble dry, or use bleach.
- Reshape gently while damp if needed, and store the owl stuffed and upright rather than pressed flat so the oval body keeps its rounded sitting shape between uses.
FAQs
Questions
What skill level is required for this cuddly owl pattern?
This pattern is rated as intermediate (4 out of 5 stars). You should be comfortable with magic rings, basic stitches (SC, HDC, DC), increasing and decreasing, color changes, sewing pieces together, and basic embroidery. The estimated completion time is 4-6 hours.
Can I use different yarn weight for this owl pattern?
While this pattern is designed for Bernat #5 Bulky Yarn with a 4.5mm hook, you can use different yarn weights. Just remember that using lighter yarn and smaller hooks will result in a smaller owl, while heavier yarn will make a larger owl. Always match your hook size to your yarn weight.
Why do I need to create eye sockets for this pattern?
Creating eye sockets by threading yarn through specific points and pulling tight gives your owl a professional, sculpted appearance. This technique creates natural indentations that make the eyes look more realistic and three-dimensional, which is crucial for achieving that authentic owl expression.
Can I sell the owls I make from this pattern?
Yes, you may sell finished owls that you create using this pattern. However, you cannot copy, redistribute, or sell the pattern itself, claim the pattern as your own, share the pattern text without permission, or mass-produce items for commercial sale without permission.
These answers came from whoever first published the pattern, kept word for word.