 EVERY CROCHET
 Amigurumi 67 rounds No account, no download
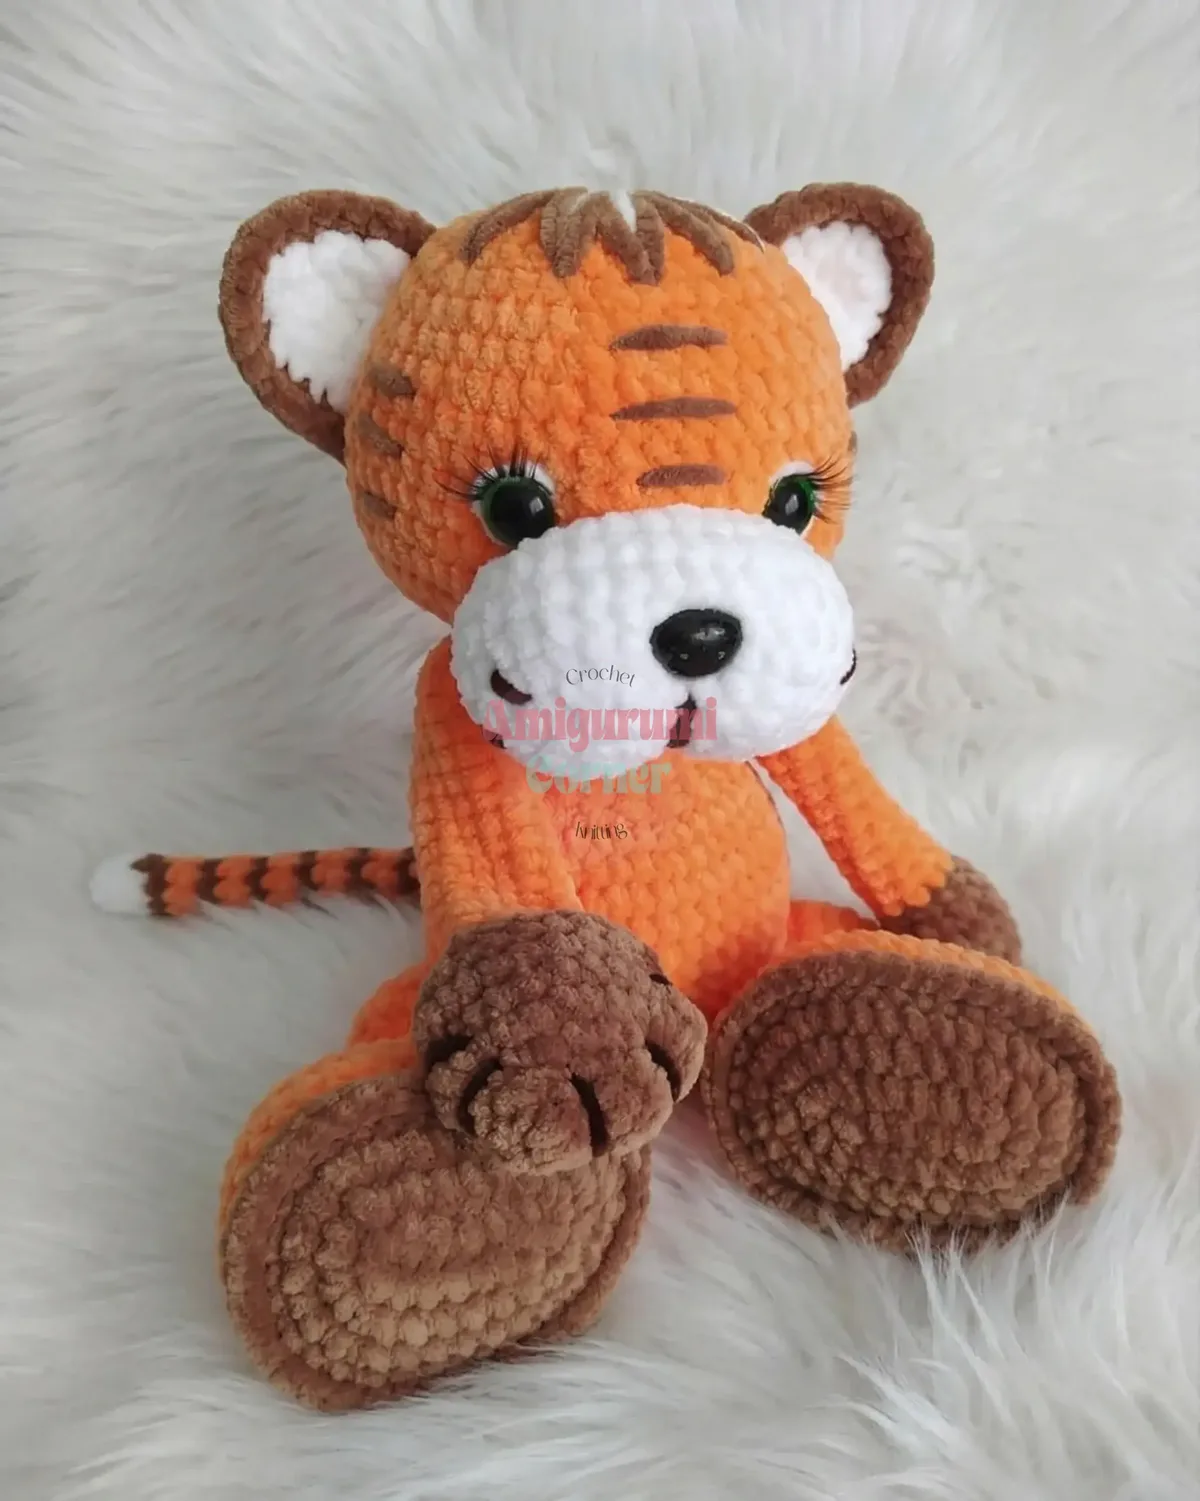
How to crochet a plush tiger amigurumi
Plush tiger amigurumi worked in single crochet (UK double crochet); US and UK stitch terms both given.
- Skill
- Intermediate
- Time
- 6-9 hours
- Yarn weight
- DK (Light Worsted)
- Hook
- 4 mm

Intermediate
What the original write-up called it. Nothing here is graded again.

DK (Light Worsted)
What the sample was worked in. Any weight works; the size moves with it.

6-9 hours
What the original page reckoned. Your own pace is the one that matters.
About this pattern
A plush tiger amigurumi worked in continuous spiral single crochet (UK double crochet) with worsted-weight plush yarn and a 4 mm hook. Feet, legs, arms, ears, tail and muzzle are made separately, while the body and head form one piece across 46 rounds. Legs join directly into the body, eyes are set as safety or half-bead eyes, and the toy is firmly stuffed with polyfill before closing.
This plush tiger amigurumi belongs to the single crochet (UK: double crochet) family of stitches, the tight, interlocking fabric that holds its shape without a lining and keeps polyfill stuffing from peeking through. Shaping comes from simple increase and decrease sequences worked in spiral rounds rather than from stitch pattern changes, so the finished tiger reads as rounded, firm and toy-like rather than lacy or textured. The accent colour appears only on the feet and two of the four ears.
Construction follows a part-based build rather than a single continuous shape: the feet, legs, arms, ears, tail and muzzle are each worked separately and set aside, while the body and head are made as one continuous piece across 46 rounds (33 for the body, continuing into the head). The legs are joined into the body mid-round rather than sewn on afterwards, which keeps the join nearly invisible but means the leg placement round has to be worked accurately. Safety eyes and a muzzle are added once the head shaping is complete.
The finished tiger stands approximately 30–35 cm tall depending on tension and yarn substitution, with a total working time of roughly 8–12 hours across multiple sessions — a beginner-to-intermediate project for anyone comfortable with basic single crochet and simple shaping in the round.
Materials
- Himalaya Dolphin Baby yarn (100% polyester, 120m/100g): Main color 80316 — 2 skeins; Accent color 80765 — 0.5 skein (Substitute: YarnArt Dolce color 778)
- Polyfill stuffing (holloffiber or equivalent)
- Crochet hook: 4 mm
- Safety eyes / half-bead eyes: 14 mm diameter
- Tapestry needle, scissors, clear craft glue
Plastic nose
- approximately 18×20 mm
The list is the pattern's own wording.
Instructions
Every round is printed as the pattern wrote it, brackets and all. Open the key beside a round to see only the short forms that round uses.
Feet (make 2)
Begin with accent color.
- Round 1
Ch 7, starting in 2nd ch from hook: 5 sc, 4 sc in one stitch, working along opposite side of chain: 5 sc, 4 sc in one stitch. (18)
Key2
- ch
- chain
- sc
- single crochet
- Round 2
5 sc, (inc) × 4, 5 sc, (inc) × 4. (26)
Key2
- inc
- increase (2 sc in same stitch)
- sc
- single crochet
- Round 3
5 sc, (sc, inc) × 4, 5 sc, (sc, inc) × 4. (34)
Key2
- inc
- increase (2 sc in same stitch)
- sc
- single crochet
- Round 4
5 sc, (2 sc, inc) × 4, 5 sc, (2 sc, inc) × 4. (42)Switch to main color.
Key2
- inc
- increase (2 sc in same stitch)
- sc
- single crochet
- Round 5
BLO — 42 sc. (42)
Key2
- BLO
- back loop only
- sc
- single crochet
- Rounds 6–8
42 sc. (3 rounds)
Key1
- sc
- single crochet
- Round 9
5 sc, (2 sc, dec) × 4, 5 sc, (2 sc, dec) × 4. (34)
Key2
- dec
- decrease (invisible decrease)
- sc
- single crochet
- Round 10
5 sc, (sc, dec) × 4, 5 sc, (sc, dec) × 4. (26)
Key2
- dec
- decrease (invisible decrease)
- sc
- single crochet
- Round 11
5 sc, (dec) × 4, 5 sc, (dec) × 4. (18)
Key2
- dec
- decrease (invisible decrease)
- sc
- single crochet
- Round 12
(sc, dec) × 6. (12)Close the opening and weave in the end.Join accent color yarn to Rnd 4 and work in FLO: 42 sc, sl st. Fasten off and weave in end.
Key4
- sl st
- slip stitch
- dec
- decrease (invisible decrease)
- FLO
- front loop only
- sc
- single crochet
Legs (make 2)
- Round 1
Ch 19, starting in 2nd ch from hook: 18 sc, join into a ring. (18)
Key2
- ch
- chain
- sc
- single crochet
- Rounds 2–14
18 sc. (13 rounds) Fasten off, leaving a long tail for sewing. Sew this open end to the foot. Do not stuff. The other end (where you began) will be joined directly into the body by working through both walls simultaneously.
Key1
- sc
- single crochet
Arms (make 2)
- Round 1
6 sc in magic ring. (6)
Key1
- sc
- single crochet
- Round 2
(inc) × 6. (12)
Key1
- inc
- increase (2 sc in same stitch)
- Round 3
(sc, inc) × 6. (18)
Key2
- inc
- increase (2 sc in same stitch)
- sc
- single crochet
- Round 4
(2 sc, inc) × 6. (24)
Key2
- inc
- increase (2 sc in same stitch)
- sc
- single crochet
- Rounds 5–7
24 sc. (3 rounds)
Key1
- sc
- single crochet
- Round 8
(2 sc, dec) × 6. (18)
Key2
- dec
- decrease (invisible decrease)
- sc
- single crochet
- Round 9
(dec) × 6, 6 sc. (12)
Key2
- dec
- decrease (invisible decrease)
- sc
- single crochet
- Rounds 10–24
12 sc. (15 rounds) Stuff only the lower rounded portion (paw end). Flatten the top and work 5 sc through both layers to close. Fasten off, leaving a tail for sewing. Sew arms to the body.
Key1
- sc
- single crochet
Body and Head (worked in one piece)
- Round 1
6 sc in magic ring. (6)
Key1
- sc
- single crochet
- Round 2
(inc) × 6. (12)
Key1
- inc
- increase (2 sc in same stitch)
- Round 3
(inc) × 12. (24)
Key1
- inc
- increase (2 sc in same stitch)
- Round 4
(3 sc, inc) × 6. (30)
Key2
- inc
- increase (2 sc in same stitch)
- sc
- single crochet
- Round 5
(4 sc, inc) × 6. (36)
Key2
- inc
- increase (2 sc in same stitch)
- sc
- single crochet
- Round 6
(5 sc, inc) × 6. (42)
Key2
- inc
- increase (2 sc in same stitch)
- sc
- single crochet
- Round 7
(6 sc, inc) × 6. (48)
Key2
- inc
- increase (2 sc in same stitch)
- sc
- single crochet
- Round 8
Join legs here — 8 sc working through both the body and one leg simultaneously, 16 sc, 8 sc working through both the body and the second leg simultaneously, 16 sc. (48)
Key1
- sc
- single crochet
- Rounds 9–15
48 sc. (7 rounds)
Key1
- sc
- single crochet
- Round 16
(6 sc, dec) × 6. (42)
Key2
- dec
- decrease (invisible decrease)
- sc
- single crochet
- Round 17
(5 sc, dec) × 6. (36)
Key2
- dec
- decrease (invisible decrease)
- sc
- single crochet
- Round 18
8 sc, (dec) × 6, 16 sc. (30)
Key2
- dec
- decrease (invisible decrease)
- sc
- single crochet
- Rounds 19–22
30 sc. (4 rounds)
Key1
- sc
- single crochet
- Round 23
(3 sc, dec) × 6. (24)
Key2
- dec
- decrease (invisible decrease)
- sc
- single crochet
- Round 24
(dec) × 12. (12) — This completes the body. The next rounds begin the head —
Key1
- dec
- decrease (invisible decrease)
- Round 25
(inc) × 12. (24)
Key1
- inc
- increase (2 sc in same stitch)
- Round 26
(sc, inc) × 12. (36)
Key2
- inc
- increase (2 sc in same stitch)
- sc
- single crochet
- Round 27
(5 sc, inc) × 6. (42)
Key2
- inc
- increase (2 sc in same stitch)
- sc
- single crochet
- Round 28
(6 sc, inc) × 6. (48)
Key2
- inc
- increase (2 sc in same stitch)
- sc
- single crochet
- Round 29
(7 sc, inc) × 6. (54)
Key2
- inc
- increase (2 sc in same stitch)
- sc
- single crochet
- Round 30
(8 sc, inc) × 6. (60)
Key2
- inc
- increase (2 sc in same stitch)
- sc
- single crochet
- Rounds 31–34
60 sc. (4 rounds)
Key1
- sc
- single crochet
- Round 35
(8 sc, dec) × 6. (54)
Key2
- dec
- decrease (invisible decrease)
- sc
- single crochet
- Round 36
(7 sc, dec) × 6. (48)
Key2
- dec
- decrease (invisible decrease)
- sc
- single crochet
- Rounds 37–38
48 sc. (2 rounds)
Key1
- sc
- single crochet
- Round 39
(6 sc, dec) × 6. (42)
Key2
- dec
- decrease (invisible decrease)
- sc
- single crochet
- Round 40
42 sc.
Key1
- sc
- single crochet
- Round 41
(5 sc, dec) × 6. (36)
Key2
- dec
- decrease (invisible decrease)
- sc
- single crochet
- Round 42
(4 sc, dec) × 6. (30)
Key2
- dec
- decrease (invisible decrease)
- sc
- single crochet
- Round 43
(3 sc, dec) × 6. (24)
Key2
- dec
- decrease (invisible decrease)
- sc
- single crochet
- Round 44
(2 sc, dec) × 6. (18)
Key2
- dec
- decrease (invisible decrease)
- sc
- single crochet
- Round 45
(sc, dec) × 6. (12)
Key2
- dec
- decrease (invisible decrease)
- sc
- single crochet
- Round 46
(dec) × 6. (6)Fasten off, pull the yarn tail through remaining stitches to close, and weave in end.
Key1
- dec
- decrease (invisible decrease)
Ears (make 4 total — 2 main color, 2 accent color)
Worked in flat rows. Begin each new row with 1 ch (turning chain).
- Round 1
Ch 2, 3 sc in 2nd ch from hook. (3)
Key2
- ch
- chain
- sc
- single crochet
- Round 2
Inc, sc, inc. (5)
Key2
- inc
- increase (2 sc in same stitch)
- sc
- single crochet
- Round 3
Inc, 3 sc, inc. (7)
Key2
- inc
- increase (2 sc in same stitch)
- sc
- single crochet
- Rounds 4–5
7 sc. (2 rows) Fasten off main color ear pieces and weave in ends. Place one accent piece and one main color piece together. Work sc evenly around the perimeter. Turn work and sc around again. Fasten off, leaving a tail for sewing.Attach ears 3 stitches back from the top center of the head, with 10 stitches between the inner edges of the two ears.
Key1
- sc
- single crochet
Tail
Begin with main color.
- Round 1
7 sc in magic ring. (7)
Key1
- sc
- single crochet
- Rounds 2–3
7 sc. (2 rounds — main color) Switch to accent color.
Key1
- sc
- single crochet
- Round 4
7 sc. Switch to main color.
Key1
- sc
- single crochet
- Rounds 5–6
7 sc. (2 rounds) Switch to accent color.
Key1
- sc
- single crochet
- Round 7
7 sc. (7)
Key1
- sc
- single crochet
- Rounds 8–25
Repeat Rnds 5–7, alternating colors as established. (18 rounds) Do not stuff. Flatten the tail and work 3 sc through both layers to close. Fasten off, leaving a tail for sewing. Sew the tail to the body in the round immediately after the leg join row.
Key1
- sc
- single crochet
Muzzle
- Round 1
Ch 7, starting in 2nd ch from hook: 5 sc, 4 sc in one stitch, working along opposite side of chain: 5 sc, 4 sc in one stitch. (18)
Key2
- ch
- chain
- sc
- single crochet
- Round 2
5 sc, (inc) × 4, 5 sc, (inc) × 4. (26)
Key2
- inc
- increase (2 sc in same stitch)
- sc
- single crochet
- Round 3
5 sc, (sc, inc) × 4, 5 sc, (sc, inc) × 4. (34)
Key2
- inc
- increase (2 sc in same stitch)
- sc
- single crochet
- Rounds 4–7
34 sc. (4 rounds)Fasten off, leaving a long tail for sewing. Attach the muzzle 3 rounds up from the neck, centered on the face, spanning approximately 6 rounds vertically.
Key1
- sc
- single crochet
Making up
- Step 1Feet to Legs: Sew the open end of each leg firmly to the top of each foot using the yarn tail. Make sure the toe points forward.
- Step 2Legs into Body: When working Rnd 8 of the body, join each leg by inserting your hook through both the body stitch and the open edge of the leg. This integrates the legs seamlessly.
- Step 3Stuff the Body and Head: Before closing the final rounds of the head, fill the body cavity firmly with polyfill stuffing. The neck area (Rnds 23–24) should be pinched slightly to define the head/body transition.
- Step 4Muzzle: Sew the muzzle to the face, centered, starting 3 rounds above the neck.
- Step 5Ears: Pin ears before sewing to confirm placement, then sew securely through all layers.
- Step 6Tail: Sew the flattened end of the tail to the back of the body just above the leg attachment row.
- Step 7Arms: Sew arms to either side of the body at approximately Rnd 10–12 from the neck.
- Step 8Eyes and Nose: Glue 14 mm half-bead eyes directly above the muzzle, with 8 stitches between them. Glue the plastic nose centered in Row 3 of the muzzle.
- Step 9Embroidery: Using accent color yarn, embroider a vertical line downward from the nose and short random whisker stitches. Using the same yarn, embroider a fringe/forelock from the center top of the head downward 5 rows, with 3-stitch-wide sections — two stripes in accent color and one stripe in main color per section. Use main color yarn to add small highlights beside the eyes and embroider 3-stitch claw lines on each paw.
Notes from the pattern
- The pattern is worked with a 4 mm hook and plush polyester yarn to a gauge of roughly 14 sc by 15 rows per 10 cm; gauge is not critical, but even tension keeps the 33-round body and head shaping consistent.
- Work proceeds continuously in a spiral with no join at the end of a round, so a locking stitch marker at the first stitch of each round is the only reliable way to track position through the longer pieces.
- Chenille-type plush yarn obscures individual stitches, making them hard to count by eye; counting stitches on the hook as each round is worked is more dependable than reading the fabric.
- Stuffing happens in stages rather than all at once: the body cavity is filled firmly before the final head rounds close, and the neck area (rounds 23-24) is pinched slightly as it is stuffed. Stuff all body parts firmly but evenly before closing; understuffing results in a floppy finished toy.
- The finished tiger stands approximately 30–35 cm tall depending on tension and yarn substitution; total working time runs roughly 8–12 hours across multiple sessions.
The essentials
- Rounds
- 67
- Parts
- 7
- Level
- Intermediate
- Time
- 6-9 hours
- Hook
- 4 mm
- Yarn
- DK (Light Worsted)
Stitches you will use
- Magic ring starts Used to open the arms (and other small pieces) with a centre that closes tight; pull the tail firm before working the first round so no gap shows at the finished toy's extremities.
- Integrated piece joins The legs are joined into the body at round 8 by hooking through both the body stitch and the leg's open edge together; catching only one wall leaves a gap or lump at the join.
- Working chenille yarn at the right tension Himalaya Dolphin Baby is a chunky plush yarn that can feel stiff on a 4 mm hook if crocheted tightly; working loosely, or sizing up to a 4.5 mm hook, keeps stitches easier to see and work without over-tightening the fabric.
Troubleshooting
The round start drifts and stitch
Spiral working has no join to mark the round, so a slipped marker is the usual cause; place a locking stitch marker in the first stitch of each round and move it up as each round finishes.
The muzzle or ears end up off-centre
These pieces are sewn on after the head is complete rather than crocheted in place, so pin before stitching: position the muzzle three rounds up from the neck, centred on the face, spanning about six rounds vertically.
The leg join at round 8 leaves a
This happens when the hook catches only one wall of the leg's open edge instead of both; work through the body stitch and both walls of the leg together at that round to keep the join flush.
Substituting yarn
- Acrylic chenille or plush yarn, DK/light worsted weight
- Closest match to the original fibre; similar softness, similar stitch definition, and the same 4 mm hook and finished size can be kept.
- Smooth cotton or cotton-blend DK yarn
- Gives sharper, more visible stitches that are easier to count round by round, but loses the plush halo; a slightly smaller hook, around 3.5 mm, tightens the fabric to compensate for cotton's lack of give.
- Wool-blend worsted yarn
- Adds warmth and a fluffier surface but is less washable than the original polyester plush; gauge may loosen slightly, so sizing up the hook is less likely needed than checking tension carefully instead.
Washing and care
- Spot clean with a damp cloth where possible rather than fully washing, since the polyester plush yarn can mat if agitated in a machine; if washing is unavoidable, hand wash in cool water and avoid wringing.
- Reshape the toy while still slightly damp and dry it flat away from direct heat, as polyester plush can flatten under high heat; store it loosely rather than compressed so the pile does not crush out of shape.
The photographs taken while this was being made
Every one was taken by whoever published the pattern, in the order the source listed them.
FAQs
Questions
Why does the pattern use two colours if the finished tiger is mostly one colour?
The accent colour appears only on the feet and two of the four ears, giving contrast at the paw pads and inner ears while the main colour covers the body, legs, arms, head and outer ears.
What does joining into a ring mean for the legs compared with the spiral used elsewhere?
The legs begin with a chain of 19 joined into a ring at round 1, giving a firm foundation edge. The remaining rounds (2-14) then continue as plain single crochet without further joining, matching the continuous spiral used for the rest of the toy.
Should the legs be stuffed before joining them to the body?
No. The pattern specifies that the legs are not stuffed, since they are joined directly into the body wall at round 8 rather than finished and sewn on as a separately stuffed piece.
What US/UK term differences matter in this pattern?
The pattern is written throughout in US terms, so every instance of sc is a US single crochet, read by UK crocheters as double crochet. No other stitch names differ in this particular pattern.
How many ears does the tiger actually have, and why are four pieces made?
Four ear pieces are made in total, two in the main colour and two in the accent colour. They are paired together, one of each colour, to form the two finished two-tone ears.
These answers came from whoever first published the pattern, kept word for word.