 EVERY CROCHET
 Amigurumi 52 rounds No account, no download
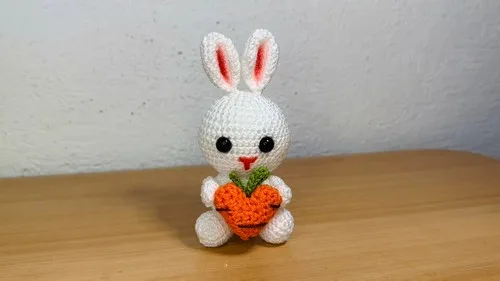
Crochet bunny amigurumi pattern with a heart-shaped carrot
A crochet bunny amigurumi pattern worked in single crochet (UK double crochet), with US and UK stitch names given throughout.
- Skill
- Intermediate
- Time
- 4-6 hours
- Yarn weight
- Worsted

Intermediate
What the original write-up called it. Nothing here is graded again.

Worsted
What the sample was worked in. Any weight works; the size moves with it.

4-6 hours
What the original page reckoned. Your own pace is the one that matters.
About this pattern
This pattern makes a stuffed bunny amigurumi with a detachable two-piece carrot accessory shaped like a heart. The body, head, arms, legs, ears and tail are each worked in continuous single crochet (UK double crochet) rounds, shaped with increases, then stuffed and sewn together. A hand-embroidered nose and blushed ears finish the face. The project suits a maker comfortable with amigurumi shaping, flat closures and sewing multiple parts together accurately.
This bunny amigurumi belongs to the single crochet (UK double crochet) family of toy-making patterns, where tight, continuous stitches build a dense fabric that holds its stuffing without gaps. The design pairs a classic head-and-body bunny with a separate two-piece carrot accessory finished with a heart motif, giving the finished toy a decorative prop rather than leaving it empty-handed. The stitch count stays consistent throughout, so each round builds predictably on the last.
Construction works outward from six main parts: a 14-round head, a 12-round body, two 4-round arms, two 12-round ears, a 4-round tail and two 6-round legs, each closed and stuffed according to its role. The head and body are shaped with rounds of increases before levelling off, the ears and arms are flattened and closed with a few stitches through both layers rather than stuffed solid, and the nose is embroidered once the head is complete. Assembly follows: head to body, then legs, tail, arms and ears pinned and sewn into place, with blush added to the ears last, and a separate two-piece heart-shaped carrot is made and sewn to the bunny's hands.
Materials
- Worsted weight yarn (main color, for the head, body and limbs)
- Orange yarn, for embroidering the nose
- Brown yarn, for embroidering the carrot details
- Crochet hook (size to suit your yarn)
- Safety eyes
- Stuffing (silicone cotton or fiberfill)
- Yarn needle, for sewing the pieces together
- Scissors
- Blush and a small brush, for the cheeks
The list is the pattern's own wording.
Instructions
Every round is printed as the pattern wrote it, brackets and all. Open the key beside a round to see only the short forms that round uses.
Head
- Round 1
Make 2 chains, then 6 single crochet (sc) in the first chain. Close with a slip stitch (sl st).
Key3
- sl st
- slip stitch
- st
- stitch
- sc
- single crochet
- Round 2
Chain 1, then make 6 increases (inc). Close with a sl st.
Key3
- sl st
- slip stitch
- inc
- increase
- st
- stitch
- Round 3
Chain 1, then repeat the sequence of 1 sc and 1 inc. Close with a sl st.
Key4
- sl st
- slip stitch
- inc
- increase
- st
- stitch
- sc
- single crochet
- Round 4
Chain 1, then repeat the sequence of 2 sc and 1 inc.
Key2
- inc
- increase
- sc
- single crochet
- Round 5
Chain 1, then make 1 sc, 1 inc, and then repeat the sequence of 3 sc and 1 inc. Finish the row with 2 sc.
Key2
- inc
- increase
- sc
- single crochet
- Round 6
Chain 1, then repeat the sequence of 4 sc and 1 inc.
Key2
- inc
- increase
- sc
- single crochet
- Round 7
Make 36 sc (no increases).
Key1
- sc
- single crochet
- Round 8
Repeat the sequence of 5 sc and 1 inc.
Key2
- inc
- increase
- sc
- single crochet
- Rounds 9–13
Make 42 sc (no increases).
Key1
- sc
- single crochet
Note: At the end of Row 13, place the safety eyes 4 rows up from the bottom and 5 stitches apart.
- Round 14
Start decreasing. Repeat the sequence of 5 sc and 1 decrease (dec).
Key2
- dec
- decrease
- sc
- single crochet
- Round 15
Make 2 sc, 1 dec, then repeat the sequence of 4 sc and 1 dec. Finish the row with 2 sc.
Key2
- dec
- decrease
- sc
- single crochet
- Round 16
Repeat the sequence of 3 sc and 1 dec.
Key2
- dec
- decrease
- sc
- single crochet
Note: Before starting Row 17, stuff the head with silicone cotton.
- Round 17
Repeat the sequence of 2 sc and 1 dec.
Key2
- dec
- decrease
- sc
- single crochet
- Round 18
Repeat the sequence of 1 sc and 1 dec.Cut the yarn, leaving a long tail for sewing, and close with a sl st. Stuff if necessary.
Key4
- sl st
- slip stitch
- dec
- decrease
- st
- stitch
- sc
- single crochet
Body
- Round 1
Make 2 chains, then 6 sc in the first chain. Close with a sl st.
Key3
- sl st
- slip stitch
- st
- stitch
- sc
- single crochet
- Round 2
Make 6 inc. Close with a sl st.
Key3
- sl st
- slip stitch
- inc
- increase
- st
- stitch
- Round 3
Repeat the sequence of 1 sc and 1 inc.
Key2
- inc
- increase
- sc
- single crochet
- Round 4
Repeat the sequence of 2 sc and 1 inc.
Key2
- inc
- increase
- sc
- single crochet
- Round 5
Make 1 sc, 1 inc, then repeat the sequence of 3 sc and 1 inc. Finish the row with 2 sc.
Key2
- inc
- increase
- sc
- single crochet
- Round 6
Repeat the sequence of 4 sc and 1 inc.
Key2
- inc
- increase
- sc
- single crochet
- Rounds 7–9
Make 36 sc (no increases).
Key1
- sc
- single crochet
- Round 10
Repeat the sequence of 4 sc and 1 dec.
Key2
- dec
- decrease
- sc
- single crochet
- Round 11
Make 30 sc (no decreases).
Key1
- sc
- single crochet
- Round 12
Repeat the sequence of 3 sc and 1 dec.
Key2
- dec
- decrease
- sc
- single crochet
- Round 13
Repeat the sequence of 2 sc and 1 dec.
Key2
- dec
- decrease
- sc
- single crochet
- Round 14
Repeat the sequence of 1 sc and 1 dec.Cut the yarn, leaving a long tail for sewing, and close with a sl st. Stuff the body.
Key4
- sl st
- slip stitch
- dec
- decrease
- st
- stitch
- sc
- single crochet
Arms (Make 2)
- Round 1
Make 2 chains, then 6 sc in the first chain. Close with a sl st.
Key3
- sl st
- slip stitch
- st
- stitch
- sc
- single crochet
- Round 2
Chain 1, then repeat the sequence of 1 sc and 1 inc three times. Close with a sl st.
Key4
- sl st
- slip stitch
- inc
- increase
- st
- stitch
- sc
- single crochet
- Rounds 3–7
Make 9 sc (no increases or decreases).
Key1
- sc
- single crochet
- Round 8
Close the arm by making 3 sc, taking stitches from both sides of the flattened fabric (do not stuff).Cut the yarn, leaving a long tail for sewing.
Key1
- sc
- single crochet
Ears (Make 2)
- Round 1
Make 2 chains, then 6 sc in the first chain. Close with a sl st.
Key3
- sl st
- slip stitch
- st
- stitch
- sc
- single crochet
- Round 2
Chain 1, then repeat the sequence of 1 sc and 1 inc three times. Close with a sl st.
Key4
- sl st
- slip stitch
- inc
- increase
- st
- stitch
- sc
- single crochet
- Round 3
Chain 1, then repeat the sequence of 2 sc and 1 inc.
Key2
- inc
- increase
- sc
- single crochet
- Round 4
Repeat the sequence of 3 sc and 1 inc.
Key2
- inc
- increase
- sc
- single crochet
- Round 5
Repeat the sequence of 4 sc and 1 inc.
Key2
- inc
- increase
- sc
- single crochet
- Rounds 6–9
Make 18 sc (no increases or decreases).
Key1
- sc
- single crochet
- Round 10
Repeat the sequence of 1 sc and 1 dec.
Key2
- dec
- decrease
- sc
- single crochet
- Round 11
Make 12 sc (no decreases).
Key1
- sc
- single crochet
- Round 12
Repeat the sequence of 2 sc and 1 dec.Close the ear by flattening the fabric and making 2 sc through both sides of the opening. Cut the yarn, leaving a long tail.
Key2
- dec
- decrease
- sc
- single crochet
Tail
- Round 1
Make 2 chains, then 5 sc in the first chain. Close with a sl st.
Key3
- sl st
- slip stitch
- st
- stitch
- sc
- single crochet
- Round 2
Chain 1, then make 5 inc. Close with a sl st.
Key3
- sl st
- slip stitch
- inc
- increase
- st
- stitch
- Rounds 3–4
Make 10 sc (no increases).
Key1
- sc
- single crochet
- Round 5
Make 5 dec. Close with a sl st.Cut the yarn, leaving a long tail. Stuff the tail.
Key3
- sl st
- slip stitch
- dec
- decrease
- st
- stitch
Legs (Make 2)
- Round 1
Make 2 chains, then 6 sc in the first chain. Close with a sl st.
Key3
- sl st
- slip stitch
- st
- stitch
- sc
- single crochet
- Round 2
Chain 1, then make 6 inc.
Key1
- inc
- increase
- Round 3
Repeat the sequence of 3 sc and 1 inc. Close with a sl st.
Key4
- sl st
- slip stitch
- inc
- increase
- st
- stitch
- sc
- single crochet
- Rounds 4–5
Make 15 sc (no increases).
Key1
- sc
- single crochet
- Round 6
Make 4 sc, 3 dec, then 5 sc.
Key2
- dec
- decrease
- sc
- single crochet
- Round 7
Make 3 sc, 3 dec, then 3 sc.Cut the yarn, leaving a long tail for sewing. Stuff the legs.
Key2
- dec
- decrease
- sc
- single crochet
Heart-Shaped Carrot
- Part 1 (Make 2)
Follow the steps for creating the carrot shape, then join both pieces.
- Rounds 4–8
Shape and stuff the carrot heart, embroider lines using brown yarn for details.
- Leaves
Make 7 chains and attach to the carrot's top.
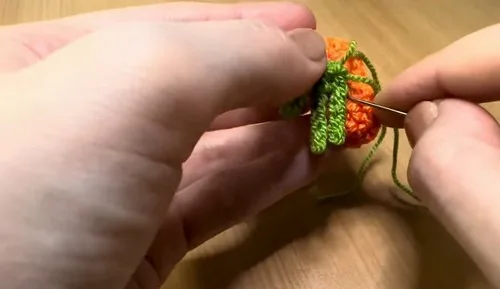
Attach Carrot Pin and sew the heart-shaped carrot to the bunny's hands.
Assembling the Bunny
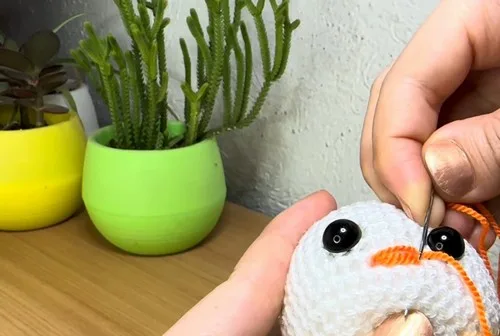
Nose Using orange yarn, embroider a "T" shaped nose on Row 12 of the head.
Attach Parts Sew the head to the body, then pin and sew the legs, tail, arms, and ears.
Cheeks Apply blush to the inside of the ears using a brush.
Notes from the pattern
- Choose a hook a size or two smaller than the yarn label recommends so the fabric stays tight enough to hide stuffing, rather than a specific size quoted here.
- Since the parts are worked in continuous rounds without regular joins, a stitch marker in the first stitch of each round prevents losing track over 14 rounds on the head.
- Consistent tension matters most on the head and body, where increases are evenly spaced; loose stitches let stuffing peek through between rounds.
- Orange yarn is reserved for the embroidered nose, worked after Row 12 of the head is complete; arms stay unstuffed by design, so only the head, body, tail, legs and carrot need filling.
The essentials
- Rounds
- 52
- Parts
- 8
- Level
- Intermediate
- Time
- 4-6 hours
- Yarn
- Worsted
Stitches you will use
- Continuous-round single crochet (UK double crochet) Used throughout every part — head, body, arms, ears, tail and legs are all worked without joining rounds, so a stitch marker helps track where each round starts.
- Flat closures through both layers Ears are closed with 2 sc and arms with 3 sc taken through both sides of the flattened opening rather than stuffed; keep tension even so the seam doesn't pucker.
Troubleshooting
The head doesn't sit level on the body once sewn on.
This usually means the increase rounds on the head or body were miscounted, leaving the opening uneven; count stitches at the end of each round and pin the head in place before sewing to check alignment.
The ears look floppy rather than lying
This happens when the ear opening isn't closed tightly; flatten the fabric fully and work the 2 sc through both layers rather than through a single edge.
The arms look lumpy or stiff instead of soft and flat.
Arms are deliberately left unstuffed and closed by flattening and working 3 sc through both sides; stuffing them or closing them unevenly is what causes the lumps.
Substituting yarn
- Acrylic, worsted/aran weight
- Closest to the pattern's working gauge; holds its shape without blocking and keeps stitch definition crisp enough that increases stay visible for counting.
- Cotton, DK weight
- Produces a denser, slightly smaller toy with less squish; a smaller hook keeps the fabric tight, but stuffing may show through more readily if tension loosens.
- Cotton-acrylic blend, worsted weight
- Gives a softer handle than pure cotton while staying washable; drape increases slightly, so stuffing firmly becomes more important to keep the rounds smooth.
Washing and care
- Hand wash the finished bunny in cool water if needed, since the acrylic yarn typically used for amigurumi of this kind holds its shape without felting or shrinking.
- Reshape the head, body and limbs while damp and leave flat to air dry; store away from direct sunlight and heat to keep the blushed ears and embroidered nose from fading.
The photographs taken while this was being made
Every one was taken by whoever published the pattern, in the order the source listed them.
FAQs
Questions
Why does the head take 14 rounds while the body only takes 12?
The head needs the extra rounds to shape both the rounded crown and the narrower neck opening that attaches to the body. The body's 12 rounds are enough to shape a similar dome without the additional narrowing.
Can the arms be stuffed for a firmer feel?
The pattern specifies no stuffing for the arms, relying instead on the flattened, closed fabric from Rows 3-7 to hold their shape. Adding stuffing will make the final 3 sc closure bulky and harder to flatten evenly.
When is the nose embroidered?
The nose is embroidered after the head is complete, using orange yarn to stitch a T-shape centred on Row 12. Embroidering before the head is fully shaped makes it harder to centre the shape accurately.
What is the two-piece carrot part for?
Part 1 is made twice to form the two sides of a heart-shaped carrot accessory, which is joined, shaped, stuffed, and finished with brown embroidered details and chained leaves, separately from the bunny's body parts. It is pinned and sewn to the bunny's hands as a decorative prop rather than a wearable piece of the toy.
In what order are the parts sewn together?
The head attaches to the body first, followed by the legs, tail, arms and ears, which are pinned before sewing to check placement. Blush is added to the ears last, once all the parts are secured.
These answers came from whoever first published the pattern, kept word for word.