 EVERY CROCHET
 Amigurumi 26 rounds No account, no download
Crochet a mini mushroom amigurumi in single crochet
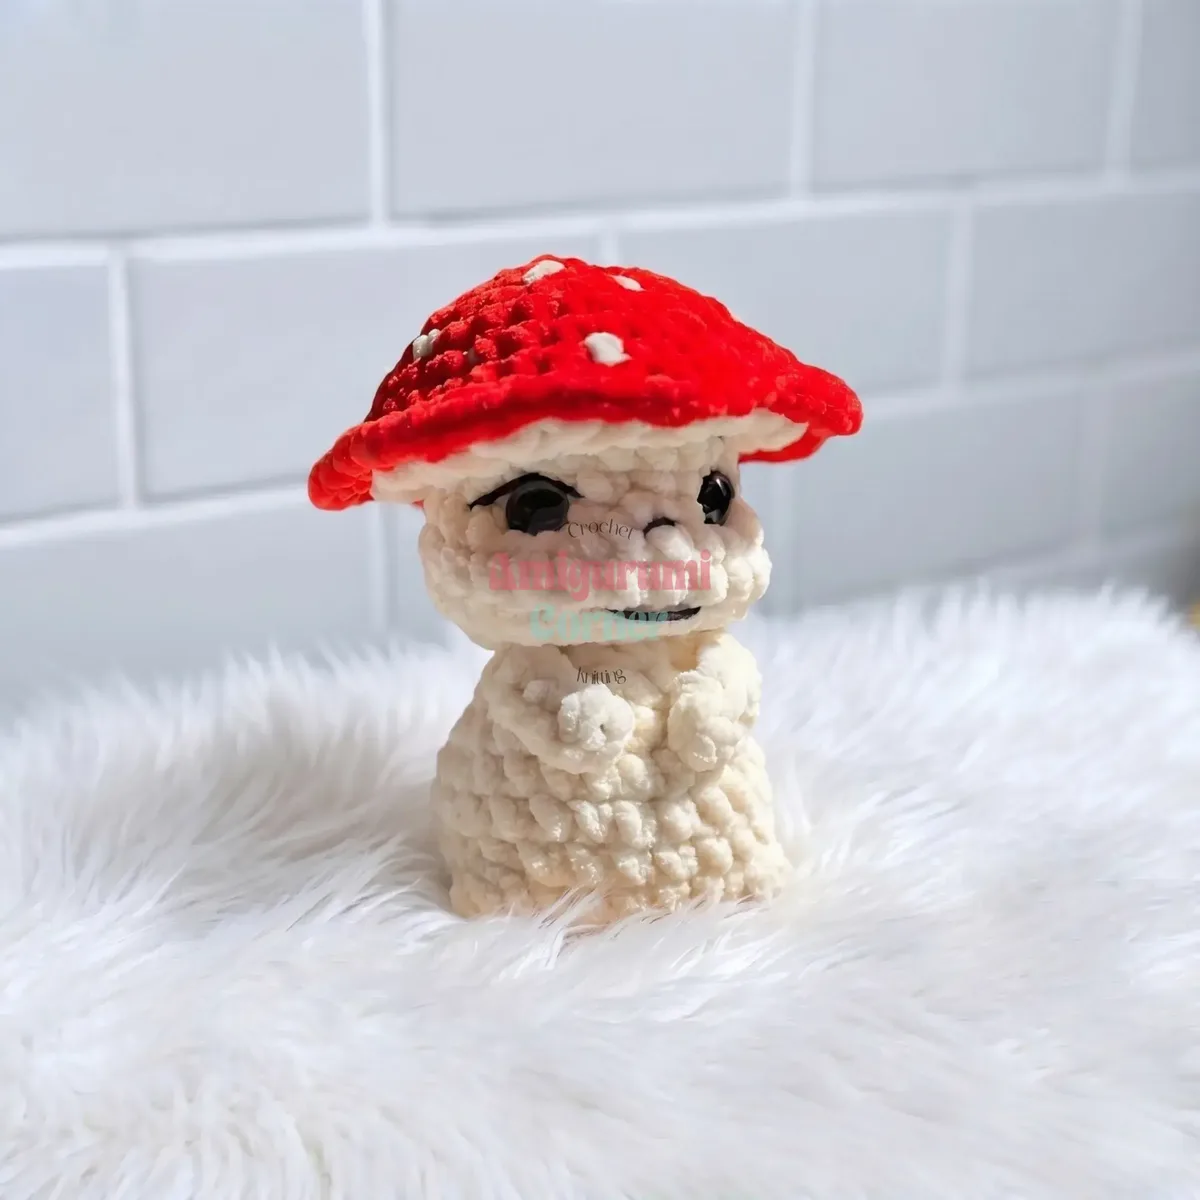
Mini mushroom amigurumi pattern worked in single crochet (UK double crochet), written in US crochet terms, with a plush body, head, and
- Skill
- Intermediate
- Time
- 4-6 hours
- Yarn weight
- Worsted
- Hook
- 12 mm

Intermediate
What the original write-up called it. Nothing here is graded again.

Worsted
What the sample was worked in. Any weight works; the size moves with it.

4-6 hours
What the original page reckoned. Your own pace is the one that matters.
About this pattern
This is a three-part amigurumi mushroom — a red body, a cream head, and a red-and-white spotted hat — worked in single crochet (UK double crochet) in a continuous spiral with a 4.0 mm hook and plush yarn. The body takes 9 rounds, the head 7, and the hat 10, followed by sewn assembly, face cinching, and embroidered features. It suits a crocheter already comfortable with magic rings, increases and decreases.
This mini mushroom amigurumi is built entirely from single crochet (UK double crochet), worked in a continuous spiral rather than joined rounds. The three parts — body, head and hat — each start from a magic ring and grow through standard increase and decrease rounds, making this a good project for a crocheter who already knows the basic amigurumi vocabulary but wants practice reading round-by-round shaping rather than row-by-row instructions.
Construction is sequential rather than simultaneous: the body is completed and stuffed first, then the head, then the hat, with each piece closed and set aside before assembly. The three sections are joined afterwards by sewing — head to body, then hat to head — with a separate face-cinching step to shape the eyes before the features are embroidered on. Nothing is crocheted together in the round; all joins happen with a yarn needle once the pieces are finished.
Materials
Plush yarn
- YarnArt Dolce in Cream/Milk (745) and Red (748)
Cotton-blend yarn
- YarnArt Jeans in Black (53) for face embroidery and White (01) for hat spots
Safety eyes
- 12 mm, 1 pair
- Polyfill stuffing
- Crochet hook: 4.0 mm
- Scissors
- Yarn/tapestry needle (long)
- Stitch marker
- Strong thread for cinching
The list is the pattern's own wording.
Instructions
Every round is printed as the pattern wrote it, brackets and all. Open the key beside a round to see only the short forms that round uses.
Body
Work with Red plush yarn.
- Round 1
6 sc in mr (6)
Key2
- sc
- Single Crochet
- mr
- Magic Ring
- Round 2
inc × 6 (12)
Key1
- inc
- Increase (2 sc in same stitch)
- Round 3
(sc, inc) × 6 (18)
Key2
- inc
- Increase (2 sc in same stitch)
- sc
- Single Crochet
- Round 4
(2 sc, inc) × 6 (24)
Key2
- inc
- Increase (2 sc in same stitch)
- sc
- Single Crochet
- Round 5
Popcorn st (4 unfinished dc joined into 1 top, sharing 1 base stitch), 6 sc, Popcorn st, 16 sc (24)
Key3
- Popcorn st
- Popcorn Stitch (cluster of unfinished dc joined at one top and one base)
- sc
- Single Crochet
- dc
- Double Crochet
- Rounds 6–8
24 sc each round (24)
Key1
- sc
- Single Crochet
- Round 9
(2 sc, dec) × 6 (18)
Key2
- dec
- Decrease (invisible decrease)
- sc
- Single Crochet
- Round 10
Make Arm: ch 5, starting in 2nd ch from hook — Popcorn st (3 unfinished dc joined at 1 top, sharing 1 base stitch), 3 hdc; then back on body: (dec, sc) × 2, dec, Make Arm: ch 5, starting in 2nd ch from hook — Popcorn st, 3 hdc; then: sc, (dec, sc) × 3 (12)
Key6
- Popcorn st
- Popcorn Stitch (cluster of unfinished dc joined at one top and one base)
- hdc
- Half Double Crochet
- dec
- Decrease (invisible decrease)
- ch
- Chain
- sc
- Single Crochet
- dc
- Double Crochet
- Round 11
(sc, dec) × 4 (8)Stuff the body firmly before closing. Fasten off, leaving a long tail for assembly.
Key2
- dec
- Decrease (invisible decrease)
- sc
- Single Crochet
Head
Work with Cream/Milk plush yarn.
- Round 1
inc × 8 in mr (16)
Key2
- inc
- Increase (2 sc in same stitch)
- mr
- Magic Ring
- Round 2
(sc, inc) × 8 (24)
Key2
- inc
- Increase (2 sc in same stitch)
- sc
- Single Crochet
- Rounds 3–5
24 sc each round (24)
Key1
- sc
- Single Crochet
- Round 6
(2 sc, dec) × 6 (18)
Key2
- dec
- Decrease (invisible decrease)
- sc
- Single Crochet
- Rounds 7–8
18 sc each round (18)After completing Rnd 6, insert safety eyes between Rnds 5 and 6. Count 6 stitches between the inner posts of each eye along Rnd 5 as your spacing guide.
Key1
- sc
- Single Crochet
- Round 9
(sc, dec) × 6 (12)
Key2
- dec
- Decrease (invisible decrease)
- sc
- Single Crochet
- Round 10
dec × 6 (6)Stuff the head firmly. Close the opening by weaving the tail through the 6 remaining stitches, pull tight, and fasten off. Bury the tail inside.
Key1
- dec
- Decrease (invisible decrease)
Hat
Work with Red plush yarn.
- Round 1
6 sc in mr (6)
Key2
- sc
- Single Crochet
- mr
- Magic Ring
- Round 2
inc × 6 (12)
Key1
- inc
- Increase (2 sc in same stitch)
- Round 3
(sc, inc) × 6 (18)
Key2
- inc
- Increase (2 sc in same stitch)
- sc
- Single Crochet
- Round 4
(2 sc, inc) × 6 (24)
Key2
- inc
- Increase (2 sc in same stitch)
- sc
- Single Crochet
- Round 5
(3 sc, inc) × 6 (30)
Key2
- inc
- Increase (2 sc in same stitch)
- sc
- Single Crochet
- Round 6
(4 sc, inc) × 6 (36)
Key2
- inc
- Increase (2 sc in same stitch)
- sc
- Single Crochet
- Round 7
(5 sc, inc) × 6 (42)
Key2
- inc
- Increase (2 sc in same stitch)
- sc
- Single Crochet
- Round 8
(6 sc, inc) × 6 (48)Work the next round in FLO only.
Key3
- inc
- Increase (2 sc in same stitch)
- FLO
- Front Loop Only
- sc
- Single Crochet
- Round 9
(FLO): (sc, hdc, dc, hdc, sc, sl st) × 8 (48)
Key5
- sl st
- Slip Stitch
- hdc
- Half Double Crochet
- FLO
- Front Loop Only
- sc
- Single Crochet
- dc
- Double Crochet
This creates the decorative ruffle brim of the hat.
Now attach Cream/Milk yarn to the BLO of Rnd 8 stitches.
- Round 10
(BLO of Rnd 8): dc-dec × 24 (24)This pulls the underside of the hat inward to create the hat crown depth. Fasten off, leaving a long tail for sewing.For a toadstool effect, embroider white spots randomly across the hat using White cotton-blend yarn, or crochet small circles (6 sc in mr, sl st, fasten off, leave tail for sewing) and sew them onto the hat.
Key6
- sl st
- Slip Stitch
- dec
- Decrease (invisible decrease)
- BLO
- Back Loop Only
- sc
- Single Crochet
- dc
- Double Crochet
- mr
- Magic Ring
Making up
- Step 1Attach head to body: Position the head on top of the body, aligning the centres. Using the long tail from the head or a separate length of yarn, sew the head securely to the body, working around the entire opening and pulling snugly. Weave in the end.
- Step 2Attach hat to head: Centre the hat on top of the head, tilting it slightly if desired for a playful look. Sew around the base of the hat crown (the inner edge formed by Rnd 10) using the long tail.
- Step 3Face cinching (eye shaping): Cut two lengths of strong thread.
- Step 4First eye: Insert thread at Point 1 (Rnd 1 of head, parallel to the edge of the eye), bring out at Point 2 (Rnd 5 of head, as close to the eye edge as possible), re-insert at Point 3 (Rnd 5, close to the opposite edge of the same eye), bring out at Point 4 (Rnd 1, adjacent stitch to Point 1). Pull tight, tie several knots, and bury the thread inside the head.
- Step 5Second eye: Repeat using Points 5–6–7–8 in the same manner.
- Step 6Embroider the face: Using Black cotton-blend yarn and a needle, embroider eyelids, eyebrows, a small nose, and a smile as desired. Keep stitches neat and reference the finished photo for placement guidance.
- Step 7Attach spots to hat: If you crocheted small white circles, sew them onto the hat in a scattered, random arrangement.
Notes from the pattern
- Work with a 4.0 mm hook throughout; plush yarn is forgiving, but a looser hook will leave stitch definition too open to hide stuffing.
- Move the stitch marker up at the start of every round, since the pattern is worked in a continuous spiral with no joining — losing track of the round start is the most common source of miscounted stitches.
- The body uses Red and the head uses Cream/Milk; the hat is also worked in Red with White spots added afterwards, so keep the two plush yarn colours separated and weave in colour-change ends as the hat spots are added rather than leaving them for the end.
- Stuff firmly and gradually rather than all at once, adding polyfill as each part nears completion so the shaping rounds close over an evenly filled piece instead of a hollow one.
- Gauge: approximately 4 sc × 4 rows = 2.5 cm (1 inch) worked with plush yarn and a 4.0 mm hook. Exact gauge is not critical for amigurumi.
- To make a larger mushroom, swap to a thicker plush yarn and a 5.0 mm hook, and add one or two extra even rounds to the body, hat, and head to proportionally scale everything up without rewriting the entire pattern.
The essentials
- Rounds
- 26
- Parts
- 3
- Level
- Intermediate
- Time
- 4-6 hours
- Hook
- 12 mm
- Yarn
- Worsted
Stitches you will use
- Magic ring (adjustable ring) start Used at the first round of the body, head and hat; keep the centre cinched tight before working the first round of single crochet into it.
- Invisible increase and decrease shaping Drives the curve of the body (Rnds 2-4) and the narrowing of the head (Rnd 6 onward); work increases into the stitch, not between stitches, to avoid holes.
- Sewing and cinching with a yarn needle Used to attach the head to the body and the hat to the head, and to cinch the face for eye shaping; pull snugly but check tension before weaving in, since over-pulling distorts the round.
Troubleshooting
Stitches are hard to see while working
Work under good lighting and gently stretch each stitch slightly before inserting the hook to confirm placement; a contrasting-colour stitch marker also helps with tracking round starts.
The popcorn stitches in Rnd 5 of the
Try leaving the stitches slightly looser before joining the tops, or use one extra dc in the cluster to add more volume so the popcorn pops toward the right side of the work.
The crocheted arms, worked directly off
Because the arms are small, they may not require stuffing. If you'd like them to hold their shape better, use the tip of a pencil or a toothpick to gently push a tiny amount of stuffing into each arm before continuing the round.
Substituting yarn
- Chunky or bulky-weight plush or chenille yarn
- Can replace YarnArt Dolce for the body, head and hat if it is unavailable — any chunky or bulky-weight plush or chenille yarn will work beautifully as a substitute.
- Smooth fingering or DK-weight cotton yarn
- Can replace YarnArt Jeans for the face embroidery and hat spots; the key is a smooth, non-fuzzy fibre that makes clean embroidered lines.
FAQs
Questions
Is this mini mushroom pattern suitable for beginners?
This pattern is best suited for crocheters who are comfortable with basic amigurumi techniques such as working in a continuous spiral, increasing, and decreasing. The popcorn stitches and face cinching add a small challenge, but both are explained step by step. A confident beginner who has completed one or two amigurumi projects before should have no trouble with this mushroom.
How long does it take to complete the mini mushroom?
Most crocheters can complete this project in two to four hours, making it an excellent weekend or evening craft. The hat takes the longest due to its increasing rounds, but the body and head work up very quickly. Setting aside a single afternoon is usually enough time to finish the entire mushroom including assembly and embroidery.
Can I sell finished mushrooms made from this free pattern?
This pattern was shared as a free tutorial for personal use and learning. If you wish to sell finished items made from this pattern, it is always best practice to credit the original designer. Policies on selling finished items can vary, so when in doubt, reach out respectfully to the designer before listing items for sale.
Can I make the mushroom without safety eyes for a baby-safe version?
Yes — simply skip the safety eyes and instead embroider the eyes using Black cotton-blend yarn in a simple oval or button shape. Embroidered eyes make the toy completely safe for babies and toddlers since there are no small parts that could detach. The embroidered look also gives the mushroom a slightly more vintage, storybook character.
These answers came from whoever first published the pattern, kept word for word.