 EVERY CROCHET
 Amigurumi 21 rounds No account, no download
Amigurumi baby tiger crochet pattern in plush yarn
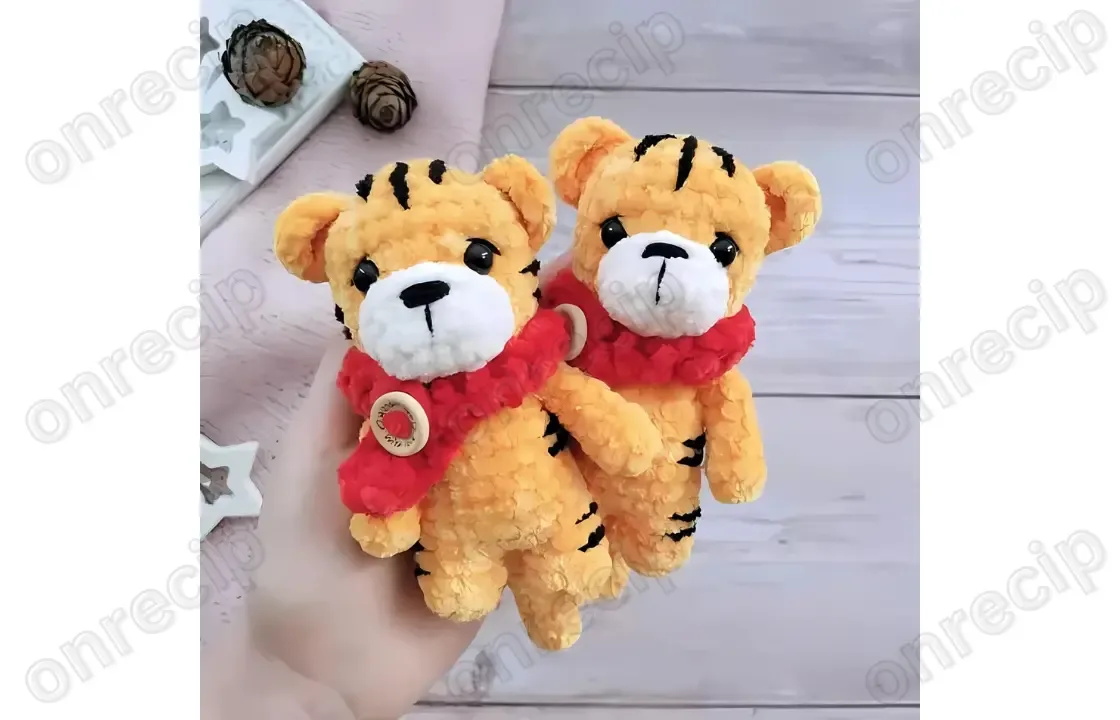
A plush amigurumi baby tiger worked in single crochet (UK double crochet), with a scarf, stripes and embroidered details.
- Skill
- Intermediate
- Time
- 4-6 hours
- Yarn weight
- Worsted
- Hook
- 3 mm

Intermediate
What the original write-up called it. Nothing here is graded again.

Worsted
What the sample was worked in. Any weight works; the size moves with it.

4-6 hours
What the original page reckoned. Your own pace is the one that matters.
About this pattern
This is an amigurumi baby tiger made mainly in single crochet (UK double crochet) using plush velvet-type yarn, with a separate muzzle, legs that join directly into the body and head, ears, arms, tail and a knitted scarf. It calls for two hook sizes, safety or sew-on eyes, a 15 mm button, toy stuffing and a contrast yarn for the stripes, making it a multi-part project suited to a confident beginner moving into intermediate work.
This baby tiger belongs to the amigurumi family, built from single crochet (UK double crochet) worked in continuous rounds to form a dense, seam-free fabric that holds its shape around stuffing. The body shrinks from 20 stitches down through two decrease rows, giving the rounded toy silhouette typical of the style, while the muzzle uses an increase sequence including a 4-sc-in-one-stitch step to create its raised, snout-like dome.
Construction is piece-based: the legs are crocheted first, the body is worked as a single continuous shape over several rounds joined directly to the legs, the head continues straight on from the body, and the muzzle is crocheted separately and sewn on afterwards. Ears, arms, tail and a knitted-look scarf are made as separate small pieces, then assembled, stuffed and finished with embroidered and sewn details.
Materials
- Plush yarn Himalaya Velvet: white and orange/yellow/blue (for the tiger)
- Plush yarn Himalaya Velvet: red (for the scarf)
- Yarn YarnArt Jeans (for the nose)
- Yarn Himalaya Baby Soft (for the stripes)
- Hooks 3 mm and 4 mm
- Toy eyes 6-8 mm
- Stuffing for toys
- 15 mm button
- Markers
- Sewing pins
- Needle
- Scissors
The list is the pattern's own wording.
Instructions
Every round is printed as the pattern wrote it, brackets and all. Open the key beside a round to see only the short forms that round uses.
Body
- Rounds 1–6
6 rows of 20 sc (20)
Key1
- sc
- single crochet
- Round 7
(2 sc, dec) x 5 (15)
Key2
- dec
- decrease
- sc
- single crochet
- Round 8
15 sc
Key1
- sc
- single crochet
- Round 9
(1 sc, dec) x 5 (10)
Key2
- dec
- decrease
- sc
- single crochet
Now move on to crocheting the head.
Head
- Round 10
10 inc (20)
Key1
- inc
- increase
- Round 11
(3 sc, inc) x 5 (25)
Key2
- inc
- increase
- sc
- single crochet
- Rounds 12–16
5 rows of 25 sc (25)Step by step: Between rows 14 and 15, insert the eyes, spaced 4-5 sc apart; if you are using sew-on eyes, sew them at this row after finishing the crocheting.
Key1
- sc
- single crochet
- Round 17
(3 sc, dec) x 5 (20)
Key2
- dec
- decrease
- sc
- single crochet
- Round 18
(2 sc, dec) x 5 (15)
Key2
- dec
- decrease
- sc
- single crochet
- Round 19
(1 sc, dec) x 5 (10)
Key2
- dec
- decrease
- sc
- single crochet
- Round 20
(dec) x 5 (5)Fasten off, pull the opening closed, and hide the end inside the work.
Key1
- dec
- decrease
Muzzle
Using white yarn, start with a chain of 5 ch and crochet into the second chain from the hook.
- Round 1
inc, 2 sc, 4 sc in the same stitch, 2 sc, inc (12)
Key2
- inc
- increase
- sc
- single crochet
- Round 2
12 sc, sl st (12)Stuff lightly if desired.Leave a tail for sewing. Sew the muzzle onto the head. Embroider the nose with cotton thread.
Key3
- sl st
- slip stitch
- st
- stitch
- sc
- single crochet
Legs (2 pieces)
- Round 1
8 MR (5)
Key1
- MR
- magic ring
- Rounds 2–3
2 rows of 8 sc (8)Fasten off. Crochet the second leg without fastening off. Continue crocheting the body.
Key1
- sc
- single crochet
Arms (2 pieces)
- Round 1
6 MR (6)
Key1
- MR
- magic ring
- Rounds 2–7
6 rows of 6 sc (6)Fold the crochet piece and crochet 3 sc across both sides to close. Leave a tail for sewing. Sew the arms to the body in row 9, spaced 4-5 sc apart.
Key1
- sc
- single crochet
Ears (2 pieces)
- Round 1
Chain 3, crochet into the first chain: 6 hdc, 2 ch, 1 sc, 1 sc into the third chain from the hook.Fasten off. Leave a tail for sewing. Sew the ears onto the head.
Key3
- hdc
- half double crochet
- ch
- chain
- sc
- single crochet
Tail
- Round 1
6 MR (6)
Key1
- MR
- magic ring
- Rounds 2–11
10 rows of 6 sc (6)Fold the crochet piece and crochet together. Sew the tail onto the body.
Key1
- sc
- single crochet
Scarf
Chain 22 ch. Crochet into the second chain from the hook.
- Round 1
Crochet 1 dc into each stitch to the end of the row.Fasten off and leave a long tail to sew on the button. Attach the button, fastening both ends of the scarf, following the photo or your preference.
Key1
- dc
- double crochet
Embroider the stripes according to your preference.
Author: Yulia Rossamakhina – @yuliaross Enjoy!
Notes from the pattern
- Two hook sizes are listed (3 mm and 4 mm); use the smaller for the YarnArt Jeans nose and Himalaya Baby Soft stripe yarn and the larger for the Himalaya Velvet plush pieces, since the yarns differ noticeably in weight.
- Place a stitch marker at the start of each round once past row 9 of the body, where repeated decreases make it easy to lose track of the round's beginning.
- Insert the eyes between rows 14 and 15 of the head, spacing them 4-5 sc apart; if using sew-on eyes rather than safety eyes, attach them at this same row only after the piece is fully crocheted.
- Stuff the body, legs and head firmly enough to hold shape through the decrease rounds, but stuff the muzzle lightly only, as instructed, so it sits as a soft raised dome rather than a hard ball.
- Skill level is rated Easy, and the finished tiger measures approximately 11 cm; any plush yarn works for this amigurumi, such as Himalaya Velvet, YarnArt Velour, or Himalaya Dolphin Baby, not only the specific brand listed in the materials.
The essentials
- Rounds
- 21
- Parts
- 8
- Level
- Intermediate
- Time
- 4-6 hours
- Hook
- 3 mm
- Yarn
- Worsted
Stitches you will use
- Continuous rounds without joining Used throughout the body, head and muzzle; keep count carefully at each decrease row since there is no slip stitch to mark the round end.
- Shaping increases and decreases The muzzle's single-stitch increase to 4 sc and the body's and head's repeated increase and decrease rows control the rounded shape; work decreases evenly to avoid a lopsided snout, torso or head.
- Joining pieces mid-construction The second leg is crocheted without fastening off and continues straight into the body, which then continues straight into the head; keep tension consistent at these joins so the transitions don't pucker.
Troubleshooting
The muzzle looks flat instead of domed
This usually means the 4-sc-in-one-stitch increase on row 1 wasn't worked tightly enough, or the muzzle was over-stuffed against the instruction to stuff lightly; rework the increase stitch firmly and use only a small amount of filling.
The body puckers where the leg joins in
This happens when tension tightens at the point the second leg continues into the body without fastening off; keep the gauge even across that transition round rather than pulling stitches tight to disguise the join.
The eyes sit unevenly on the face
Eyes placed between rows 14 and 15 of the head without consistent spacing will drift; count the 4-5 sc gap on both sides from a shared centre point before inserting or sewing them.
Substituting yarn
- Polyester chenille, worsted weight
- Closest match to the plush velvet yarn used for the body and ears; similar softness and stitch definition, no hook size change needed.
- Smooth acrylic, worsted weight
- Gives a flatter, less fuzzy finish with clearer stitch definition than the plush original; drape is slightly stiffer, so stuffing may need to be packed a touch looser to avoid visible lumps.
- Cotton, DK or light worsted weight
- Produces a firmer, less plush toy with crisper stripes when used for the contrast sections; a smaller hook than the 4 mm listed may be needed to keep the fabric dense enough to hold stuffing.
Washing and care
- Hand wash the finished tiger in cool water with a mild detergent, since plush velvet-type yarns can mat or lose loft in a machine wash; press out excess water in a towel rather than wringing.
- Dry flat away from direct heat to preserve the plush texture, and reshape the body and ears gently by hand while damp so the stuffing settles evenly before storing the toy somewhere dry.
FAQs
Questions
Why does the pattern call for two hook sizes?
The 4 mm hook suits the thicker Himalaya Velvet plush yarn used for the body, muzzle, ears and scarf, while the 3 mm hook is sized for the finer YarnArt Jeans nose yarn and Himalaya Baby Soft stripe yarn. Using one hook for both would leave either the plush parts loose or the fine details too tight.
Do the legs attach separately or as part of the body?
One leg is crocheted and fastened off on its own, but the second leg is worked without fastening off and continues directly into the body round. This means the body isn't started fresh after the legs are made.
When should the toy eyes go in?
The eyes are inserted between rows 14 and 15 of the head, spaced 4-5 sc apart. If sew-on eyes are used instead of safety eyes, they're attached at that same row once the head piece is finished crocheting rather than during the round itself.
How much should the muzzle be stuffed compared to the body?
The muzzle is stuffed lightly, if at all, so it keeps a soft, slightly raised shape rather than becoming firm. The body, legs and head can take a firmer fill since they need to hold a rounder, more structured shape through their decrease rounds.
What is the 15 mm button used for?
The button is sewn onto the scarf: after fastening off the scarf, a long tail is left to attach the button, which is then used to fasten both ends of the scarf together once it is wrapped around the tiger's neck.
These answers came from whoever first published the pattern, kept word for word.