 EVERY CROCHET
 Garments 20 rounds No account, no download
Granny square toddler dress and cardigan set pattern
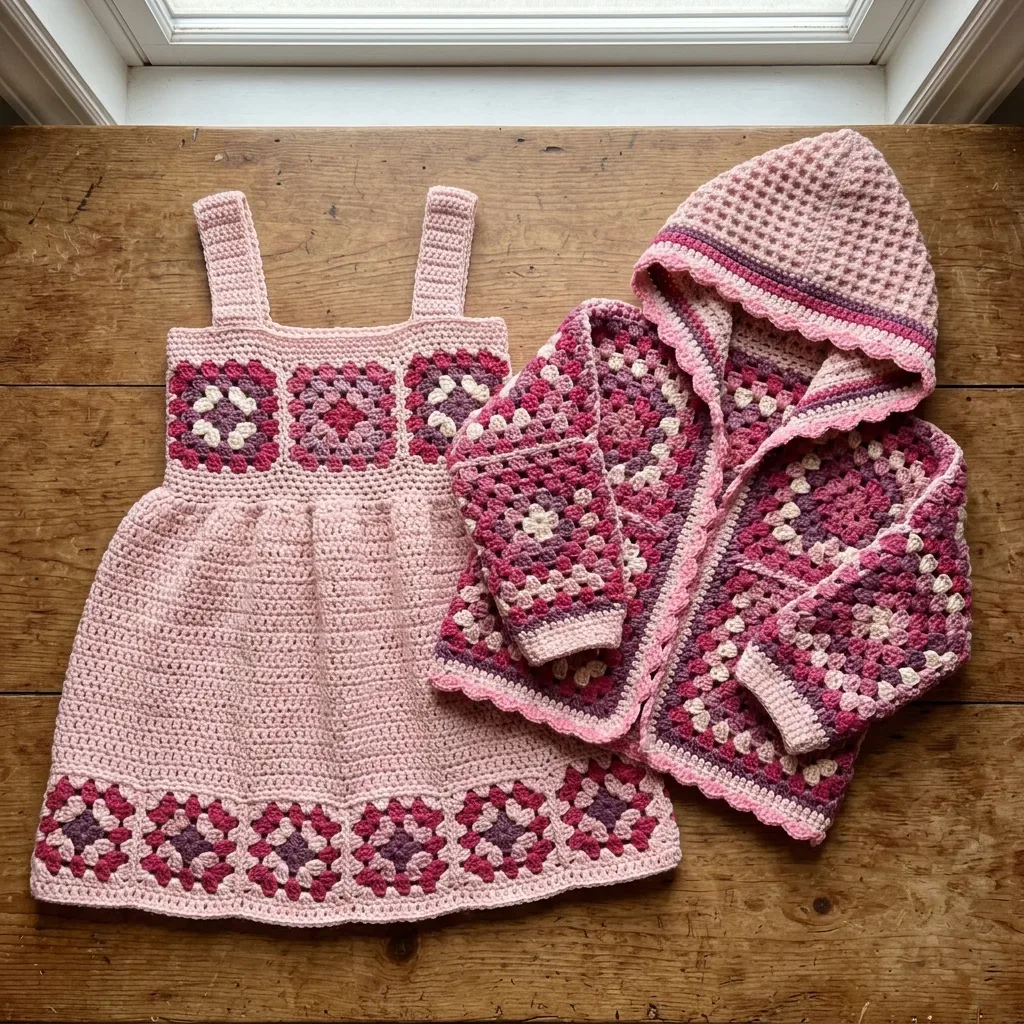
Granny square toddler set in double crochet (UK: treble crochet). US and UK stitch terms given throughout.
- Skill
- Intermediate
- Time
- 4-6 hours
- Yarn weight
- DK
- Hook
- 4.0 mm

Intermediate
What the original write-up called it. Nothing here is graded again.

DK
What the sample was worked in. Any weight works; the size moves with it.

4-6 hours
What the original page reckoned. Your own pace is the one that matters.
About this pattern
This is a two-piece toddler set, a granny square dress and a matching cardigan, built from 32 three-round granny squares joined into back, front and sleeve panels. It adds a waffle-stitch hood, single crochet shoulder straps, ribbed cuffs and a rounded skirt worked in DK cotton with a 4.0 mm hook. Expect several evenings of square-making followed by a focused assembly and blocking session.
The Berry Blossom set is built from granny squares worked in double crochet (UK: treble crochet), the same stitch family behind classic afghan blocks. Each motif takes shape over three rounds, starting with a cream centre and building outward through burgundy, mauve and dusty rose rings, which gives the finished fabric its layered, floral look. Thirty-two of these squares, identical in structure though not all in colour, supply the fabric for both a sleeveless dress and a matching long-sleeved cardigan.
Construction works panel by panel: eight squares form the back (four wide, two tall), four each form the left and right front panels, and eight form each sleeve, worked two wide and four tall. Once the panels are joined, single crochet shoulder straps, a waffle-stitch hood, ribbed cuffs and a rounded skirt are added directly onto the assembled bodice, so the granny squares set the finished width before any shaping rows are worked.
Materials
- Color A, Blush Pink (main color): approximately 450 yards / 411 m for the dress plus 350 yards / 320 m for the cardigan
- Color B, Dusty Rose (light granny accent and edging): approximately 80 yards / 73 m total
- Color C, Burgundy/Berry (dominant granny square ring): approximately 120 yards / 110 m total
- Color D, Mauve Purple (inner granny square ring): approximately 100 yards / 91 m total
- Color E, Cream/Off-White (granny square center): approximately 80 yards / 73 m total
- Color F, Deep Dusty Rose/Antique Pink (granny square outer ring and cardigan stripe accent): approximately 90 yards / 82 m total
- Paintbox Yarns Cotton DK works beautifully for this pattern. It offers 273 yards per 100 g skein, excellent stitch definition, and machine washability.
- Lion Brand 24/7 Cotton in DK weight provides a slightly smoother finish with gentle sheen and lovely drape for the skirt section.
- Scheepjes Softfun (60% cotton, 40% acrylic) adds a little stretch, which helps garments stay on an active toddler.
- US G-6 / 4.0 mm for granny squares and main fabric
- Tapestry needle for weaving in ends
- 6 to 8 stitch markers
- Scissors
- Rust-proof pins for blocking
- Measuring tape
The list is the pattern's own wording.
Instructions
Every round is printed as the pattern wrote it, brackets and all. Open the key beside a round to see only the short forms that round uses.
The Granny Square (3-Round Version)
This foundational motif appears throughout both pieces. Each completed square measures 3.5 inches / 9 cm.
- Round 1
Worked with Color E, Cream Make a magic ring (or chain 4 and join with slip stitch to form a ring).Chain 3 (counts as first double crochet here only).Work 2 double crochet into the ring.Chain 2.[3 double crochet into ring, chain 2] three times.Join with slip stitch to top of beginning chain-3.Fasten off Color E. (12 dc, 4 ch-2 corner spaces)
Key2
- ch
- chain (yarn over and pull through the loop on your hook)
- dc
- double crochet (yarn over, insert hook, yarn over and pull up a loop, yarn over and pull through 2 loops twice)
- Round 2
Worked with Color D, Mauve Purple Join Color D with slip stitch to any ch-2 corner space.Repeat Rows 1 and 2 alternately for 26 total rows. The hood panel measures approximately 7.5 inches / 19 cm tall and 15.5 inches / 39.5 cm wide.Step by step: Fasten off, leaving a long tail; Fold the panel in half widthwise so the two short edges meet. Seam the top edge closed.Chain 3 (counts as first double crochet here only).Work 2 double crochet into same corner space.Chain 2.3 double crochet into same corner space.Chain 1.[3 dc, ch 2, 3 dc into next corner space, ch 1] three times.Join with slip stitch to top of beginning chain-3.Fasten off Color D. (24 dc, 4 ch-2 corner spaces, 4 ch-1 side spaces)
Key2
- ch
- chain (yarn over and pull through the loop on your hook)
- dc
- double crochet (yarn over, insert hook, yarn over and pull up a loop, yarn over and pull through 2 loops twice)
- Round 3
Worked with Color C, Burgundy/Berry Join Color C with slip stitch to any ch-2 corner space.Chain 3 (counts as first double crochet here only).Work 2 double crochet into same corner space.Chain 2.3 double crochet into same corner space.Chain 1.3 double crochet into ch-1 side space.Chain 1.[3 dc, ch 2, 3 dc into next corner space, ch 1, 3 dc into ch-1 side space, ch 1] three times.Join with slip stitch to top of beginning chain-3.Fasten off Color C. (36 dc, 4 ch-2 corner spaces, 8 ch-1 spaces)
Key2
- ch
- chain (yarn over and pull through the loop on your hook)
- dc
- double crochet (yarn over, insert hook, yarn over and pull up a loop, yarn over and pull through 2 loops twice)
Color variation note: For the cardigan, approximately one-third of squares have Round 3 worked in Color F (deep dusty rose) instead of Color C. Scatter these across the body and sleeves as desired.
Waffle Stitch (for the Hood)
This textured stitch creates the cozy hood fabric.
- Round 1
(RS): Chain 2, double crochet in first stitch, front post double crochet around next stitch, double crochet in next stitch repeat across to last stitch, double crochet in last stitch. Turn.
Key1
- RS
- right side
- Round 2
(WS): Chain 2, double crochet in first stitch, back post double crochet around next post stitch, double crochet in next stitch repeat across to last stitch, double crochet in last stitch. Turn.Repeat Rows 1 and 2 for the waffle texture.
Key1
- WS
- wrong side
Section 2: Shoulder Straps
With right side facing, join Color A with slip stitch at the top right corner of the rightmost square.
Work 8 single crochet evenly along the top edge of the first square. (8 sc)
Work the right strap:
- Round 1
Chain 1, turn. Single crochet across. (8 sc)
Key1
- sc
- single crochet (insert hook, yarn over and pull up a loop, yarn over and pull through both loops)
- Round 2
Chain 1, turn. Single crochet across. (8 sc) Continue in single crochet for a total of 14 rows. Fasten off. The strap measures approximately 4.5 inches / 11.5 cm.Skip the center squares for the neckline opening. Join Color A at the beginning of the fifth (leftmost) square top edge. Work 8 single crochet along its top edge. (8 sc)Work the left strap identically to the right strap for 14 rows. Fasten off.
Key1
- sc
- single crochet (insert hook, yarn over and pull up a loop, yarn over and pull through both loops)
Section 4: Skirt
The skirt is worked in the round from the lower edge of the bodice tube in Color A.
Setup Round: With right side facing, join Color A with slip stitch to the lower edge of the front bodice band at the right side seam. Work 70 single crochet evenly distributed around the lower edge of both front and back square bands. Join with slip stitch to first single crochet. (70 sc)
- Round 1
Chain 2, double crochet in each stitch around. Join with slip stitch to first double crochet. (70 dc)
Key1
- dc
- double crochet (yarn over, insert hook, yarn over and pull up a loop, yarn over and pull through 2 loops twice)
- Rounds 2–3
Chain 2, double crochet in each stitch around. Join. (70 dc)
Key1
- dc
- double crochet (yarn over, insert hook, yarn over and pull up a loop, yarn over and pull through 2 loops twice)
- Round 4
Increase round Chain 2, [double crochet in next 6 stitches, 2 double crochet in next stitch] 10 times. Join. (80 dc)
Key1
- dc
- double crochet (yarn over, insert hook, yarn over and pull up a loop, yarn over and pull through 2 loops twice)
- Rounds 5–6
Chain 2, double crochet in each stitch around. Join. (80 dc)
Key1
- dc
- double crochet (yarn over, insert hook, yarn over and pull up a loop, yarn over and pull through 2 loops twice)
- Round 7
Increase round Chain 2, [double crochet in next 7 stitches, 2 double crochet in next stitch] 10 times. Join. (90 dc)
Key1
- dc
- double crochet (yarn over, insert hook, yarn over and pull up a loop, yarn over and pull through 2 loops twice)
- Rounds 8–9
Chain 2, double crochet in each stitch around. Join. (90 dc)
Key1
- dc
- double crochet (yarn over, insert hook, yarn over and pull up a loop, yarn over and pull through 2 loops twice)
- Round 10
Increase round Chain 2, [double crochet in next 8 stitches, 2 double crochet in next stitch] 10 times. Join. (100 dc)
Key1
- dc
- double crochet (yarn over, insert hook, yarn over and pull up a loop, yarn over and pull through 2 loops twice)
- Rounds 11–12
Chain 2, double crochet in each stitch around. Join. (100 dc)
Key1
- dc
- double crochet (yarn over, insert hook, yarn over and pull up a loop, yarn over and pull through 2 loops twice)
- Round 13
Increase round Chain 2, [double crochet in next 9 stitches, 2 double crochet in next stitch] 10 times. Join. (110 dc)
Key1
- dc
- double crochet (yarn over, insert hook, yarn over and pull up a loop, yarn over and pull through 2 loops twice)
- Rounds 14–15
Chain 2, double crochet in each stitch around. Join. (110 dc)
Key1
- dc
- double crochet (yarn over, insert hook, yarn over and pull up a loop, yarn over and pull through 2 loops twice)
- Round 16
Increase round Chain 2, [double crochet in next 10 stitches, 2 double crochet in next stitch] 10 times. Join. (120 dc)
Key1
- dc
- double crochet (yarn over, insert hook, yarn over and pull up a loop, yarn over and pull through 2 loops twice)
- Rounds 17–18
Chain 2, double crochet in each stitch around. Join. (120 dc) Fasten off Color A.
Key1
- dc
- double crochet (yarn over, insert hook, yarn over and pull up a loop, yarn over and pull through 2 loops twice)
Checkpoint: The skirt should measure approximately 9.5 inches / 24 cm from the top of the bodice to the lower edge, with a hem circumference of approximately 34 inches / 86 cm.
Section 8: Ribbed Cuffs
Join Color A to the lower edge of one sleeve tube with right side facing.
Work 22 single crochet evenly around the lower edge. Join to work in the round. (22 sc)
Switch to US E-4 / 3.5 mm hook.
- Round 1
Chain 1, single crochet in back loop only of each stitch around. Join. (22 sc) Repeat Round 1 for 8 total rounds. Fasten off.Repeat for second sleeve.
Key1
- sc
- single crochet (insert hook, yarn over and pull up a loop, yarn over and pull through both loops)
Section 1: Top Granny Square Bodice Band
Make 5 standard granny squares following the instructions above.
Join them in a horizontal strip using the flat join method, connecting along one side edge of each square.
The joined strip should measure approximately 17.5 inches / 44.5 cm wide and 3.5 inches / 9 cm tall.
Section 3: Back Bodice Band
Make 5 more standard granny squares. Join them identically to the front band.
Attach the strap ends to the back bodice band using whipstitch, positioning left front strap to left back shoulder and right front strap to right back shoulder.
Seam the front and back bodice bands together along their side edges using whipstitch. This creates the body tube. Leave the bottom edge open.
Checkpoint: The bodice tube should measure approximately 17.5 inches / 44.5 cm around and approximately 3.5 inches / 9 cm tall.
Section 5: Lower Granny Square Band
Make 10 standard granny squares.
Join them in a horizontal ring to form a tube measuring approximately 35 inches / 89 cm in circumference and 3.5 inches / 9 cm tall.
With Color A and a tapestry needle, whipstitch the top edge of the square band to the last round of double crochet on the skirt, spacing the 10 squares evenly around the 120 double crochet.
Making up
- Step 1Wet blocking is strongly recommended for both pieces. Soak each piece in cool water for 20 minutes. Gently squeeze out excess water in a towel. Pin to measurements on a foam blocking mat. Allow to dry completely (12 to 24 hours) before removing pins.
- Step 2Blocking evens the granny squares, relaxes the skirt drape, and makes seaming lines crisp.
- Step 3After blocking, check that all granny squares lie flat with no cupping or ruffling. If any square cups, it was worked too tightly and may need reblocking with pins or remaking with a larger hook.
Notes from the pattern
- Use a US G-6 / 4.0 mm hook throughout for both the granny squares and the main fabric; a looser or tighter hook will shift the 3.5 inch / 9 cm square size and throw off panel dimensions.
- Set aside 6 to 8 stitch markers to track panel counts, since the back panel alone needs 8 squares arranged 4 wide by 2 tall and mixing up rows is easy once colours vary.
- About 20 of the 32 squares follow the standard colour formula, while the remaining 12 substitute Colour F on Round 3; sort or label finished squares by type before assembling panels.
- Check gauge against the stated 3.5 inch / 9 cm square before starting all 32 motifs, since any size drift compounds quickly across an 8-square panel.
The essentials
- Rounds
- 20
- Parts
- 8
- Level
- Intermediate
- Time
- 4-6 hours
- Hook
- 4.0 mm
- Yarn
- DK
Stitches you will use
- Granny square construction with colour changes Appears in every one of the 32 squares; fasten off and rejoin cleanly between rounds so Colour B, C, D, E and F sit in tidy, undistorted rings.
- Front post and back post double crochet Used for the waffle-stitch hood rows; work the post stitch around the stitch stem, not into its top, or the raised texture flattens out.
- Panel joining and edge single crochet Needed to assemble squares into the back, front and sleeve panels and to pick up the 8 single crochet stitches for each shoulder strap; keep stitch placement even along seams so strap widths match.
Troubleshooting
A granny square cups or ruffles instead of lying flat after blocking
This points to stitches worked too tightly, most often in the foundation ring or Round 1; re-block with firm pins, and on future squares ease tension slightly on the first two rounds.
Squares come out noticeably different sizes across the 32 made
Hook tension usually drifts over a long make; recheck against the 3.5 inch / 9 cm measurement partway through and swap to a slightly larger or smaller hook if squares are running small or large.
The waffle-stitch hood looks flat rather than textured
Front post and back post stitches have likely been worked as ordinary double crochet into the stitch top; unravel to the last correct row and rework each post stitch around the stem of the stitch below.
Substituting yarn
- 100% mercerised cotton, DK weight
- Gives the crispest stitch definition for the granny square rings and holds blocking well, but has less stretch than the cotton blends named, so squares may need slightly firmer tension to match the stated size with the same 4.0 mm hook.
- Cotton-acrylic blend, DK weight
- Keeps a similar drape to the pattern's named yarns with easier care and a touch more give, useful for the skirt section; hook size and gauge stay close to the original without adjustment.
- Wool-cotton blend, DK weight
- Adds warmth and a softer hand for the cardigan, but wool content means hand washing rather than machine washing; swatch the granny square first, as wool blends can grow slightly and may call for a 3.5 mm hook to hold the 3.5 inch / 9 cm square size.
Washing and care
- Hand wash in cool water using a gentle detergent suited to cotton and cotton-acrylic blends, then squeeze out excess water in a towel rather than wringing, which protects the granny square shaping.
- Dry the dress and cardigan flat on a blocking mat, easing the squares back into shape while damp; store folded rather than hung, since the granny square panels can stretch out of shape on a hanger.
FAQs
Questions
How many granny squares does the full set need?
The set uses 32 granny squares in total, split across the back panel, left and right front panels, and the sleeves. Roughly 20 follow the standard colour formula and 12 use Colour F on Round 3 for variety.
Can the dress and cardigan be made on their own instead of as a set?
Yes, since each piece is assembled from its own panels of granny squares. Making only the dress or only the cardigan simply means working the relevant panel counts rather than all 32 squares.
What is the difference between the standard squares and the Colour F squares?
Both use the same three-round granny square structure, but 12 of the 32 squares swap in Colour F for Round 3 instead of the usual round colour. This is a deliberate variation for visual interest, not an error to correct.
Why does the pattern recommend wet blocking before seaming?
Blocking evens out any unevenness between the 32 granny squares, relaxes the skirt's drape and makes the seaming lines between panels sit crisply. Squares should lie flat with no cupping once blocking is complete.
Which hook size is needed for the whole set?
A US G-6 / 4.0 mm hook is used throughout, for the granny squares and the main fabric alike. Holding this hook size consistently helps keep every square close to the stated 3.5 inch / 9 cm measurement.
These answers came from whoever first published the pattern, kept word for word.