 EVERY CROCHET
Baby & Toddler 14 rounds No account, no download
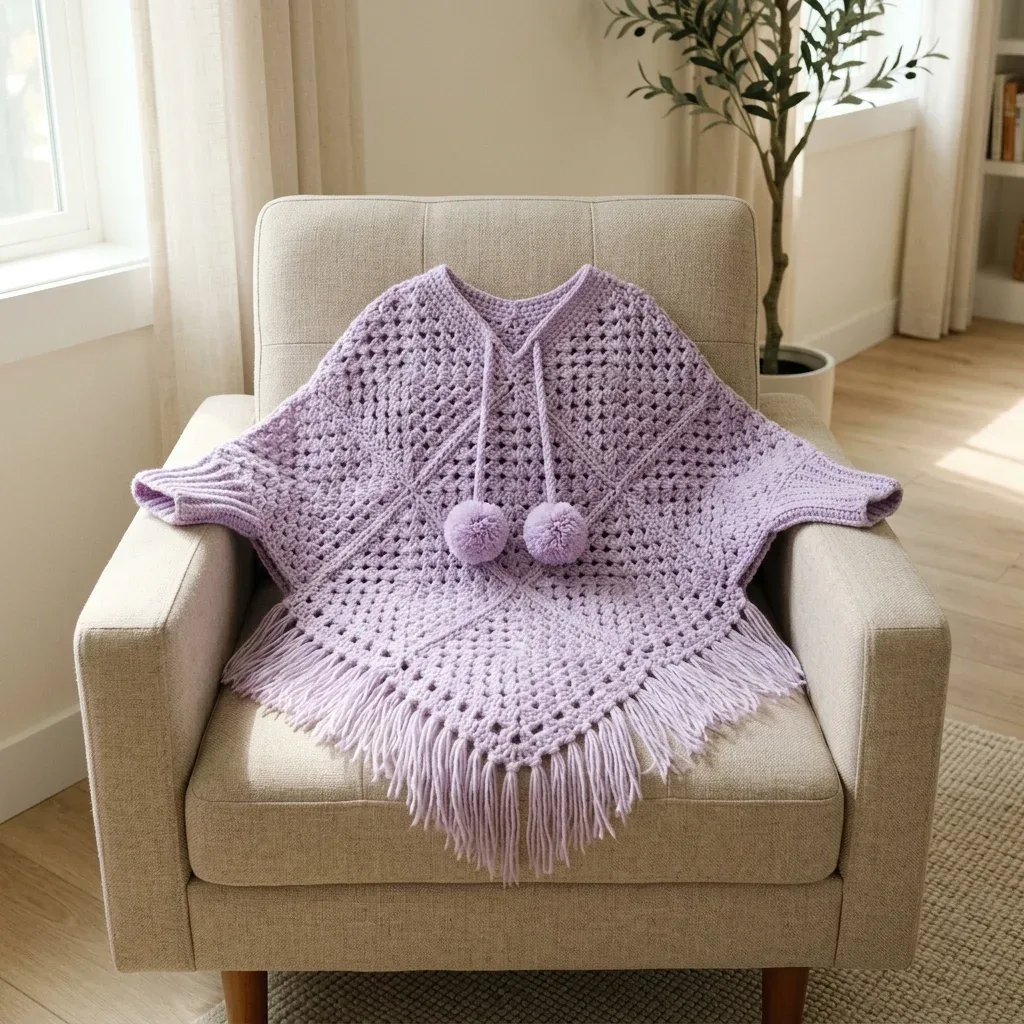
A diamond granny square poncho with pom pom ties
A lacy granny cluster (UK: treble) poncho for toddlers, with both US and UK crochet terms explained where needed.
- Skill
- Intermediate
- Time
- 6-9 hours
- Yarn weight
- Worsted
- Hook
- 6.0 mm
Intermediate
What the original write-up called it. Nothing here is graded again.
Worsted
What the sample was worked in. Any weight works; the size moves with it.
6-9 hours
What the original page reckoned. Your own pace is the one that matters.
About this pattern
This is a baby poncho made from two granny square panels, turned diamond-wise and seamed only at the shoulders so the open side corners become arm holes. The fabric uses a three-double-crochet granny cluster (UK: treble cluster), finished with single crochet trim, a fringed hem, and a woven neck tie strung with pom poms. It fits children 12 to 24 months and takes 350 to 400 yards of worsted-weight yarn.
This poncho belongs to the granny cluster family of crochet fabrics, built from groups of three double crochet stitches (UK: treble crochet) worked into the same stitch or space. The technique, sometimes called a shell cluster, produces an open, lacy texture with good stitch definition and plenty of drape — ideal for a layer that needs to be warm without trapping heat against a busy toddler. Lavender is the sample colourway, though the stitch pattern reads clearly in any solid or lightly variegated worsted-weight yarn.
Construction relies on two identical granny squares, each worked from the centre out in the standard four-corner format. Turned on point so each becomes a diamond, the squares are seamed together along one edge only, at the top corners that sit on the shoulders. The two open side corners of each diamond are left unseamed, forming the arm openings without any separate armhole shaping. A single-crochet edging finishes the neck and each arm opening once the panels are joined, and a woven chain tie threaded through the neck edging closes the look.
Materials
- Paintbox Yarns Simply DK held double creates a worsted equivalent weight while keeping the fabric airy and lightweight.
- Caron Simply Soft in Soft Plum or Orchid is budget friendly, easy care, and produces a lovely fluid drape.
- When substituting yarn, choose something machine washable since this is a baby garment. Avoid fuzzy yarns like mohair blends because they will obscure the pretty granny cluster texture.
Yarn
- Worsted weight yarn, CYC 4 or Medium weight, approximately 350 to 400 yards total in lavender or your chosen color
Hook
- US size J-10, which is 6.0 mm
Notions
- Yarn needle for seaming and weaving in ends
- Sharp scissors
- 4 stitch markers
- Pom pom maker or two small cardboard circles for making 2 inch pom poms
- Measuring tape
The list is the pattern's own wording.
Instructions
Every round is printed as the pattern wrote it, brackets and all. Open the key beside a round to see only the short forms that round uses.
Notions
Yarn needle for seaming and weaving in ends Sharp scissors 4 stitch markers Pom pom maker or two small cardboard circles for making 2 inch pom poms
Measuring tape Yarn Suggestions That Work Beautifully
Lion Brand Pound of Love in Pastel Lavender is soft against baby skin, machine washable, and gives beautiful stitch definition with its slight sheen.
Paintbox Yarns Simply DK held double creates a worsted equivalent weight while keeping the fabric airy and lightweight.
Caron Simply Soft in Soft Plum or Orchid is budget friendly, easy care, and produces a lovely fluid drape.
When substituting yarn, choose something machine washable since this is a baby garment. Avoid fuzzy yarns like mohair blends because they will obscure the pretty granny cluster texture.
Gauge Information
Getting gauge right matters here because even small differences will significantly affect how the finished poncho fits a small child.
One complete granny square motif repeat measured over 4 rows of cluster pattern should equal 3.5 inches or 9 cm.
For a more practical reference: 16 double crochet stitches across should measure 4 inches or 10 cm, and 8 rows of double crochet should measure 4 inches or 10 cm.
Always swatch before starting. If your swatch is too big, try a smaller hook. If it is too small, go up a hook size.
Finished Measurements This poncho fits a child approximately 12 to 24 months old.
Width across one panel from point to point: approximately 18 inches or 46 cm Length from neckline to front hem point: approximately 14 inches or 35.5 cm
Total width when worn across the shoulders: approximately 14 inches or 35.5 cm The poncho drapes as a double pointed front and back panel that falls to mid torso on a toddler.
Abbreviations and Stitch Definitions
Here are all the abbreviations used in this pattern. I have included plain English definitions so you know exactly what each stitch involves. beg = beginning
ch = chain. Wrap the yarn over your hook and pull it through the loop on your hook. That is one chain. ch-sp = chain space. The gap or hole created by a chain stitch in the previous row or round.
dc = double crochet. Yarn over, insert hook into stitch, yarn over and pull up a loop (3 loops on hook), yarn over and pull through 2 loops (2 loops remain), yarn over and pull through remaining 2 loops. One double crochet complete. rep = repeat rnd = round
RS = right side. The front or public facing side of your work.
sc = single crochet. Insert hook into stitch, yarn over and pull up a loop (2 loops on hook), yarn over and pull through both loops. sk = skip
sl st = slip stitch. Insert hook into stitch, yarn over and pull through both the stitch and the loop on your hook in one motion. sp = space st = stitch sts = stitches
WS = wrong side. The back or private facing side of your work. yo = yarn over. Wrap the yarn over your hook from back to front.
[ ] = work the instructions within brackets the number of times indicated ( ) = stitch count at the end of the row or round
\ * = repeat the instructions following the asterisk as directed Special Stitches Explained Granny Cluster
This is also called a shell cluster in this pattern. It is simply 3 double crochet stitches worked into the same stitch or space.
Here is how to work it: Yarn over, insert hook into the designated stitch or space, yarn over and pull up a loop, yarn over and draw through two loops, yarn over, insert hook into the same stitch or space, yarn over and pull up a loop, yarn over and draw through two loops, yarn over, insert hook into the same stitch or space again, yarn over and pull up a loop, yarn over and draw through two loops, yarn over and draw through all four loops on hook.
That completes one 3 dc granny cluster. In this pattern, a granny cluster is always 3 dc worked into the same space unless otherwise noted.
Corner Increase Unit
Work [3 dc, ch 2, 3 dc] into the same corner chain 2 space. This unit adds width at each of the four corners on every round, which is what makes your square grow.
Side Fill Unit
Work [3 dc, ch 1, 3 dc] into each ch 1 side space along the edges between corners. As your square grows, more ch 1 spaces accumulate and each one receives a side fill unit.
Fringe
Cut yarn strands to the stated length. Hold the specified number of strands together and fold in half. Insert the folded loop through a stitch at the hem edge, pull the yarn tails through the loop, and tighten. That creates one fringe knot.
Pattern Notes Before You Begin
1. The poncho is made of two identical panels. Each panel begins from a center ring and grows outward in rounds, forming a large granny square approximately 18 inches from corner to corner measured diagonally.
2. Each panel is worked flat in joined rounds. After completing each round, join with a slip stitch to the top of the beginning ch 3, then turn your work. Turning on each round keeps both sides of the fabric looking consistent and prevents a visible spiral jog.
3. The panels are placed with one corner at the top for the neck, one at the bottom for the hem point, and two at the sides where the arms come through. The two panels are seamed at the top two shoulder segments only, leaving the side corner spaces open as arm openings.
4. The neck opening is the space between the two joined panels at the center top. A simple chain tie is worked around this opening.
5. The sleeve cuffs are worked in the round in ribbed single crochet around each arm opening after seaming.
6. Fringe is attached along the entire lower hem edge of both front and back panels after all other finishing is complete.
7. The starting magic ring can be substituted with ch 4 and join with sl st to form a ring.
8. All ch 3 at the beginning of a round counts as a dc throughout.
Granny Square Panel Instructions Make 2 identical panels.
Foundation Ring Make a magic ring. Or if you prefer, ch 4 and join with sl st to form a ring.
- Round 1
(RS) Ch 3 (counts as dc), work 2 dc into ring, ch 2, [3 dc into ring, ch 2] 3 times, join with sl st to top of beginning ch 3. Turn. (4 clusters, 4 ch 2 corner spaces, 12 dc total)
Key5
- sl st
- slip stitch. Insert hook into stitch, yarn over and pull through both the stitch and the loop on your hook in one motion.
- ch
- chain. Wrap the yarn over your hook and pull it through the loop on your hook. That is one chain.
- dc
- double crochet. Yarn over, insert hook into stitch, yarn over and pull up a loop (3 loops on hook), yarn over and pull through 2 loops (2 loops remain), yarn over and pull through remaining 2 loops. One double crochet complete.
- RS
- right side. The front or public facing side of your work.
- st
- stitch
- Round 2
(WS) Sl st into first ch 2 corner sp, ch 3, work 2 dc into same corner sp, ch 2, 3 dc into same corner sp [this completes the first corner unit], ch 1, [work corner unit of (3 dc, ch 2, 3 dc) into next ch 2 corner sp, ch 1] 3 times, join with sl st to top of beg ch 3. Turn. (8 clusters, 4 ch 2 corner spaces, 4 ch 1 side spaces, 24 dc total)
Key7
- sl st
- slip stitch. Insert hook into stitch, yarn over and pull through both the stitch and the loop on your hook in one motion.
- beg
- beginning
- ch
- chain. Wrap the yarn over your hook and pull it through the loop on your hook. That is one chain.
- dc
- double crochet. Yarn over, insert hook into stitch, yarn over and pull up a loop (3 loops on hook), yarn over and pull through 2 loops (2 loops remain), yarn over and pull through remaining 2 loops. One double crochet complete.
- sp
- space
- st
- stitch
- WS
- wrong side. The back or private facing side of your work.
- Round 3
(RS) Sl st into first ch 2 corner sp, ch 3, 2 dc into same corner sp, ch 2, 3 dc into same corner sp, ch 1, 3 dc into next ch 1 side sp, ch 1, [corner unit into next ch 2 sp, ch 1, 3 dc into next ch 1 side sp, ch 1] 3 times, join with sl st to top of beg ch 3. Turn. (12 clusters, 4 ch 2 corner spaces, 8 ch 1 side spaces, 36 dc total)
Key7
- sl st
- slip stitch. Insert hook into stitch, yarn over and pull through both the stitch and the loop on your hook in one motion.
- beg
- beginning
- ch
- chain. Wrap the yarn over your hook and pull it through the loop on your hook. That is one chain.
- dc
- double crochet. Yarn over, insert hook into stitch, yarn over and pull up a loop (3 loops on hook), yarn over and pull through 2 loops (2 loops remain), yarn over and pull through remaining 2 loops. One double crochet complete.
- RS
- right side. The front or public facing side of your work.
- sp
- space
- st
- stitch
- Round 4
(WS) Sl st into first ch 2 corner sp, ch 3, 2 dc into same corner sp, ch 2, 3 dc into same corner sp, ch 1, [3 dc into next ch 1 side sp, ch 1] 2 times, [corner unit into next ch 2 corner sp, ch 1, [3 dc into next ch 1 side sp, ch 1] 2 times] 3 times, join with sl st to top of beg ch 3. Turn. (16 clusters, 4 ch 2 corner spaces, 12 ch 1 side spaces, 48 dc total)
Key7
- sl st
- slip stitch. Insert hook into stitch, yarn over and pull through both the stitch and the loop on your hook in one motion.
- beg
- beginning
- ch
- chain. Wrap the yarn over your hook and pull it through the loop on your hook. That is one chain.
- dc
- double crochet. Yarn over, insert hook into stitch, yarn over and pull up a loop (3 loops on hook), yarn over and pull through 2 loops (2 loops remain), yarn over and pull through remaining 2 loops. One double crochet complete.
- sp
- space
- st
- stitch
- WS
- wrong side. The back or private facing side of your work.
- Round 5
(RS) Sl st into first ch 2 corner sp, ch 3, 2 dc into same corner sp, ch 2, 3 dc into same corner sp, ch 1, [3 dc into next ch 1 side sp, ch 1] 3 times, [corner unit into next ch 2 corner sp, ch 1, [3 dc into next ch 1 side sp, ch 1] 3 times] 3 times, join with sl st to top of beg ch 3. Turn. (20 clusters, 4 ch 2 corner spaces, 16 ch 1 side spaces, 60 dc total)
Key7
- sl st
- slip stitch. Insert hook into stitch, yarn over and pull through both the stitch and the loop on your hook in one motion.
- beg
- beginning
- ch
- chain. Wrap the yarn over your hook and pull it through the loop on your hook. That is one chain.
- dc
- double crochet. Yarn over, insert hook into stitch, yarn over and pull up a loop (3 loops on hook), yarn over and pull through 2 loops (2 loops remain), yarn over and pull through remaining 2 loops. One double crochet complete.
- RS
- right side. The front or public facing side of your work.
- sp
- space
- st
- stitch
- Round 6
(WS) Sl st into first ch 2 corner sp, ch 3, 2 dc into same corner sp, ch 2, 3 dc into same corner sp, ch 1, [3 dc into next ch 1 side sp, ch 1] 4 times, [corner unit into next ch 2 corner sp, ch 1, [3 dc into next ch 1 side sp, ch 1] 4 times] 3 times, join with sl st to top of beg ch 3. Turn. (24 clusters, 4 ch 2 corner spaces, 20 ch 1 side spaces, 72 dc total)
Key7
- sl st
- slip stitch. Insert hook into stitch, yarn over and pull through both the stitch and the loop on your hook in one motion.
- beg
- beginning
- ch
- chain. Wrap the yarn over your hook and pull it through the loop on your hook. That is one chain.
- dc
- double crochet. Yarn over, insert hook into stitch, yarn over and pull up a loop (3 loops on hook), yarn over and pull through 2 loops (2 loops remain), yarn over and pull through remaining 2 loops. One double crochet complete.
- sp
- space
- st
- stitch
- WS
- wrong side. The back or private facing side of your work.
- Round 7
(RS) Sl st into first ch 2 corner sp, ch 3, 2 dc into same corner sp, ch 2, 3 dc into same corner sp, ch 1, [3 dc into next ch 1 side sp, ch 1] 5 times, [corner unit into next ch 2 corner sp, ch 1, [3 dc into next ch 1 side sp, ch 1] 5 times] 3 times, join with sl st to top of beg ch 3. Turn. (28 clusters, 4 ch 2 corner spaces, 24 ch 1 side spaces, 84 dc total)
Key7
- sl st
- slip stitch. Insert hook into stitch, yarn over and pull through both the stitch and the loop on your hook in one motion.
- beg
- beginning
- ch
- chain. Wrap the yarn over your hook and pull it through the loop on your hook. That is one chain.
- dc
- double crochet. Yarn over, insert hook into stitch, yarn over and pull up a loop (3 loops on hook), yarn over and pull through 2 loops (2 loops remain), yarn over and pull through remaining 2 loops. One double crochet complete.
- RS
- right side. The front or public facing side of your work.
- sp
- space
- st
- stitch
- Round 8
(WS) Sl st into first ch 2 corner sp, ch 3, 2 dc into same corner sp, ch 2, 3 dc into same corner sp, ch 1, [3 dc into next ch 1 side sp, ch 1] 6 times, [corner unit into next ch 2 corner sp, ch 1, [3 dc into next ch 1 side sp, ch 1] 6 times] 3 times, join with sl st to top of beg ch 3. Turn. (32 clusters, 4 ch 2 corner spaces, 28 ch 1 side spaces, 96 dc total)
Key7
- sl st
- slip stitch. Insert hook into stitch, yarn over and pull through both the stitch and the loop on your hook in one motion.
- beg
- beginning
- ch
- chain. Wrap the yarn over your hook and pull it through the loop on your hook. That is one chain.
- dc
- double crochet. Yarn over, insert hook into stitch, yarn over and pull up a loop (3 loops on hook), yarn over and pull through 2 loops (2 loops remain), yarn over and pull through remaining 2 loops. One double crochet complete.
- sp
- space
- st
- stitch
- WS
- wrong side. The back or private facing side of your work.
- Round 9
(RS) Sl st into first ch 2 corner sp, ch 3, 2 dc into same corner sp, ch 2, 3 dc into same corner sp, ch 1, [3 dc into next ch 1 side sp, ch 1] 7 times, [corner unit into next ch 2 corner sp, ch 1, [3 dc into next ch 1 side sp, ch 1] 7 times] 3 times, join with sl st to top of beg ch 3. Turn. (36 clusters, 4 ch 2 corner spaces, 32 ch 1 side spaces, 108 dc total)
Key7
- sl st
- slip stitch. Insert hook into stitch, yarn over and pull through both the stitch and the loop on your hook in one motion.
- beg
- beginning
- ch
- chain. Wrap the yarn over your hook and pull it through the loop on your hook. That is one chain.
- dc
- double crochet. Yarn over, insert hook into stitch, yarn over and pull up a loop (3 loops on hook), yarn over and pull through 2 loops (2 loops remain), yarn over and pull through remaining 2 loops. One double crochet complete.
- RS
- right side. The front or public facing side of your work.
- sp
- space
- st
- stitch
- Round 10
(WS) Sl st into first ch 2 corner sp, ch 3, 2 dc into same corner sp, ch 2, 3 dc into same corner sp, ch 1, [3 dc into next ch 1 side sp, ch 1] 8 times, [corner unit into next ch 2 corner sp, ch 1, [3 dc into next ch 1 side sp, ch 1] 8 times] 3 times, join with sl st to top of beg ch 3. Turn. (40 clusters, 4 ch 2 corner spaces, 36 ch 1 side spaces, 120 dc total)Checkpoint: After Round 10, each panel should measure approximately 18 inches or 46 cm from corner to corner diagonally. Each side of the square measures approximately 12.5 inches or 32 cm. If your panel is larger or smaller, adjust by adding or removing rounds before proceeding.Fasten off and weave in ends. Make a second identical panel.
Key7
- sl st
- slip stitch. Insert hook into stitch, yarn over and pull through both the stitch and the loop on your hook in one motion.
- beg
- beginning
- ch
- chain. Wrap the yarn over your hook and pull it through the loop on your hook. That is one chain.
- dc
- double crochet. Yarn over, insert hook into stitch, yarn over and pull up a loop (3 loops on hook), yarn over and pull through 2 loops (2 loops remain), yarn over and pull through remaining 2 loops. One double crochet complete.
- sp
- space
- st
- stitch
- WS
- wrong side. The back or private facing side of your work.
Seaming the Panels Together
Lay both panels flat with the right side facing up. Orient each panel as a diamond with one corner pointing up, one pointing down, and two out to the sides. The top corner of each panel will form part of the neck edge, and the bottom corner will be the front and back hem point.
Place the two panels together with wrong sides facing each other so the right side faces out on both sides.
You will seam along the top two side edges only. Leave the bottom two side edges open because these become the arm openings. Also leave a center neck gap.
The seam on each shoulder covers approximately 3 side cluster groups, roughly 4 to 4.5 inches or 10 to 11.5 cm, measuring down from the top corner on each side edge.
Mark the seam start and stop points with stitch markers on both panels before joining.
Using a yarn needle and a length of yarn, use whip stitch through both panels cluster by cluster and chain space by chain space along each marked shoulder segment. Seam the left shoulder, then the right shoulder, leaving the center top open as the neck opening and both lower side corners open as arm openings.
You can also join the shoulders using a slip stitch seam worked through the right side with your hook and yarn for a decorative ridge on the outside.
Checkpoint: After seaming, try the poncho over a doll or form. The neck opening should be approximately 9 to 10 inches or 23 to 25.5 cm in circumference, large enough to slip over a toddler’s head. Each arm opening should measure approximately 8 to 9 inches or 20 to 23 cm around.
Neck Edging and Tie With right side facing and beginning at one shoulder seam, attach yarn at neck edge with sl st.
Part 2
- Round 1
Ch 1, work 1 sc into each dc and 1 sc into each ch sp evenly around entire neck opening, join with sl st to first sc. Do not turn. Aim for approximately 44 to 48 sc evenly distributed. (approximately 46 sc)
Key6
- sl st
- slip stitch. Insert hook into stitch, yarn over and pull through both the stitch and the loop on your hook in one motion.
- ch
- chain. Wrap the yarn over your hook and pull it through the loop on your hook. That is one chain.
- dc
- double crochet. Yarn over, insert hook into stitch, yarn over and pull up a loop (3 loops on hook), yarn over and pull through 2 loops (2 loops remain), yarn over and pull through remaining 2 loops. One double crochet complete.
- sc
- single crochet. Insert hook into stitch, yarn over and pull up a loop (2 loops on hook), yarn over and pull through both loops.
- sp
- space
- st
- stitch
- Round 2
Ch 1, sc in each sc around, join with sl st to first sc. Fasten off. (approximately 46 sc)Making the Tie Using the same yarn, make a chain approximately 24 inches or 61 cm long. Fasten off.Beginning at one side of the neck center front, weave the chain in and out through the sc stitches of the neck edging, going in and out through the stitches rather than through the fabric itself. Circle the entire neckline. The two ends of the chain will emerge at the same point at center front.Knot a pom pom securely onto each end of the chain.
Key4
- sl st
- slip stitch. Insert hook into stitch, yarn over and pull through both the stitch and the loop on your hook in one motion.
- ch
- chain. Wrap the yarn over your hook and pull it through the loop on your hook. That is one chain.
- sc
- single crochet. Insert hook into stitch, yarn over and pull up a loop (2 loops on hook), yarn over and pull through both loops.
- st
- stitch
Making the Pom Poms
Wrap yarn around two fingers or a pom pom maker approximately 50 to 60 times. Tie tightly at the center with a long strand. Cut the loops on both sides. Trim into a round 1.5 to 2 inch or 4 to 5 cm pom pom. Use the long tying strand to attach each pom pom to one end of the chain tie.
Sleeve Cuffs The cuffs are worked in the round around each arm opening to create the ribbed wrist edge.
With right side facing and beginning at the underarm point of one arm opening, attach yarn with sl st.
Part 3
- Round 1
Ch 1, work 1 sc into each st and ch sp evenly around arm opening, join with sl st to first sc. Aim for approximately 36 to 40 sc distributed evenly. (approximately 38 sc)
Key5
- sl st
- slip stitch. Insert hook into stitch, yarn over and pull through both the stitch and the loop on your hook in one motion.
- ch
- chain. Wrap the yarn over your hook and pull it through the loop on your hook. That is one chain.
- sc
- single crochet. Insert hook into stitch, yarn over and pull up a loop (2 loops on hook), yarn over and pull through both loops.
- sp
- space
- st
- stitch
- Round 2
through 5 Ch 1, sc in each sc around, join with sl st to first sc. (38 sc) Tip for ribbed texture: For a more pronounced rib effect, work Rounds 2 through 5 in back loop only single crochet instead of both loops. This creates a subtle horizontal rib texture.After Round 5, fasten off and weave in ends. Repeat for the second arm opening.
Key4
- sl st
- slip stitch. Insert hook into stitch, yarn over and pull through both the stitch and the loop on your hook in one motion.
- ch
- chain. Wrap the yarn over your hook and pull it through the loop on your hook. That is one chain.
- sc
- single crochet. Insert hook into stitch, yarn over and pull up a loop (2 loops on hook), yarn over and pull through both loops.
- st
- stitch
Checkpoint: Each cuff should measure approximately 1.25 to 1.5 inches or 3 to 4 cm in depth. If you want a slightly longer cuff, work 2 additional rounds before fastening off.
Making up
- Step 1Weave in all remaining ends securely using a yarn needle. Work each tail in two different directions through the back of the work to prevent unraveling.
- Step 2Wet blocking is strongly recommended. Submerge the finished poncho in cool water and press out excess moisture in a towel. Do not wring. Lay flat on a blocking mat or clean towels and pin each corner point firmly, stretching gently to the stated measurements. Allow to dry completely before unpinning, typically 24 hours.
- Step 3Blocking opens up the granny cluster lace texture significantly and gives the poncho a more polished, even appearance. The fringe will also straighten and soften during the blocking process.
Notes from the pattern
- The pattern is written for a US size J-10 (6.0 mm) hook; swatching first against the stated gauge (16 dc and 8 rows per 4in/10cm, and a 3.5in/9cm motif repeat over 4 rows) matters more here than in most projects, since even a small mismatch changes how the poncho fits a small child.
- Four stitch markers are called for; placing one at each corner of the granny square keeps the diamond shape square while working the panel from the centre out.
- Because this is a baby garment, choose a machine-washable yarn such as those listed and avoid fuzzy fibres like mohair, which will blur the open texture of the granny cluster.
- Roughly 350 to 400 yards of worsted-weight yarn is needed in total; buying on the higher end of that range leaves room for the fringe and the woven neck tie.
The essentials
- Rounds
- 14
- Parts
- 3
- Level
- Intermediate
- Time
- 6-9 hours
- Hook
- 6.0 mm
- Yarn
- Worsted
Stitches you will use
- Granny cluster (3-dc shell) construction Used throughout both panels; keep all three double crochet stitches snug in the same space so the cluster stays compact rather than splaying open.
- Partial seaming at the shoulders Only the top corners of each diamond are joined; watch that both panels are matched round-for-round so the front and back points hang level.
- Back-loop-only single crochet ribbing Optional on the cuffs (Rounds 2 through 5 of Part 3); working into the back loop only tightens the rib, so keep tension even to avoid a flared or puckered edge.
Troubleshooting
The arm openings feel tight or gape oddly once the cuff trim is added.
The sc count around the opening likely fell outside the 36 to 40 stitch range; pull back to Round 1 of the cuff and redistribute stitches more evenly before working Rounds 2 through 5.
The front and back points of the poncho do not hang at the same length.
The shoulder seam was likely joined at mismatched rounds on the two panels; unpick and re-pin so the same corner round on each diamond meets before seaming.
The finished poncho comes out noticeably larger or smaller than the 12 to 24 month fit.
Gauge has drifted from the stated 16 dc and 8 rows per 4in or the 3.5in motif repeat; reswatch and move up or down a hook size rather than adjusting tension by eye.
Substituting yarn
- Cotton-acrylic blend, DK weight held double
- Gives a slightly crisper, heavier drape than the suggested yarns and firmer stitch definition on the cluster; the J-10 (6.0 mm) hook still works but swatch to confirm the motif repeat.
- 100% cotton, worsted weight
- Produces a heavier, more structured poncho with less movement in the fringe; machine washable but may need a hook half a size larger to keep the fabric from stiffening.
- Acrylic, worsted weight, single strand
- Closest match to the pattern's intended fabric — light, airy, and budget-friendly — with no change to hook size or yardage needed.
Washing and care
- Wash on a gentle, cool machine cycle or by hand, since the suggested acrylic and acrylic-blend yarns are machine washable; avoid high heat in the dryer and instead lay the poncho flat to dry.
- Reshape by pinning the corner points flat while damp, as in the original blocking, each time the poncho is washed; store folded flat rather than on a hanger to keep the granny cluster fabric from stretching out of shape.
FAQs
Questions
What age or size does this poncho fit?
As written, the poncho fits children approximately 12 to 24 months old. Sizing notes are included in the pattern for crocheters who want to size it up or down.
What exactly is a granny cluster, and is it the same as a shell?
In this pattern the two terms are used interchangeably: it is three double crochet stitches worked into the same stitch or space, drawn together at the top. It is the stitch that gives the fabric its open, lacy structure.
Why does gauge matter so much for a baby garment like this?
Because the poncho has no separate armhole shaping, the fit depends entirely on the finished size of the two granny square panels. A gauge that is even slightly off the stated 16 dc and 8 rows per 4in will shift the neckline, arm openings, and overall drape.
How do the two squares actually become a poncho?
Each square is worked from the centre out, then turned so it sits as a diamond. The two diamonds are seamed together only at the top shoulder corners, leaving the side corners open as arm holes.
Is the back-loop-only cuff technique required?
No, it is offered as an option for a more pronounced ribbed texture on Rounds 2 through 5 of the cuffs. Working both loops as usual gives a smoother, equally valid finish.
These answers came from whoever first published the pattern, kept word for word.