 EVERY CROCHET
 Amigurumi 38 rounds No account, no download
Amigurumi pencil doll crochet pattern in single crochet
An amigurumi pencil worked in single crochet (UK double crochet), with US and UK stitch terms noted throughout.
- Skill
- Intermediate
- Time
- 4-6 hours
- Yarn weight
- Worsted
- Hook
- 4 mm

Intermediate
What the original write-up called it. Nothing here is graded again.

Worsted
What the sample was worked in. Any weight works; the size moves with it.

4-6 hours
What the original page reckoned. Your own pace is the one that matters.
About this pattern
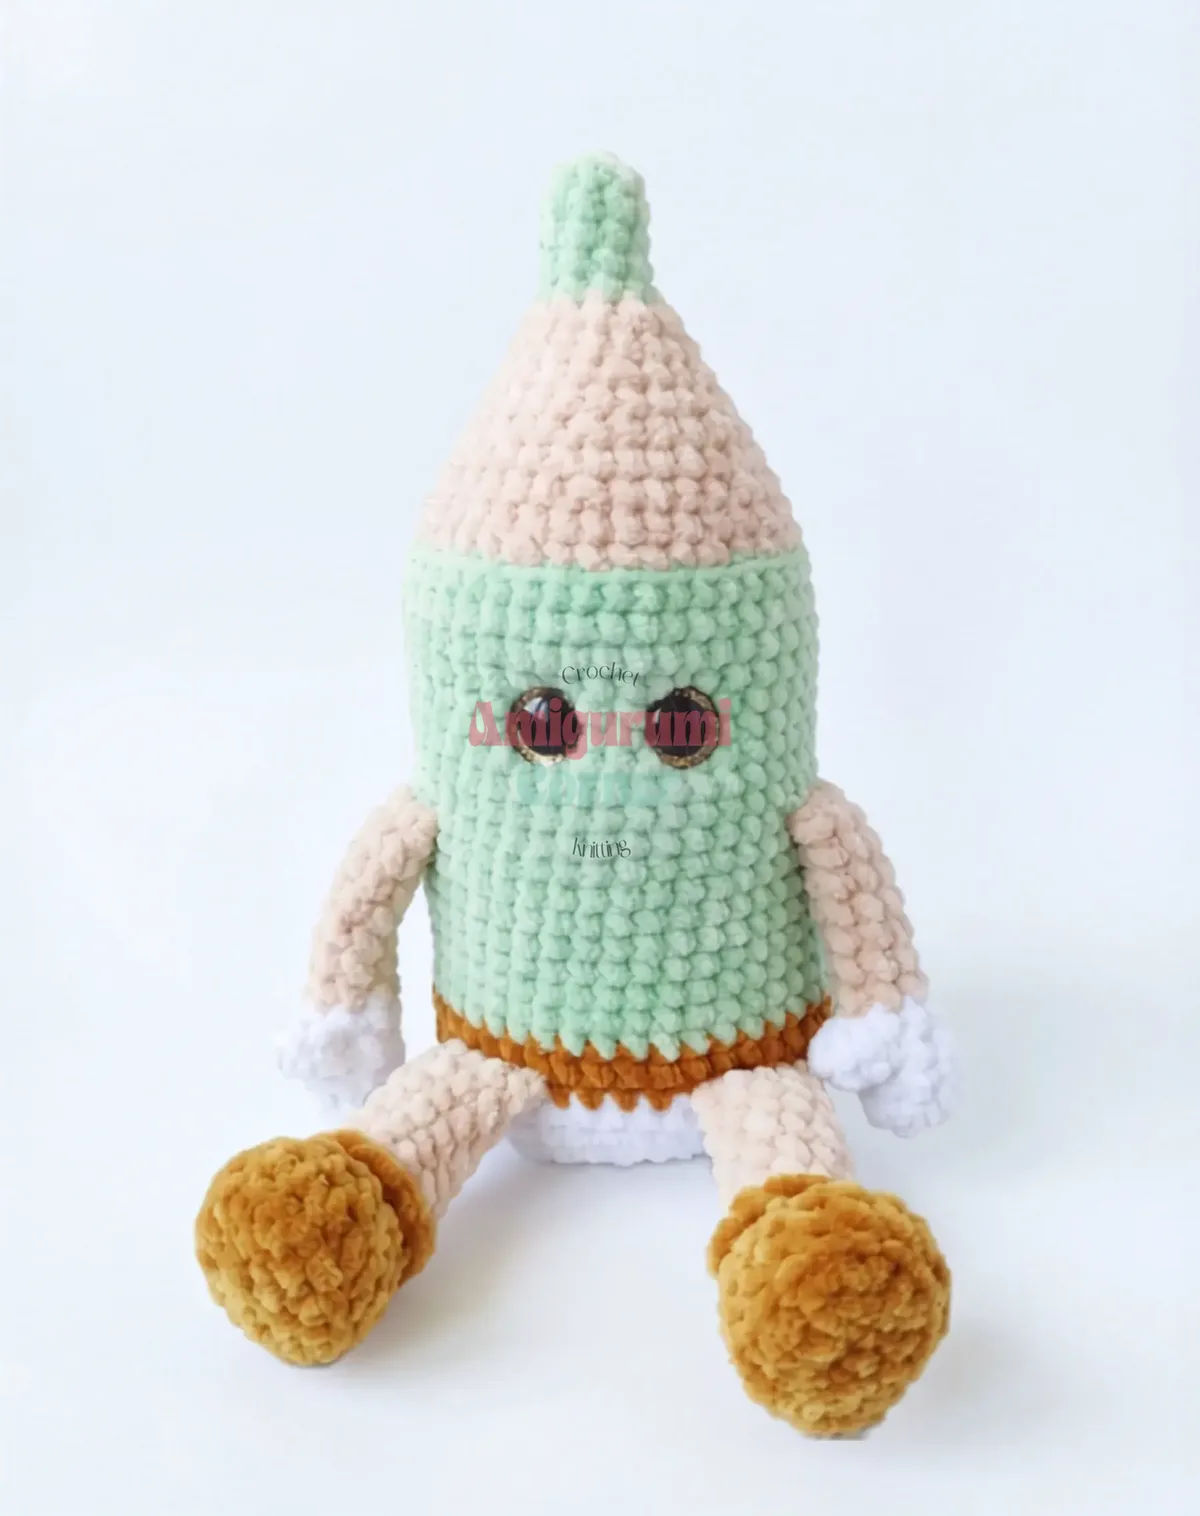
This is an amigurumi pencil toy worked in single crochet (UK double crochet) using worsted-weight plush or velvet-style yarn on a 4mm or 3.5mm hook. The Legs (8 rounds) and Arms (4 rounds) are crocheted separately then joined live into the 26-round Body at specific rounds, so most assembly happens while working the Body rather than afterwards. Safety eyes and embroidery finish the face.
This amigurumi pencil is built entirely in single crochet (UK: double crochet), the dense, gauge-forgiving stitch that amigurumi relies on to hold stuffing without gaps. The design plays on the everyday stationery item, giving it a rounded eraser-cap head, a tapered body worked in a main colour of choice, and a pair of booted legs finished in brown to suggest a sharpened tip. Safety eyes and simple embroidery keep the face understated, in keeping with the toy's clean, geometric silhouette.
Construction runs bottom-up and continuous: the Legs are worked first as an 8-round boot-and-limb unit, then joined directly into the Body at round 10, with the Arms following at round 21 rather than being sewn on afterwards. The 26-round Body is worked in one continuous spiral from a magic ring, stuffed as it grows, so shaping and stuffing happen together rather than as a separate finishing stage.
Materials
Yarn
- Worsted weight (Medium, #4) plush or velvet-style yarn (such as Dolphin Baby or a similar chenille yarn) in cream/white, brown, skin-tone/blush, and a main color of your choice
Hook
- US G-6 (4mm), or US E-4 (3.5mm) for a slightly tighter fabric
Safety eyes
- 18–20mm, 1 pair
- Fiberfill stuffing
- Stitch markers
- Yarn or tapestry needle
- Scissors
- Thin brown yarn or embroidery floss, for facial details
- Fabric-safe craft glue
- Two small pieces cut from a plastic lid (such as a yogurt or sour cream container), to stiffen the base of the feet and body
The list is the pattern's own wording.
Instructions
Every round is printed as the pattern wrote it, brackets and all. Open the key beside a round to see only the short forms that round uses.
Arms (make 2)
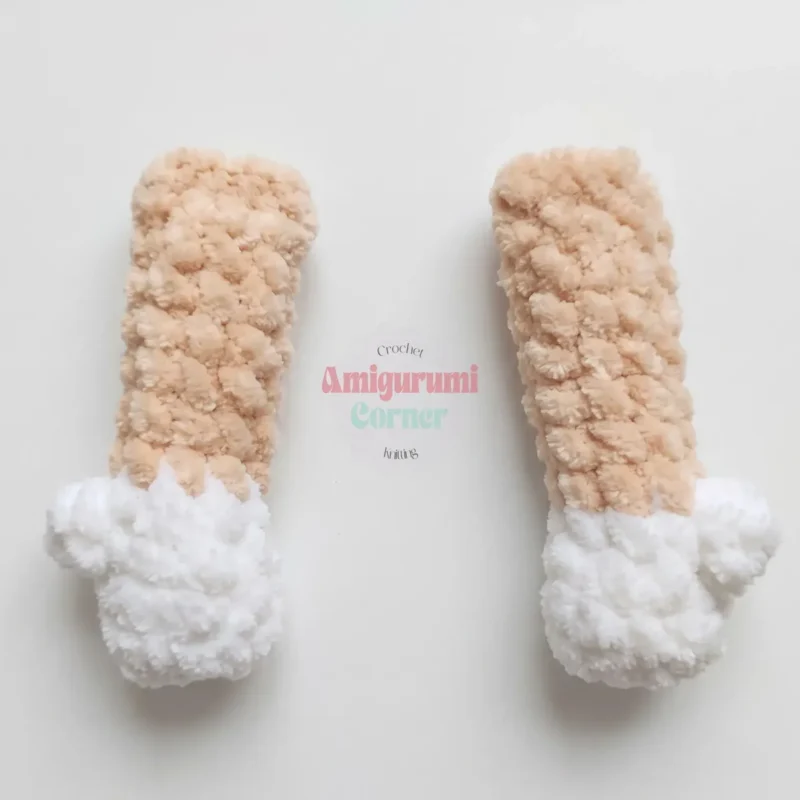
Begin with white or cream yarn.
- Round 1
Ch 4; working in the 2nd ch from hook: inc, sc 1, 3 sc in next st; continue into the back ridge of the foundation chain: sc 2. (8)
Key3
- inc
- Increase
- ch
- Chain
- sc
- Single Crochet
- Rounds 2–3
sc in each st around. (8)
Key1
- sc
- Single Crochet
- Round 4
tr3tog (3 tr crocheted together into one cluster) in next st, sc 7. (8)Change to skin-tone yarn.
Key2
- sc
- Single Crochet
- tr
- Treble Crochet
- Rounds 5–11
sc in each st around, shifting your starting point by 1 st on the final round. (8)Stuff the cuff (glove) section only, and only lightly.Fold the piece flat and sc 4 through both layers to close it. Fasten off, leaving a yarn tail for attaching later.
Key1
- sc
- Single Crochet
Legs (make 2)
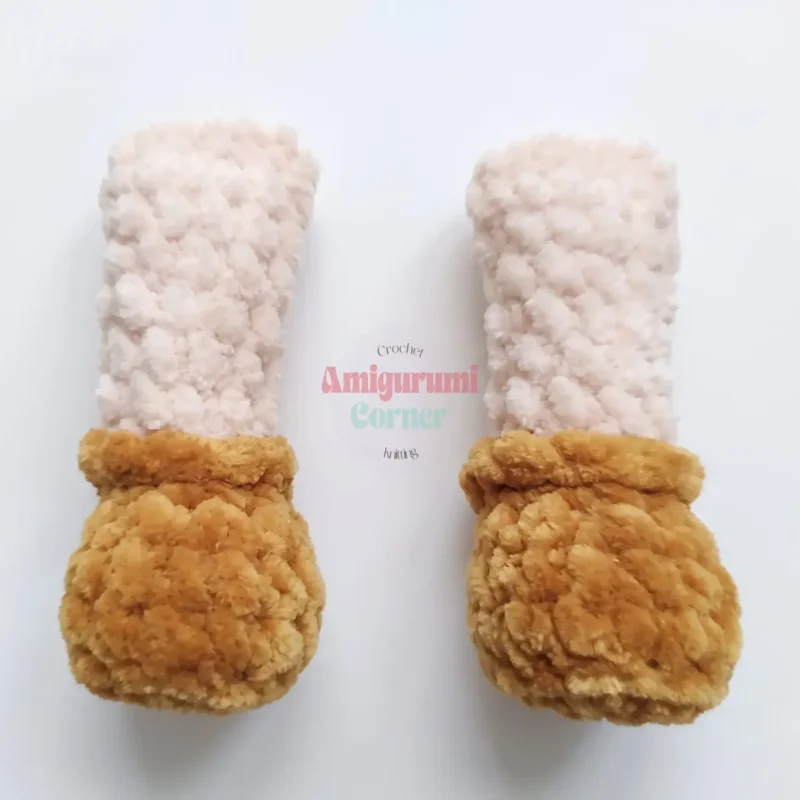
Stuff the boot section firmly; stuff the leg section lightly as you go.
Begin with brown yarn.
- Round 1
Ch 5; working in the 2nd ch from hook: inc, sc 2, 3 sc in next st; continue into the back ridge of the foundation chain: sc 3. (10)
Key3
- inc
- Increase
- ch
- Chain
- sc
- Single Crochet
- Round 2
inc, inc, sc 2, inc, inc, inc, sc 2, inc. (16)
Key2
- inc
- Increase
- sc
- Single Crochet
Once Rnd 2 is complete, cut two oval shapes from your plastic lid to match the sole of this piece.
- Round 3
sc in BLO around. (16)After Rnd 3, glue the plastic ovals to the wrong side of the piece — this keeps the boot sole flat and stable so your pencil can stand.
Key2
- BLO
- Back Loop Only
- sc
- Single Crochet
- Round 4
sc in each st around. (16)
Key1
- sc
- Single Crochet
- Round 5
sc 4, dec 5 times, sc 2. (11)
Key2
- dec
- Decrease (invisible decrease)
- sc
- Single Crochet
- Round 6
sc 6, dec, sc 3. (10)Do not fasten off the brown yarn. Bring it forward and work one edging round in FLO with sc before continuing to the next round.Change to skin-tone yarn.
Key3
- dec
- Decrease (invisible decrease)
- FLO
- Front Loop Only
- sc
- Single Crochet
- Round 7
sc in BLO around. (10)
Key2
- BLO
- Back Loop Only
- sc
- Single Crochet
- Rounds 8–13
sc in each st around. (10)Fold the piece flat and sc 5 through both layers to close it. Fasten off, leaving a yarn tail for attaching later.
Key1
- sc
- Single Crochet
Body
Stuff as you go throughout this section.
Begin with white or cream yarn.
- Round 1
6 sc in MR. (6)
Key2
- MR
- Magic Ring
- sc
- Single Crochet
- Round 2
inc in each st around. (12)
Key1
- inc
- Increase
- Round 3
sc 1, inc repeat around. (18)
Key2
- inc
- Increase
- sc
- Single Crochet
- Round 4
sc 2, inc repeat around. (24)
Key2
- inc
- Increase
- sc
- Single Crochet
- Round 5
sc 3, inc repeat around. (30)
Key2
- inc
- Increase
- sc
- Single Crochet
- Round 6
sc 4, inc repeat around. (36)
Key2
- inc
- Increase
- sc
- Single Crochet
- Round 7
sc 5, inc repeat around. (42)
Key2
- inc
- Increase
- sc
- Single Crochet
Once Rnd 7 is complete, cut a circle from your plastic lid to match the base of this piece.
- Round 8
sc in BLO around. (42)After Rnd 8, glue the plastic circle to the wrong side of the base for stability.
Key2
- BLO
- Back Loop Only
- sc
- Single Crochet
- Round 9
sc in each st around. (42)Change to brown yarn.
Key1
- sc
- Single Crochet
- Round 10
sc 14, attach one Leg with sc 5 through both layers, sc 4, attach the second Leg with sc 5 through both layers, sc 14. (42)
Key1
- sc
- Single Crochet
- Rounds 11–12
sc in each st around. (42)Change to your main color (MC).
Key1
- sc
- Single Crochet
- Rounds 13–20
sc in each st around. (42)
Key1
- sc
- Single Crochet
If you’re making the “girl” version of the pencil, work Rnd 15 in BLO instead of both loops. Later, when you reach this point in finishing, join MC yarn into the free front loops left from Rnd 15 and work 2 more rounds: first sc in FLO around, then inc using dc in every st. This creates a ruffled skirt around the pencil’s middle.
- Round 21
sc 12, attach one Arm with sc 4 through both layers, sc 13, attach the second Arm with sc 4 through both layers, sc 9. (42)
Key1
- sc
- Single Crochet
- Rounds 22–30
sc in each st around. (42)Insert the safety eyes between Rnds 25 and 26, spacing them 5 sts apart.Change to skin-tone yarn.
Key1
- sc
- Single Crochet
- Round 31
in BLO, sc 5, dec repeat around. (36)
Key3
- BLO
- Back Loop Only
- dec
- Decrease (invisible decrease)
- sc
- Single Crochet
- Round 32
sc in each st around. (36)
Key1
- sc
- Single Crochet
- Round 33
sc 4, dec repeat around. (30)
Key2
- dec
- Decrease (invisible decrease)
- sc
- Single Crochet
- Round 34
sc in each st around. (30)
Key1
- sc
- Single Crochet
- Round 35
sc 3, dec repeat around. (24)
Key2
- dec
- Decrease (invisible decrease)
- sc
- Single Crochet
- Round 36
sc in each st around. (24)
Key1
- sc
- Single Crochet
- Round 37
sc 2, dec repeat around. (18)
Key2
- dec
- Decrease (invisible decrease)
- sc
- Single Crochet
- Round 38
sc in each st around. (18)
Key1
- sc
- Single Crochet
- Round 39
sc 1, dec repeat around. (12)Change to main color (MC).
Key2
- dec
- Decrease (invisible decrease)
- sc
- Single Crochet
- Round 40
sc 2, dec repeat around 3 times. (9)
Key2
- dec
- Decrease (invisible decrease)
- sc
- Single Crochet
- Rounds 41–43
sc in each st around. (9)
Key1
- sc
- Single Crochet
- Round 44
sc 1, dec repeat around 3 times. (6)Finish stuffing firmly, then close the opening. Fasten off and weave in the end.
Key2
- dec
- Decrease (invisible decrease)
- sc
- Single Crochet
Making up
- Step 1Your Arms and Legs are already attached directly into the Body at Rnd 10 (Legs) and Rnd 21 (Arms), so most of the assembly happens as you crochet.
- Step 2Once the Body top is closed, use a leftover yarn tail and a whipstitch to reinforce any small gaps around the Arm and Leg attachment points.
- Step 3Embroider the nose with plush yarn, positioned 2–3 rounds below the safety eyes.
- Step 4Layer white and skin-tone yarn or felt directly around each safety eye to build up eye whites and eyelids.
- Step 5Using thin brown yarn, embroider soft eyebrows and a gentle smile.
- Step 6For the “girl” pencil version, glue on small eyelashes just above the eyes.
- Step 7Weave in all remaining yarn ends and trim neatly.
Notes from the pattern
- The pattern calls for a US G-6 (4mm) hook, or US E-4 (3.5mm) for a tighter fabric that hides stuffing better in plush or velvet-style yarn.
- Because the whole toy is worked in continuous spirals, place a stitch marker in the first stitch of every round to track progress accurately toward the Rnd 10 and Rnd 21 attachment points.
- The Arms change from white/cream to skin-tone yarn partway through their four rounds, so make the colour change at the exact round given to keep the hand in proportion.
- Stuff the Body as work progresses rather than at the end; on the Legs, stuff the boot section firmly and the leg section above it only lightly.
- Gauge is not critical for this project; aim for a fabric tight enough that stuffing won't peek through. The whole toy is worked in continuous spirals throughout — do not join or turn unless a note says otherwise.
- Safety eyes are inserted mid-Body (between Rnds 25 and 26), then the face is completed with embroidery after stuffing.
- Arms and Legs are made separately, then attached directly into the Body as you crochet — it saves time to have both pairs finished before you start the Body.
The essentials
- Rounds
- 38
- Parts
- 3
- Level
- Intermediate
- Time
- 4-6 hours
- Hook
- 4 mm
- Yarn
- Worsted
Stitches you will use
- Continuous spiral crochet Used for all three parts with no joins or turns; a stitch marker in the first stitch of each round is essential to keep track of round counts such as round 10 and round 21.
- Increase shaping from a magic ring Heavy increasing shapes the Body from Rnd 1 to Rnd 3 and the Leg from Rnd 1 to Rnd 2; keep increases evenly spaced so the base sits flat rather than cupping.
- tr3tog cluster stitch Appears once, at Arm Rnd 4, to taper the hand; work it at an even tension so the cluster doesn't pull tighter than the surrounding stitches.
Troubleshooting
The boot section of the Leg looks lumpy or uneven underfoot.
This usually comes from inconsistent stuffing density between the firm boot and lighter leg sections; pack the boot firmly first, and add the plastic-lid sole insert after Rnd 2 before continuing to stuff.
The Arms or Legs sit at the wrong
This happens when a limb is attached at the wrong Body round; confirm the round count with a stitch marker and attach only at Rnd 10 for Legs and Rnd 21 for Arms, as specified.
The tr3tog cluster at the end of the
The three tr legs have likely been worked too tightly in the plush yarn; loosen tension on that single round only and check the stitch count still reads 8 before moving on.
Substituting yarn
- Cotton, DK or worsted weight
- Gives firmer stitch definition but less stretch and softness than chenille; a smaller hook closer to E-4 (3.5mm) and firmer stuffing help compensate.
- Standard acrylic, worsted weight
- Keeps the same G-6 (4mm) hook and finished size but produces a flatter, matte surface where individual stitches remain visible rather than blended.
- Cotton or acrylic, Aran weight
- Produces a noticeably larger pencil; needs a hook up to around 4.5–5mm and more stuffing to fill the bigger cavity.
The photographs taken while this was being made
Every one was taken by whoever published the pattern, in the order the source listed them.
FAQs
Questions
What yarn works best for this amigurumi pencil pattern?
A worsted-weight plush or chenille yarn, such as Dolphin Baby, gives this pattern its soft, velvety texture and helps hide the stitches for a smooth finish. You can substitute a standard worsted-weight acrylic or cotton yarn, but the finished pencil will look less plush and more textured. Stick to a similar weight so your stitch counts and finished size stay accurate.
Why are the Arms and Legs joined before the Body is finished?
The pattern attaches them live, at Rnd 10 for the Legs and Rnd 21 for the Body, so the limbs become part of the Body structure rather than being sewn on afterwards. This reduces separate finishing work but means round counts need to be tracked carefully with a stitch marker.
What should be done if there are gaps around the limb attachment points after assembly?
Use a leftover yarn tail and a whipstitch to close any small gaps once the Body top is finished. This is a normal part of finishing rather than a sign of a mistake.
Does this pattern use US or UK crochet terms?
It is written in US terminology throughout, with single crochet as the main stitch. The UK equivalent, double crochet, is noted once where it first matters.
How firmly should the piece be stuffed?
The Body is stuffed as it is worked, aiming for a fabric tight enough that stuffing does not peek through the stitches. The Legs need firmer stuffing in the boot section and lighter stuffing above it in the leg section.
Do I have to use the plastic lid inserts?
The plastic lid pieces are optional, but they make a real difference in helping the boots and body base stay flat so the pencil can stand upright. Without them, the piece will still work but may lean or wobble more easily. Any firm, food-safe plastic, such as a yogurt or sour cream lid, works well for this.
These answers came from whoever first published the pattern, kept word for word.