 EVERY CROCHET
 Amigurumi 63 rounds No account, no download
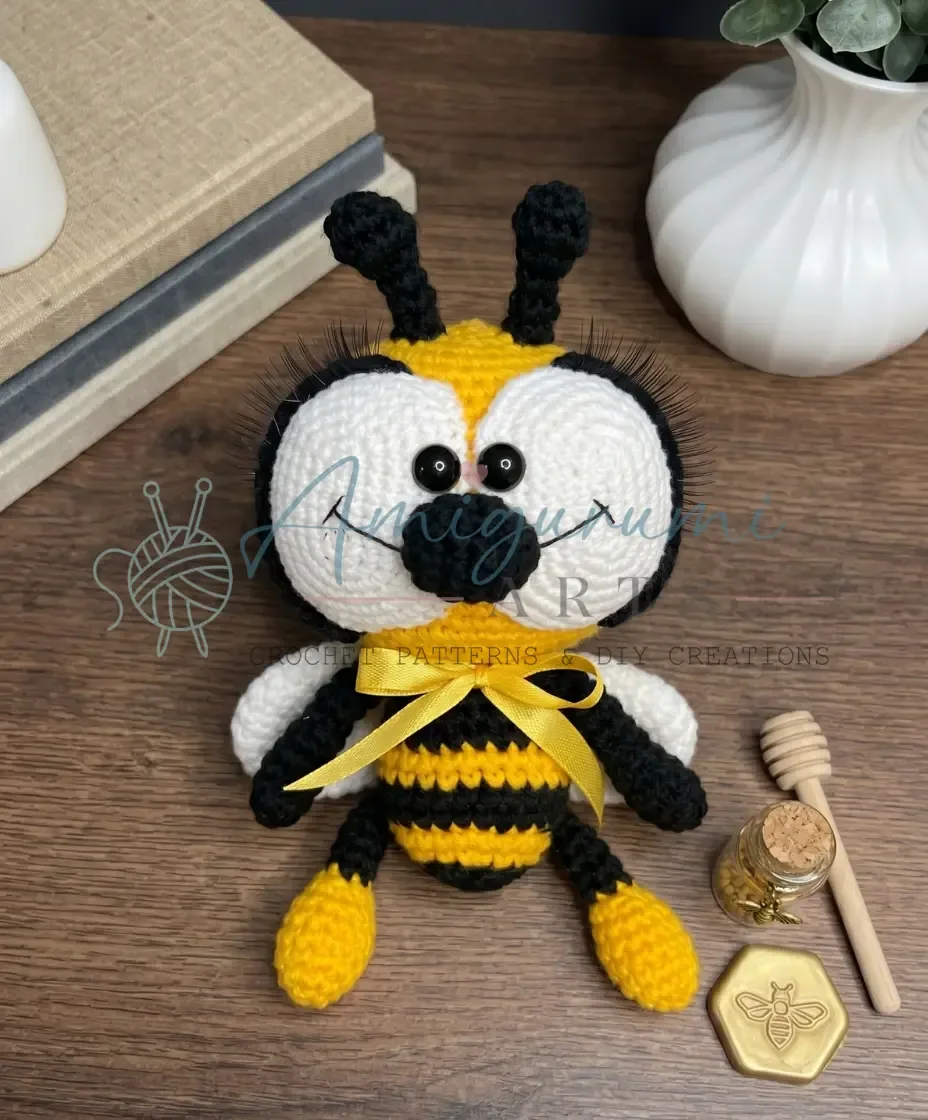
Crochet bumble bee amigurumi pattern in fingering weight yarn
Amigurumi bee pattern using single crochet (UK double crochet); written in US terms with the UK equivalent given once.
- Skill
- Intermediate
- Time
- 4-6 hours
- Yarn weight
- Fingering
- Hook
- 1.65 mm

Intermediate
What the original write-up called it. Nothing here is graded again.

Fingering
What the sample was worked in. Any weight works; the size moves with it.

4-6 hours
What the original page reckoned. Your own pace is the one that matters.
About this pattern
A small amigurumi bumble bee made mostly in fingering weight acrylic, with white crochet thread for the eyes and a separate fine hook for that piece. The head and body form one continuous 28-round piece; eyes, nose, arms, wings, and antennae are worked separately and sewn or glued on. Half-dome beads, false eyelashes, and ribbon finish the face and body.
This bumble bee softie belongs to the amigurumi family, built almost entirely from single crochet (UK double crochet) worked in a continuous spiral. The small scale and rounded shaping are typical of the form: short rounds of increases and decreases turn a flat starting ring into a domed head, body, and limbs with no seams running through the main pieces.
The head and body are worked as a single continuous piece across 28 rounds, while the eyes, nose, arms, wings, and antennae are each made separately and sewn on afterwards. Fiberfill is added gradually during assembly rather than stuffed all at once, which lets the maker control the finished shape of the eyes and body as the pieces come together.
Materials
- Yarn (main): 100% acrylic, fingering weight / approx. 300 m per 100 g — in black, yellow, and white
- Yarn (eyes): White crochet thread (Iris / size 10 crochet thread), white
Hook sizes
- US Steel #7 / 1.65 mm (for eyes); US Steel #4 / 1.5 mm (for all other pieces)
Stuffing
- Polyester fiberfill
Eyes
- Black half-dome beads, 7 mm diameter — 2 pieces
Lashes
- Stick-on false eyelashes — 2 pieces
Ribbon
- Satin ribbon, 0.7 cm wide × 20 cm long
Sewing thread
- Black sewing thread
- Tapestry needle / yarn needle
- Scissors
- Stitch markers
The list is the pattern's own wording.
Instructions
Every round is printed as the pattern wrote it, brackets and all. Open the key beside a round to see only the short forms that round uses.
Eyes (make 2)
Use white crochet thread and US Steel #7 / 1.65 mm hook.
- Round 1
Ch 8. Starting in the 2nd ch from hook, sc in next 6 ch, 3 sc in last ch; continue working along the opposite side of the foundation chain: sc in next 5 ch, inc in last ch. (16)Step by step: Continue working in a continuous spiral.Continue working in a continuous spiral from here.
Key3
- inc
- Increase (2 sc in same stitch)
- ch
- Chain
- sc
- Single Crochet
- Round 2
Inc, sc in next 5 sts, inc 3 times, sc in next 5 sts, inc 2 times. (22)
Key2
- inc
- Increase (2 sc in same stitch)
- sc
- Single Crochet
- Round 3
Sc, inc, sc in next 5 sts, (sc, inc) 3 times, sc in next 5 sts, (sc, inc) 2 times. (28)
Key2
- inc
- Increase (2 sc in same stitch)
- sc
- Single Crochet
- Round 4
2 sc, inc, sc in next 5 sts, (2 sc, inc) 3 times, sc in next 5 sts, (2 sc, inc) 2 times. (34)
Key2
- inc
- Increase (2 sc in same stitch)
- sc
- Single Crochet
- Round 5
3 sc, inc, sc in next 5 sts, (3 sc, inc) 3 times, sc in next 5 sts, (3 sc, inc) 2 times. (40)
Key2
- inc
- Increase (2 sc in same stitch)
- sc
- Single Crochet
- Round 6
4 sc, inc, sc in next 5 sts, (4 sc, inc) 3 times, sc in next 5 sts, (4 sc, inc) 2 times. (46)
Key2
- inc
- Increase (2 sc in same stitch)
- sc
- Single Crochet
- Round 7
5 sc, inc, (10 sc, inc) 3 times, sc in next 7 sts. (50)Step by step: Fasten off with sl st. Weave in and trim ends. Do not stuff the black section.
Key3
- sl st
- Slip Stitch
- inc
- Increase (2 sc in same stitch)
- sc
- Single Crochet
- Round 8
Sc in each st around. (50)Fasten off with sl st. Leave a long yarn tail for sewing.
Key2
- sl st
- Slip Stitch
- sc
- Single Crochet
Nose
Use black yarn and US Steel #4 / 1.5 mm hook.
- Round 1
Ch 2; work 6 sc into the 2nd ch from hook. (6)Continue working in a continuous spiral.
Key2
- ch
- Chain
- sc
- Single Crochet
- Round 2
Inc in each st around. (12)
Key1
- inc
- Increase (2 sc in same stitch)
- Rounds 3–5
Sc in each st around. (12)
Key1
- sc
- Single Crochet
- Round 6
Dec 6 times. (6)Stuff firmly.
Key1
- dec
- Invisible Decrease (insert hook through front loop of next 2 sts, pull up a loop, yarn over, draw through all 3 loops)
- Round 7
Dec until the opening closes. (3)Fasten off with sl st. Leave a long yarn tail for sewing. this …
Key2
- sl st
- Slip Stitch
- dec
- Invisible Decrease (insert hook through front loop of next 2 sts, pull up a loop, yarn over, draw through all 3 loops)
Arms (make 2)
Use black yarn and US Steel #4 / 1.5 mm hook.
- Round 1
Ch 2; work 6 sc into the 2nd ch from hook. (6)Continue working in a continuous spiral.
Key2
- ch
- Chain
- sc
- Single Crochet
- Round 2
(Sc, inc) 3 times. (9)
Key2
- inc
- Increase (2 sc in same stitch)
- sc
- Single Crochet
- Round 3
Sc in each st around. (9)
Key1
- sc
- Single Crochet
- Round 4
4 sc, 2 dc in same st, 4 sc. (10)
Key2
- dc
- Double Crochet
- sc
- Single Crochet
- Round 5
4 sc, 2 dc together (dc2tog), 4 sc. (9)
Key2
- dc
- Double Crochet
- sc
- Single Crochet
- Round 6
(Sc, dec) 3 times. (6)
Key2
- dec
- Invisible Decrease (insert hook through front loop of next 2 sts, pull up a loop, yarn over, draw through all 3 loops)
- sc
- Single Crochet
- Rounds 7–11
Sc in each st around. (6)Fasten off with sl st. Weave in and trim ends. Do not stuff the arms.
Key2
- sl st
- Slip Stitch
- sc
- Single Crochet
Wings (make 2)
Use white yarn and US Steel #4 / 1.5 mm hook.
- Round 1
Ch 2; work 6 sc into the 2nd ch from hook. (6)Continue working in a continuous spiral.
Key2
- ch
- Chain
- sc
- Single Crochet
- Round 2
Inc in each st around. (12)
Key1
- inc
- Increase (2 sc in same stitch)
- Round 3
(Sc, inc) 6 times. (18)
Key2
- inc
- Increase (2 sc in same stitch)
- sc
- Single Crochet
- Round 4
(2 sc, inc) 6 times. (24)
Key2
- inc
- Increase (2 sc in same stitch)
- sc
- Single Crochet
- Rounds 5–8
Sc in each st around. (24)
Key1
- sc
- Single Crochet
- Round 9
(2 sc, dec) 6 times. (18)
Key2
- dec
- Invisible Decrease (insert hook through front loop of next 2 sts, pull up a loop, yarn over, draw through all 3 loops)
- sc
- Single Crochet
- Round 10
Sc in each st around. (18)
Key1
- sc
- Single Crochet
- Round 11
(Sc, dec) 6 times. (12)
Key2
- dec
- Invisible Decrease (insert hook through front loop of next 2 sts, pull up a loop, yarn over, draw through all 3 loops)
- sc
- Single Crochet
- Round 12
(Sc, dec) 4 times. (8)
Key2
- dec
- Invisible Decrease (insert hook through front loop of next 2 sts, pull up a loop, yarn over, draw through all 3 loops)
- sc
- Single Crochet
- Round 13
Sc in each st around. (8)Fasten off with sl st. Weave in and trim ends. Do not stuff the wings.
Key2
- sl st
- Slip Stitch
- sc
- Single Crochet
Head & Body (worked as one piece)
Begin with black yarn and US Steel #4 / 1.5 mm hook. Carry unused colors loosely — do not cut unless instructed.
- Round 1
Ch 2; work 6 sc into the 2nd ch from hook. (6)Continue working in a continuous spiral.
Key2
- ch
- Chain
- sc
- Single Crochet
- Round 2
(Sc, inc) 3 times. (9)
Key2
- inc
- Increase (2 sc in same stitch)
- sc
- Single Crochet
- Round 3
(2 sc, inc) 3 times. (12)Switch to yellow yarn. Do not cut black.
Key2
- inc
- Increase (2 sc in same stitch)
- sc
- Single Crochet
- Round 4
(Sc, inc) 6 times. (18)
Key2
- inc
- Increase (2 sc in same stitch)
- sc
- Single Crochet
- Round 5
(2 sc, inc) 6 times. (24)Switch to black yarn. Do not cut yellow.Now join the legs into the body. Hold one leg against the body and crochet through both the body stitch and the leg opening simultaneously (3 layers of fabric). Check symmetry as you work — adjust joining position if needed. Alternatively, sew the legs on after completing the body.
Key2
- inc
- Increase (2 sc in same stitch)
- sc
- Single Crochet
- Round 6
5 sc, 2 sc joining first leg, 10 sc, 2 sc joining second leg, 5 sc. (24)
Key1
- sc
- Single Crochet
- Round 7
Sc in each st around. (24)Switch to yellow yarn. Do not cut black.
Key1
- sc
- Single Crochet
- Rounds 8–9
Sc in each st around. (24)Switch to black yarn. Do not cut yellow.
Key1
- sc
- Single Crochet
- Round 10
Sc in each st around. (24)
Key1
- sc
- Single Crochet
- Round 11
(6 sc, dec) 3 times. (21)
Key2
- dec
- Invisible Decrease (insert hook through front loop of next 2 sts, pull up a loop, yarn over, draw through all 3 loops)
- sc
- Single Crochet
- Round 12
(5 sc, dec) 3 times. (18)Switch to yellow yarn. Cut black yarn now.Now join the arms into the body at Round 13, working through 3 layers as with the legs.
Key2
- dec
- Invisible Decrease (insert hook through front loop of next 2 sts, pull up a loop, yarn over, draw through all 3 loops)
- sc
- Single Crochet
- Round 13
2 sc, dec 2 times, 2 sc joining first arm, dec 3 times, 2 sc joining second arm, dec. (12)
Key2
- dec
- Invisible Decrease (insert hook through front loop of next 2 sts, pull up a loop, yarn over, draw through all 3 loops)
- sc
- Single Crochet
- Round 14
Sc in next 10 sts. (Work this round partway — do not complete the full round.) Now join the wings.
Key1
- sc
- Single Crochet
- Round 15
3 sc joining first wing, 3 sc joining second wing. (This round is not worked to completion.)Place a stitch marker at the new beginning of the round. The body section is complete. You will now continue upward to shape the head.
Key1
- sc
- Single Crochet
- Round 16
Working in FLO: inc in each st around. (24)
Key2
- FLO
- Front Loop Only
- inc
- Increase (2 sc in same stitch)
- Round 17
(Sc, inc) 12 times. (36)Stuff the body firmly now before the head closes up.
Key2
- inc
- Increase (2 sc in same stitch)
- sc
- Single Crochet
- Round 18
(2 sc, inc) 12 times. (48)
Key2
- inc
- Increase (2 sc in same stitch)
- sc
- Single Crochet
- Round 19
(7 sc, inc) 6 times. (54)
Key2
- inc
- Increase (2 sc in same stitch)
- sc
- Single Crochet
- Rounds 20–27
Sc in each st around. (54)
Key1
- sc
- Single Crochet
- Round 28
(7 sc, dec) 6 times. (48)
Key2
- dec
- Invisible Decrease (insert hook through front loop of next 2 sts, pull up a loop, yarn over, draw through all 3 loops)
- sc
- Single Crochet
- Round 29
Sc in each st around. (48)
Key1
- sc
- Single Crochet
- Round 30
(6 sc, dec) 6 times. (42)
Key2
- dec
- Invisible Decrease (insert hook through front loop of next 2 sts, pull up a loop, yarn over, draw through all 3 loops)
- sc
- Single Crochet
- Round 31
(5 sc, dec) 6 times. (36)
Key2
- dec
- Invisible Decrease (insert hook through front loop of next 2 sts, pull up a loop, yarn over, draw through all 3 loops)
- sc
- Single Crochet
- Round 32
(4 sc, dec) 6 times. (30)
Key2
- dec
- Invisible Decrease (insert hook through front loop of next 2 sts, pull up a loop, yarn over, draw through all 3 loops)
- sc
- Single Crochet
- Round 33
(3 sc, dec) 6 times. (24)
Key2
- dec
- Invisible Decrease (insert hook through front loop of next 2 sts, pull up a loop, yarn over, draw through all 3 loops)
- sc
- Single Crochet
- Round 34
(2 sc, dec) 6 times. (18)
Key2
- dec
- Invisible Decrease (insert hook through front loop of next 2 sts, pull up a loop, yarn over, draw through all 3 loops)
- sc
- Single Crochet
- Round 35
(Sc, dec) 6 times. (12)
Key2
- dec
- Invisible Decrease (insert hook through front loop of next 2 sts, pull up a loop, yarn over, draw through all 3 loops)
- sc
- Single Crochet
- Round 36
Dec 6 times. (6)Step by step: Stuff the yellow section lightly. Switch to black yarn.Fasten off with sl st. Thread the yarn tail through the front loops of the last round and pull tight to close. Weave in and trim ends.
Key2
- sl st
- Slip Stitch
- dec
- Invisible Decrease (insert hook through front loop of next 2 sts, pull up a loop, yarn over, draw through all 3 loops)
Antennae (make 2)
Use black yarn and US Steel #4 / 1.5 mm hook.
- Round 1
Ch 2; work 5 sc into the 2nd ch from hook. (5)Continue working in a continuous spiral.
Key2
- ch
- Chain
- sc
- Single Crochet
- Round 2
Inc in each st around. (10)
Key1
- inc
- Increase (2 sc in same stitch)
- Round 3
Sc in each st around. (10)
Key1
- sc
- Single Crochet
- Round 4
Dec 5 times. (5)Stuff the round ball section only.
Key1
- dec
- Invisible Decrease (insert hook through front loop of next 2 sts, pull up a loop, yarn over, draw through all 3 loops)
- Rounds 5–7
Working in FLO: sc in each st around. (5)Fasten off with sl st. Leave a yarn tail for sewing.
Key3
- sl st
- Slip Stitch
- FLO
- Front Loop Only
- sc
- Single Crochet
Eyelids (make 2)
Use black yarn and US Steel #4 / 1.5 mm hook.
Ch 16. Starting in the 2nd ch from hook: sl st, sc in next 13 sts, sl st. (15 sts total)
Fasten off. Leave a yarn tail for sewing.
Making up
- Step 1Sew the eyes onto the front of the head, adding fiberfill gradually as you sew to give them a slightly rounded shape.
- Step 2Apply craft glue to the false eyelashes and press them firmly along the upper edge of each eye. Allow to dry completely.
- Step 3Sew the eyelids in a curved arc around the top of each eye, framing the lash line.
- Step 4Sew the nose centered below the eyes on the face.
- Step 5Glue the black half-dome beads onto the center of each eye as pupils.
- Step 6Using black sewing thread doubled, embroider a curved smile below the nose with small straight stitches.
- Step 7Sew the antennae to the top of the head, evenly spaced.
- Step 8Tie the satin ribbon into a bow and sew or glue it to the bee’s head or neck.
- Step 9Weave in all remaining ends.
Notes from the pattern
- Two hook sizes are used: a US Steel #7 / 1.65 mm hook for the white crochet thread eyes, and a US Steel #4 / 1.5 mm hook for every other piece worked in yarn.
- Because rounds are not joined, a stitch marker on the first stitch of each round is the only reliable way to track where a round starts and ends in the spiral.
- Fabric should be worked tightly enough that stuffing does not show through the stitches; if gaps appear, dropping to a smaller hook size tightens the tension.
- Fiberfill is added gradually while sewing the eyes in place rather than stuffed in one go, which is what gives them their rounded dome rather than a flat disc.
The essentials
- Rounds
- 63
- Parts
- 7
- Level
- Intermediate
- Time
- 4-6 hours
- Hook
- 1.65 mm
- Yarn
- Fingering
Stitches you will use
- Continuous spiral crochet Used throughout every piece except where otherwise noted; rounds are not joined, so losing the starting point is the main risk.
- Shaping with increases Eyes, nose, arms, and other small pieces rely on evenly spaced increases to curve outward; uneven placement shows as lumps or a lopsided shape.
- Attaching small components The eyelashes, half-dome bead pupils, and eyelids are glued or sewn on during assembly; placement before the glue sets determines the bee's expression.
Troubleshooting
The eyes end up flat instead of domed once sewn
This usually means fiberfill was added all at once at the end rather than gradually during sewing; unpick a few stitches and add small amounts of stuffing as the seam closes to build the curve.
The round pieces (nose, arms) start to cup or curl at the edge
This points to fabric that is too loose for the thread or yarn weight; drop to a smaller hook so the stitches sit close enough together to hold the intended shape.
The stitch count drifts partway through a round on the head and body
no join at the end of each round it is easy to lose the start point; place a stitch marker in the first stitch of every new round and move it up as work progresses.
Substituting yarn
- Fingering weight wool or wool blend
- Keeps the finished size close to the original but gives a softer, slightly fuzzier surface; stitch definition is less crisp, which can blur the colour changes between black and yellow rounds.
- Cotton or cotton-blend thread for the eyes only
- Gives a slightly stiffer, more structured eye than the white crochet thread specified; keep the same fine hook size to match the small scale of the piece.
Washing and care
- The main body is acrylic, so the finished bee can be spot-cleaned with a damp cloth and mild soap rather than fully washed, which protects the glued eyelashes and bead pupils from loosening.
- Store away from direct heat and reshape any flattened rounds by hand while the piece is still slightly damp from cleaning; the polyester fiberfill will hold the restored shape as it dries.
FAQs
Questions
Is this pattern written in US or UK crochet terms?
The pattern is written throughout in US crochet terminology. Where a stitch is introduced, the UK name is given once in brackets for reference, but the instructions themselves follow US terms consistently.
Why does the pattern use two different hook sizes?
The white crochet thread used for the eyes is much finer than the yarn used for the rest of the bee, so it needs the smaller US Steel #7 / 1.65 mm hook. Every other piece, worked in the fingering weight yarn, uses the US Steel #4 / 1.5 mm hook.
Why are the head and body worked as one piece instead of separately?
Working the head and body as a single continuous 28-round piece avoids a seam at the neck, which keeps the shaping smooth and removes a step where stuffing could otherwise show through a join.
What happens if the eyes are stuffed all at once instead of gradually?
Stuffing the eyes in one go before sewing tends to produce a flatter, less controlled shape. Adding fiberfill in small amounts while the seam is being closed gives the slightly rounded dome described in the instructions.
Why use stitch markers if the pattern is worked in a continuous spiral?
Because the rounds are not joined, there is no stitch to mark the start of a new round other than a placed marker. Moving a marker up at the start of each round is the only way to keep an accurate stitch count.
These answers came from whoever first published the pattern, kept word for word.