 EVERY CROCHET
 Bags & Totes 10 rounds No account, no download
Sunburst granny square tote crochet pattern
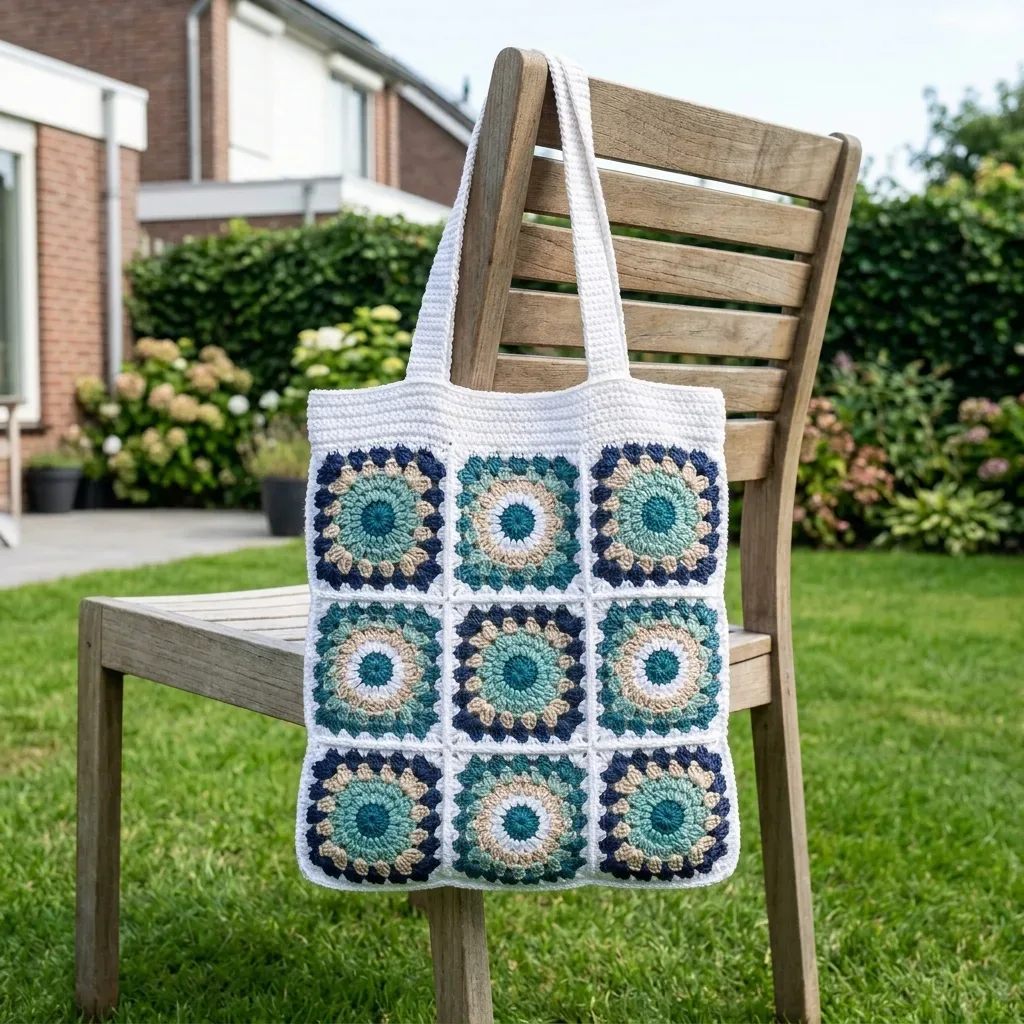
A granny square tote built from double crochet (US dc / UK tr) squares, with US/UK terms given throughout.
- Skill
- Easy to Intermediate
- Time
- 6-10 hours
- Yarn weight
- Worsted/Aran
- Hook
- 4.0 mm

Easy to Intermediate
What the original write-up called it. Nothing here is graded again.

Worsted/Aran
What the sample was worked in. Any weight works; the size moves with it.

6-10 hours
What the original page reckoned. Your own pace is the one that matters.
About this pattern
This pattern is an 18-square sunburst granny square tote worked in a 4.0 mm (US G/6) hook with worsted/Aran cotton. The finished bag measures about 12.5 by 14 inches (32 x 35.5 cm) with a 10-inch (25 cm) handle drop. Squares are made in double crochet (UK treble), joined into two panels, finished with a half double crochet (UK half treble) band and folded double-thickness handles. Rated easy to intermediate.
This tote belongs to the granny square family, built from the familiar 3-dc cluster worked in US double crochet (UK treble). Eighteen sunburst squares – each layered from a teal centre through a sand or seafoam burst to navy corners and a white border – give the bag its coastal, uneven colour. The corner increase, worked as a bundled (3 dc, ch 2, 3 dc), shapes each square into the rounded sunburst motif rather than the usual flat granny look.
Construction moves from squares to panels to finishing. Nine squares join into a front panel and nine into a back panel, each arranged three wide by three tall, before the panels are seamed together along the sides. A white border of single crochet (UK double crochet) rounds builds the top band in half double crochet (UK half treble), and two folded, double-thickness straps are seamed on last to give the handles their load-bearing structure.
Materials
- You’ll want a firm worsted or Aran weight cotton yarn . Cotton keeps the tote structured and makes those sunburst centers really pop. Here are some yarns that work beautifully:
- Paintbox Yarns Cotton Aran
- Lily Sugar’n Cream (worsted cotton)
- DROPS Paris (Aran cotton)
Color quantities
- White (MC): approximately 250 grams / 470 yards for borders, band, and handles
Navy
- approximately 80 grams / 150 yards for square corners
- Teal (dark): approximately 40 grams / 75 yards for square centers
- Seafoam (light teal): approximately 50 grams / 95 yards for sunburst
- Sand/cream: approximately 50 grams / 95 yards for sunburst
Crochet hook
- 4.0 mm (US G/6)
Tools
- Tapestry needle
- Stitch markers
- Scissors
The list is the pattern's own wording.
Instructions
Every round is printed as the pattern wrote it, brackets and all. Open the key beside a round to see only the short forms that round uses.
Mc
- Round 1
main color (white in this pattern) For UK crocheters: US single crochet (sc) equals UK double crochet (dc). US half double crochet (hdc) equals UK half treble (htr). US double crochet (dc) equals UK treble (tr).
Key4
- For UK crocheters
- US single crochet (sc) equals UK double crochet (dc). US half double crochet (hdc) equals UK half treble (htr). US double crochet (dc) equals UK treble (tr).
- hdc
- half double crochet, a medium-height stitch
- sc
- single crochet, a short basic stitch
- dc
- double crochet, a taller stitch that creates an open, lacy fabric
Special Stitches
3-dc group (granny cluster): This is simply 3 double crochet stitches worked into the same space or stitch. It’s the building block of granny squares.
Corner: Work (3 dc, ch 2, 3 dc) all into the same space. This creates the corner increase that shapes your square.
Pattern note: The chain 3 (ch 3) at the beginning of rounds counts as the first double crochet throughout this pattern.
How the Tote Comes Together
Here’s the big picture before we dive into details. The tote is made from 18 sunburst squares , arranged as 9 for the front panel and 9 for the back panel (3 squares wide by 3 squares tall). You’ll seam these panels together, add a white band around the top opening, and attach two sturdy handles.
Each square follows the same color sequence: teal center → sand or seafoam burst → navy corners → white border . The magic comes from varying those two inner colors (sand versus seafoam) from square to square. This creates that beautiful ocean-like effect where some squares feel bright and others feel deep.
I suggest making about half your squares with sand as the dominant inner color and half with seafoam forward. Keep navy and white constant across all squares for a clean, cohesive grid.
The Sunburst Square Pattern
Make 18 squares total. Work each square through five rounds, then block to a true 4-inch square before joining.
- Round 1
Teal Create a magic ring . Chain 3 (this counts as your first dc), then work 11 dc into the ring. Join with a slip stitch to the top of the chain 3. Pull the ring closed tightly.Stitch count: 12 dc
Key1
- dc
- double crochet, a taller stitch that creates an open, lacy fabric
- Round 2
Sand or Seafoam Join your chosen color in any stitch. Chain 3, work 1 dc in the same stitch (so you have 2 dc in that first stitch). Then work 2 dc in each stitch around. Join to the top of the chain 3.Stitch count: 24 dc
Key1
- dc
- double crochet, a taller stitch that creates an open, lacy fabric
- Round 3
Second Inner Color Join your second inner color in any stitch. Chain 1, single crochet in the same stitch. Chain 3, skip the next stitch, single crochet in the next stitch. Repeat from * around the entire round, ending with chain 3, skip the last stitch. Join to the first single crochet.
Stitch count: 12 sc and 12 chain-3 loops This round creates those beautiful petal-like loops that give the sunburst its character.
- Round 4
Navy Join navy in any chain-3 loop. Chain 3, then work (2 dc, ch 2, 3 dc) in the same loop to create your first corner.Work 3 dc in each of the next 2 loops. In the following loop, work (3 dc, ch 2, 3 dc) for the next corner.Repeat from * two more times (creating corners 2, 3, and 4). Work 3 dc in each of the last 2 loops. Join to the top of the chain 3.Stitch count: 48 dc and 4 corner spaces
Key3
- Corner
- Work (3 dc, ch 2, 3 dc) all into the same space. This creates the corner increase that shapes your square.
- ch
- chain, the foundation stitch that creates a series of connected loops
- dc
- double crochet, a taller stitch that creates an open, lacy fabric
- Round 5
White Join white in any corner space. Chain 3, then work (2 dc, ch 2, 3 dc) in the same space for your first corner.Work 3 dc in each of the next 3 gaps between clusters. In the next corner space, work (3 dc, ch 2, 3 dc).Repeat from * two more times. Work 3 dc in each of the last 3 gaps. Join to the top of the chain 3.Fasten off, leaving a long tail for joining later.Stitch count: 60 dc and 4 corner spaces Blocking Your Squares
Key3
- Corner
- Work (3 dc, ch 2, 3 dc) all into the same space. This creates the corner increase that shapes your square.
- ch
- chain, the foundation stitch that creates a series of connected loops
- dc
- double crochet, a taller stitch that creates an open, lacy fabric
This step is crucial. Wet-block or steam-block all 18 squares to exactly 4 inches (10 cm) before joining. Even, consistent squares make a tote that hangs straight and seams together without any puckering or pulling.
I like to pin my squares to a blocking mat, spritz them with water, and let them dry completely. It takes a bit of patience, but the results are worth it.
Color Placement Tips
Here’s where you can really make this tote your own. Swap the two inner colors (sand versus seafoam) from square to square so the grid feels like the sea. Some squares will be bright and warm, others deep and cool, while the consistent navy and white hold everything together visually.
I recommend laying out all 18 squares before you start joining, arranging them until you’re happy with the distribution. Step back and squint at them. Move squares around until the overall effect feels balanced.
Assembly Instructions Now for the satisfying part: bringing your squares together into a finished tote.
Step 1: Lay Out Your Squares
Arrange 9 squares as a 3 x 3 grid for the front panel and 9 squares for the back panel. Mix your sand-forward and seafoam-forward squares for visual interest.
Step 2: Seam the Squares
Using white yarn, join your squares together using either a whip stitch or single crochet join. Work through the back loops only, corner to corner.
First, join each row of three squares horizontally. Then join the three rows together vertically. Repeat for both panels.
Result: Two 3 x 3 panels Step 3: Close the Bag
Hold your two panels with wrong sides together. Using white yarn, seam up the left side, across the bottom, and up the right side.
Turn the bag right side out.
Top Band
The band creates a clean, structured finish around the opening and provides a sturdy base for attaching the handles. Work this in the round.
Part 3
- Round 1
White Join white at a top corner. Work single crochet evenly around the entire opening. Aim for about 48 sc across the front and 48 sc across the back. Join.Stitch count: 96 sc totalHelpful tip: Work this first round at a relaxed tension so the top doesn’t pull in and pucker. A few more or fewer stitches is fine as long as your front and back match.
Key2
- Corner
- Work (3 dc, ch 2, 3 dc) all into the same space. This creates the corner increase that shapes your square.
- sc
- single crochet, a short basic stitch
- Round 2
through 6 (White) Chain 1, then hdc in each stitch around. Join. Repeat for a total of 5 rounds of hdc.Fasten off after Round 6.Stitch count: 96 hdc each round Handles
Key1
- hdc
- half double crochet, a medium-height stitch
These double-thick straps are designed to carry weight comfortably. You’ll make two identical handles, then sew them firmly to the inside of the band.
Make 2 Handles
Part 4
- Round 1
White Chain 91. Work hdc in the 2nd chain from the hook and in each chain across.Stitch count: 90 hdc
Key1
- hdc
- half double crochet, a medium-height stitch
- Round 2
through 6 (White): Chain 1, turn. Work hdc in each stitch across. Stitch count: 90 hdc per rowFold and Join: Fold the strip in half lengthwise. Single crochet the long edges together to create a sturdy double-thick strap.
Key1
- hdc
- half double crochet, a medium-height stitch
Finished length: approximately 22 inches (56 cm)
Stitch count for joining: 90 sc Attaching the Handles
Pin each handle to the inside of the top band. Position the ends about 4 inches (10 cm) apart , centered over the outer squares.
Sew down firmly using white yarn, reinforcing each end with extra stitches for durability. These handles will carry weight, so don’t skimp on the stitching here.
Repeat on the back panel so both handles mirror each other.
Pro tip: Try the tote on before sewing the second handle. Slip the first strap over your shoulder to check whether you’re happy with the handle drop, then match the second handle to it exactly.
Finishing Your Ocean Breeze Tote Almost there! Take time with these final steps for a polished result.
Weave in all ends on the wrong side of your work. I know, I know. Nobody’s favorite task. But those loose ends will work themselves free if you skip this step.
Give your finished tote a final blocking. Steam-block or wet-block the completed bag, gently squaring the corners and smoothing the band so it stands tall and crisp.
Care Instructions
Hand wash your tote in cool water , reshape while damp, and dry flat. Cotton softens beautifully with use, developing a lovely drape over time. Skip the dryer to keep the tote crisp and square.
Customization Ideas Want to make this tote uniquely yours? Here are some modifications to try:
Make it bigger: Add a 4th column or row of squares for a larger tote. You could also widen the band by continuing to Round 10 instead of stopping at Round 6.
Making up
- Step 1Almost there! Take time with these final steps for a polished result.
- Step 2Weave in all ends on the wrong side of your work. I know, I know. Nobody’s favorite task. But those loose ends will work themselves free if you skip this step.
- Step 3Give your finished tote a final blocking. Steam-block or wet-block the completed bag, gently squaring the corners and smoothing the band so it stands tall and crisp.
Notes from the pattern
- Hook and gauge: a 4.0 mm (US G/6) hook should give the stated 4-inch (10 cm) square and the 14-hdc by 11-row, 4-inch band gauge. Work one test square before committing yarn to all eighteen, and size the hook up or down if the square comes out large or small.
- Stitch markers: place a marker at the top corner where white is first joined for Part 3, since all 96 stitches of Round 1 are built from that single point and it's easy to lose track of the start after several rounds of hdc.
- Tension: Round 1 of the top band should be worked loosely. A tight first round pulls the opening in and puckers the join between the two panels.
- Colour balance: aim for roughly half of the eighteen squares with sand as the dominant inner colour and half with seafoam, while keeping the teal centre, navy corners, and white border consistent on every square so the coastal gradient reads clearly across both panels.
The essentials
- Rounds
- 10
- Parts
- 3
- Level
- Easy to Intermediate
- Time
- 6-10 hours
- Hook
- 4.0 mm
- Yarn
- Worsted/Aran
Stitches you will use
- 3-dc granny clusters with corner shells Used throughout the six rounds of each sunburst square; keep the ch-2 corner space open so the (3 dc, ch 2, 3 dc) shell reads as a clean point rather than a bulky lump.
- Panel seaming Applies when the nine front squares and nine back squares are joined into 3x3 panels; match sand and seafoam placement square by square so the ocean gradient reads correctly before seaming.
Troubleshooting
The top band flares out or pulls in instead of sitting flat.
This usually comes from uneven tension on Round 1 of Part 3. Rework that round at a relaxed tension and confirm the front and back each carry about 48 sc before continuing into the hdc rounds.
Squares come out noticeably different sizes from one another.
Hook tension can drift across eighteen squares. Recheck each square against the 4-inch (10 cm) target, adjust hook size if needed, and block the squares before joining them into panels.
The sunburst motif doesn't line up neatly once the panels are seamed.
This is often an orientation or colour-placement mismatch. Lay all nine squares for each panel out flat beforehand to confirm the sand/seafoam balance and corner orientation match before seaming.
Substituting yarn
- Mercerised cotton, DK weight
- Squares come out smaller than the 4-inch (10 cm) target, so a 4.5 mm hook and possibly extra rounds are needed to keep the finished bag close to 12.5 x 14 inches.
- Cotton-acrylic blend, worsted weight
- Gives a softer, less structured fabric than pure cotton, with the same 4.0 mm hook; the finished tote will hold its shape slightly less crisply than the stiffer all-cotton version.
- Cotton-linen blend, Aran weight
- Produces a crisper, heavier fabric with more texture; linen's lower stretch may call for a hook half a size up, and the handles will feel stiffer when folded.
Washing and care
- Hand wash the finished tote in cool water with a mild detergent. Cotton holds its shape well but can felt or shrink slightly in a hot wash or tumble dryer.
- Lay the bag flat to dry and reshape the band and corners while still damp. Store flat or loosely padded rather than folded, since creasing cotton fabric can leave a permanent line.
FAQs
Questions
Can the tote be made smaller or larger than the stated 12.5 x 14 inches?
Adding or removing squares changes the panel size directly, though the design is built around nine squares per panel in a 3x3 grid. Rechecking the band stitch count against the new opening keeps Round 1 of Part 3 fitting correctly.
What happens if seafoam yarn is swapped for a different light colour?
The sunburst centre still reads clearly as long as it contrasts with both the teal centre and the navy corners. Keeping the sand/seafoam split roughly even across the eighteen squares preserves the ocean-gradient effect the design is built around.
Why does the pattern use US stitch terms?
The pattern is written in US terms throughout, so UK crocheters should read US sc as UK dc, US hdc as UK htr, and US dc as UK tr. This conversion is given once at the start of the squares and applies to every round in the pattern.
How much yarn is really needed across all eighteen squares?
The materials list gives roughly 40 grams of teal, 50 grams of seafoam, and 50 grams of sand for the sunburst centres, plus about 80 grams for the navy corners, with white reserved separately for borders, band, and handles. Those amounts already assume eighteen squares, so there is little buffer beyond the one recommended test square.
Are the handles strong enough for everyday use?
The handles are worked as a folded, double-thickness hdc strip rather than a single layer, which is what gives them their load-bearing strength. Following the fold-and-join step in Part 4 rather than leaving the strap single-layer makes the difference.
These answers came from whoever first published the pattern, kept word for word.