 EVERY CROCHET
 Bags & Totes 8 rounds No account, no download
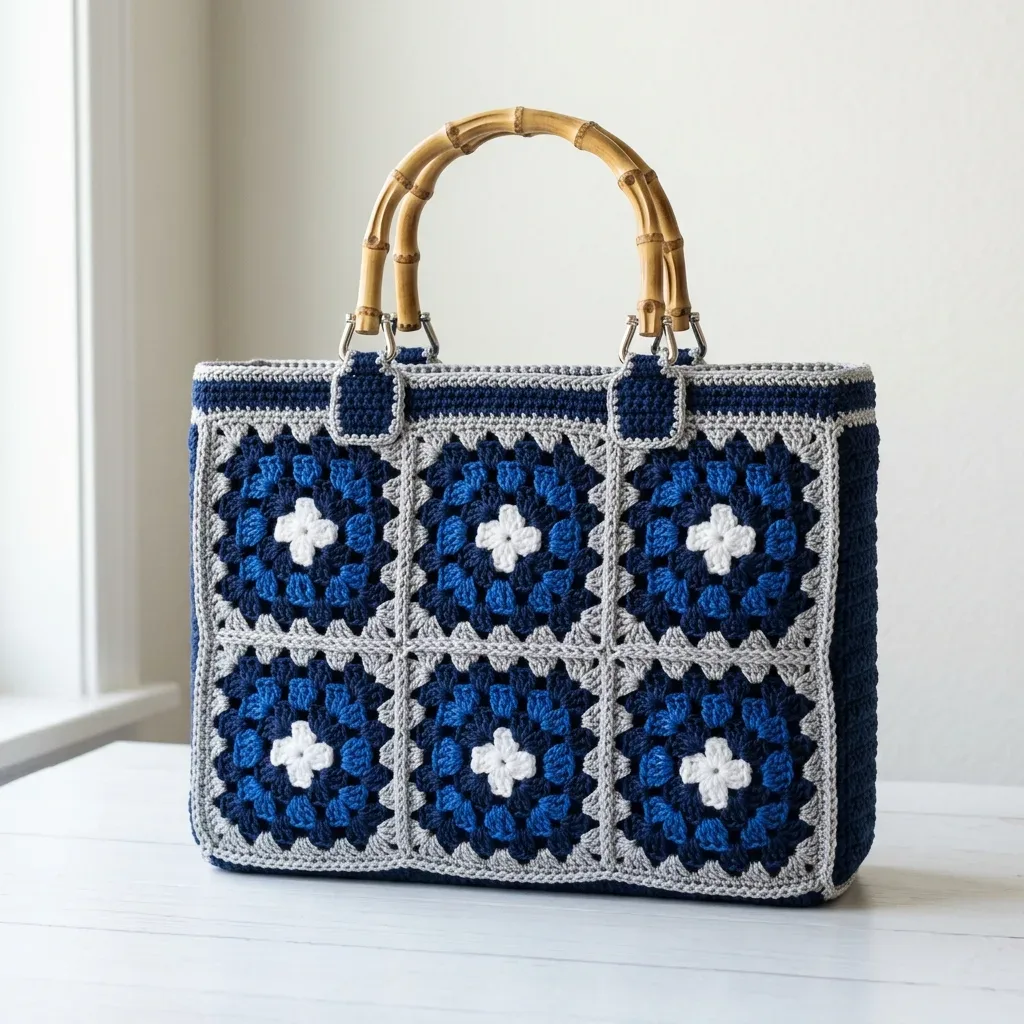
Structured navy granny square tote with bamboo handles
A navy granny square tote worked in double crochet (UK treble), with bamboo handles. Both US and UK stitch terms given.
- Skill
- Intermediate
- Time
- 12 to 16 hours
- Yarn weight
- Worsted
- Hook
- 4.0 mm

Intermediate
What the original write-up called it. Nothing here is graded again.

Worsted
What the sample was worked in. Any weight works; the size moves with it.

12 to 16 hours
What the original page reckoned. Your own pace is the one that matters.
About this pattern
This is a structured granny square tote in navy, cobalt, grey and white cotton, joined with a single crochet gusset and band and finished with bamboo handles. It takes 12 to 16 hours with a 4.0 mm hook, uses four colours of worsted cotton, and finishes at 13 by 10 by 3.5 inches once the gusset, band and lining are added.
The Navy Coastal Tote belongs to the granny square family, built from repeated 3-dc (UK: 3-tr) clusters and ch-2 corners that stack into a firm, geometric fabric. Rather than the soft, rounded look often associated with granny squares, the structured joining and firm cotton give this piece a tailored, almost woven finish that suits it to daily use rather than decorative display.
Two panels of joined squares form the front and back, linked by a single crochet gusset strip worked as one long piece and a matching band that carries the handle tabs. The gusset wraps around the base and sides to give the bag its 3.5 inch / 9 cm depth, while the band ties the top edge together and anchors the bamboo handles via stitched tabs and swivel clasps.
Materials
Yarn Requirements
- You’ll need worsted weight (#4 medium) cotton or cotton blend in four colors. Cotton is essential here because it gives the tote its firm, structured body. Acrylic would be too floppy for this design.
Navy
- approximately 250 g (for squares and gusset)
Cobalt blue
- approximately 80 g
Light gray
- approximately 120 g (for joins and bands)
White
- approximately 40 g (for centers)
Suggested Yarn Brands
- Paintbox Yarns Cotton Aran
- Lily Sugar’n Cream (worsted cotton)
- Yarn and Colors Must-Have / Epic
Additional Supplies
- 4.0 mm (US G/6) crochet hook
- 4 lobster swivel clasps or D-rings
- Tapestry needle
- Stitch markers
- Scissors
Optional
- fabric lining with needle and thread
The list is the pattern's own wording.
Instructions
Every round is printed as the pattern wrote it, brackets and all. Open the key beside a round to see only the short forms that round uses.
Special Stitches
3-dc cluster (granny group): Work 3 dc into the same space. This is the building block of every granny square.
Corner: Work (3 dc, ch 2, 3 dc) into one ch-2 space. This creates the corner turn that keeps your squares flat and square.
Pattern Notes Before You Begin Read these notes carefully. A few minutes here will make every round that follows feel effortless.
1. The beginning ch-3 counts as the first dc throughout the pattern.
2. Join each round with a sl st to the top of the beg ch-3 unless told otherwise.
3. Fasten off and weave in ends after each color change for the cleanest finish.
4. The bag is worked with the right side facing on every round.
The Granny Square Pattern
Make 12 squares total. Each uses the same four colors in the same order: white center, one cobalt round, two navy rounds, and a gray border.
- Round 1
White Create a magic ring. Ch 3 (this counts as your first dc), work 2 dc in ring, ch 2, then work [3 dc in ring, ch 2] 3 times. Join to the top of ch-3 with a sl st. Fasten off.Stitch count: 12 dc, 4 corner spaces
Key4
- Corner
- Work (3 dc, ch 2, 3 dc) into one ch-2 space. This creates the corner turn that keeps your squares flat and square.
- sl st
- slip stitch (insert hook, yarn over, pull through both loops at once)
- ch
- chain (wrap yarn over hook and pull through the loop on your hook)
- dc
- double crochet (yarn over, insert hook, yarn over, pull up a loop, yarn over, pull through two loops, yarn over, pull through remaining two loops)
- Round 2
Cobalt Join cobalt in any corner ch-2 sp. Ch 3, work (2 dc, ch 2, 3 dc) in same sp, then work (3 dc, ch 2, 3 dc) in each remaining corner sp around. Join with sl st. Fasten off.Stitch count: 24 dc, 4 corners
Key5
- Corner
- Work (3 dc, ch 2, 3 dc) into one ch-2 space. This creates the corner turn that keeps your squares flat and square.
- sl st
- slip stitch (insert hook, yarn over, pull through both loops at once)
- ch
- chain (wrap yarn over hook and pull through the loop on your hook)
- dc
- double crochet (yarn over, insert hook, yarn over, pull up a loop, yarn over, pull through two loops, yarn over, pull through remaining two loops)
- sp
- space
- Round 3
Navy Join navy in any corner sp. Ch 3, work (2 dc, ch 2, 3 dc) in same sp; ch 1, work 3 dc in next side sp, ch 1, work (3 dc, ch 2, 3 dc) in next corner; rep from around. Join with sl st. Do not fasten off.Stitch count: 36 dc
Key6
- Corner
- Work (3 dc, ch 2, 3 dc) into one ch-2 space. This creates the corner turn that keeps your squares flat and square.
- sl st
- slip stitch (insert hook, yarn over, pull through both loops at once)
- rep
- repeat
- ch
- chain (wrap yarn over hook and pull through the loop on your hook)
- dc
- double crochet (yarn over, insert hook, yarn over, pull up a loop, yarn over, pull through two loops, yarn over, pull through remaining two loops)
- sp
- space
- Round 4
Navy Work corners as before with 3 dc in each side sp along the way, ch 1 between groups. Join with sl st. Fasten off.Stitch count: 48 dc
Key4
- sl st
- slip stitch (insert hook, yarn over, pull through both loops at once)
- ch
- chain (wrap yarn over hook and pull through the loop on your hook)
- dc
- double crochet (yarn over, insert hook, yarn over, pull up a loop, yarn over, pull through two loops, yarn over, pull through remaining two loops)
- sp
- space
- Round 5
Gray Join gray in any corner. Work (3 dc, ch 2, 3 dc) in each corner and 3 dc in each side sp, ch 1 between groups. Join with sl st. Fasten off.Stitch count: 60 dc
Key5
- Corner
- Work (3 dc, ch 2, 3 dc) into one ch-2 space. This creates the corner turn that keeps your squares flat and square.
- sl st
- slip stitch (insert hook, yarn over, pull through both loops at once)
- ch
- chain (wrap yarn over hook and pull through the loop on your hook)
- dc
- double crochet (yarn over, insert hook, yarn over, pull up a loop, yarn over, pull through two loops, yarn over, pull through remaining two loops)
- sp
- space
Important Tip: Block all 12 squares to a true 4 inches / 10 cm before joining. Even, square edges make the panels line up perfectly during assembly.
Building the Front and Back Panels
Now comes the fun part. You’ll arrange your squares into two panels, each 3 squares wide by 2 squares tall. That’s 6 squares per panel.
Joining the Squares (Gray)
Using gray yarn and a tapestry needle, whip stitch the squares together through the back loops only. Match stitch for stitch as you go. Join into rows of three first, then join the two rows together.
Result: 2 panels of 6 squares each Optional Continuous Join
If you prefer using a hook instead of a needle, you can work a gray sl st join through both back loops across each seam. This creates a defined raised line. Work ch 1 over each corner intersection.
Result: Same 2 panels with a more visible seam line
Each finished panel measures approximately 12.5 inches / 32 cm wide by 8.5 inches / 21.5 cm tall before the gusset and band are added.
Sides and Base Gusset
One continuous navy strip forms both sides and the base of your tote. It’s worked flat in single crochet for a firm, hard-wearing wall that holds the bag’s shape.
Foundation (Navy)
Ch 15.
Stitch count: 14 ch
- Round 1
Sc in 2nd ch from hook and each ch across. Turn. Stitch count: 14 sc
Key2
- ch
- chain (wrap yarn over hook and pull through the loop on your hook)
- sc
- single crochet (insert hook, yarn over, pull up a loop, yarn over, pull through both loops)
- Round 2
through 135 Ch 1, sc in each st across. Turn. Repeat until the strip measures about 30 inches / 76 cm.Stitch count: 14 sc each row
Key2
- ch
- chain (wrap yarn over hook and pull through the loop on your hook)
- sc
- single crochet (insert hook, yarn over, pull up a loop, yarn over, pull through both loops)
Important: Do not fasten off until you have checked the length against your assembled panel. The strip should equal one side plus the base plus the other side (about 8.5 + 13 + 8.5 inches). Add or remove rows as needed, then fasten off.
Assembly Instructions
This is where your tote really comes together. Take your time here and the results will be beautiful.
Step 1: Attach the Gusset
With gray yarn and the wrong sides together, whip stitch one long edge of the navy strip to the front panel. Start at the top of one side, work down to the base, across the bottom, and up the other side.
Result: 3 edges joined Step 2: Add the Back Panel
Whip stitch the back panel to the free long edge of the gusset in the same way. The tote now stands up on its own.
Result: Bag body complete Step 3: Square the Corners
Pinch and align the base corners so the gusset folds neatly. A few extra gray stitches at each lower corner keep the box shape crisp.
Result: 4 neat corners
Lining Tip: If you want to add a fabric lining, cut it 0.5 inches larger than each face, press the seam allowance, and hand-stitch it just below the top edge before adding the band.
Top Band and Handle Tabs
The top band gives your tote a polished, finished look and provides a sturdy base for attaching the handle tabs.
Band Round 1 (Gray)
Join gray at a back corner. Sc evenly around the entire top opening, working 1 sc per st and easing at the corners. Join with sl st.
Stitch count: 132 sc Band Round 2 (Navy)
Ch 1, sc in each st around. Join with sl st.
Stitch count: 132 sc Band Round 3 (Navy)
Ch 1, sc in each st around. Join with sl st. Fasten off.
Stitch count: 132 sc Handle Tabs (Make 4)
Foundation (Navy)
Ch 9. Sc in 2nd ch and across.
Stitch count: 8 sc
- Round 2
through 11: Ch 1, sc across. Turn. Fasten off, leaving a long tail for sewing. Stitch count: 8 sc each row
Key2
- ch
- chain (wrap yarn over hook and pull through the loop on your hook)
- sc
- single crochet (insert hook, yarn over, pull up a loop, yarn over, pull through both loops)
Attaching the Tabs
On the front band, count in so the two tabs sit above the gaps between squares 1-2 and 2-3. Mirror this placement on the back. Thread each tab through a swivel clasp, fold in half, and stitch the end down securely to the inside of the band. Clip the bamboo handles to the clasps.
Result: 4 tabs, 2 handles Finishing and Care Instructions Finishing Steps 1. Weave in every end on the wrong side and trim flush.
2. Steam or wet-block the finished tote to even the stitches.
3. Check that all four tabs are stitched down firmly before use.
Care Instructions Hand wash cool with mild detergent Reshape damp and dry flat, away from direct heat Remove bamboo handles before washing to protect the finish
Do not tumble dry or wring Sizing and Customization Options Want to make this pattern your own? Here are some ideas.
Bigger Tote
Making up
- Step 1Finishing Steps: 1. Weave in every end on the wrong side and trim flush. 2. Steam or wet-block the finished tote to even the stitches. 3. Check that all four tabs are stitched down firmly before use.
- Step 2Care Instructions: Hand wash cool with mild detergent Reshape damp and dry flat, away from direct heat Remove bamboo handles before washing to protect the finish Do not tumble dry or wring
Notes from the pattern
- Work with a 4.0 mm (US G/6) hook and check gauge before starting: one finished square through Round 5 should measure 4 inches / 10 cm square, and the single crochet sections should measure 16 stitches and 18 rows to 4 inches / 10 cm.
- Use cotton or a cotton blend rather than acrylic. The firm, structured body of this tote depends on cotton's lack of stretch and springback.
- Keep the four colours consistent across squares: navy and cobalt for the main clusters, white for the centres, and grey for the border and joining rounds, so the coastal palette reads evenly across both panels.
- Position the two tabs on each band so they sit above the gaps between squares 1-2 and 2-3, and mirror this on the front and back before stitching the tabs down.
The essentials
- Rounds
- 8
- Parts
- 3
- Level
- Intermediate
- Time
- 12 to 16 hours
- Hook
- 4.0 mm
- Yarn
- Worsted
Stitches you will use
- Granny square corners and clusters Used through Round 5 of each square; keep the 3-dc groups and ch-2 corner spaces even so all squares finish at the same 4 inch / 10 cm size.
- Slip stitch join through back loops (optional) Used along panel seams if working with a hook instead of a needle; work a ch-1 over each corner intersection to keep the raised seam line consistent.
- Attaching tabs and swivel clasps Used when mounting the bamboo handles to the band; fold each sc tab in half through the clasp and stitch the end down firmly to the inside of the band.
Troubleshooting
Finished squares are smaller or larger than 4 inches / 10 cm
This is a gauge mismatch; go up a hook size if squares are small, or down a size if they are large, and re-check after Round 5 rather than adjusting mid-square.
A handle tab pulls loose from the band
The stitched end was not secured firmly enough to the inside of the band; re-stitch through several layers of the folded tab before clipping the bamboo handle back on.
Substituting yarn
- Cotton-acrylic blend, worsted weight
- Softer drape and lighter finished bag, but less structure; expect the panels to hold their shape less firmly than 100% cotton.
- 100% cotton, DK weight
- A smaller finished tote at the same round count; move down to roughly a 3.5 mm hook and re-check the 4 inch / 10 cm square gauge before starting.
- Cotton-linen blend, worsted weight
- Similar firm body to all-cotton, with a slightly stiffer hand; block gently to soften the fabric before assembling panels.
Washing and care
- Hand wash the finished tote in cool water with a mild detergent, and remove the bamboo handles first to protect their finish.
- Reshape while still damp and dry flat away from direct heat; do not tumble dry or wring, since this can distort the firm cotton structure.
FAQs
Questions
Can acrylic yarn be used instead of cotton?
It is not recommended for this design. The tote's structure depends on cotton's firmness, and acrylic will make the finished bag floppy rather than self-supporting.
What if the finished squares come out the wrong size?
Check gauge against the 4 inch / 10 cm square measurement taken through Round 5, and go up or down a hook size accordingly. Matching this measurement is what keeps the final 13 by 10 by 3.5 inch dimensions accurate.
Is it possible to join the panels with a hook instead of a tapestry needle?
Yes; work a grey slip stitch join through both back loops across each seam, with a ch-1 over every corner intersection. This gives the same two panels but with a more visible, raised seam line.
Do the bamboo handles need to be removed for washing?
Yes, always unclip them before hand washing. Leaving them attached during washing or drying can damage their finish.
Can fabric lining be skipped?
The lining is listed as part of the materials and helps the tote keep its shape and hide seam allowances inside, but a maker confident in the finish of the sl st or needle join could choose to omit it. Doing so will expose the inside seams and gusset joins.
These answers came from whoever first published the pattern, kept word for word.