 EVERY CROCHET
 Bags 10 rounds No account, no download
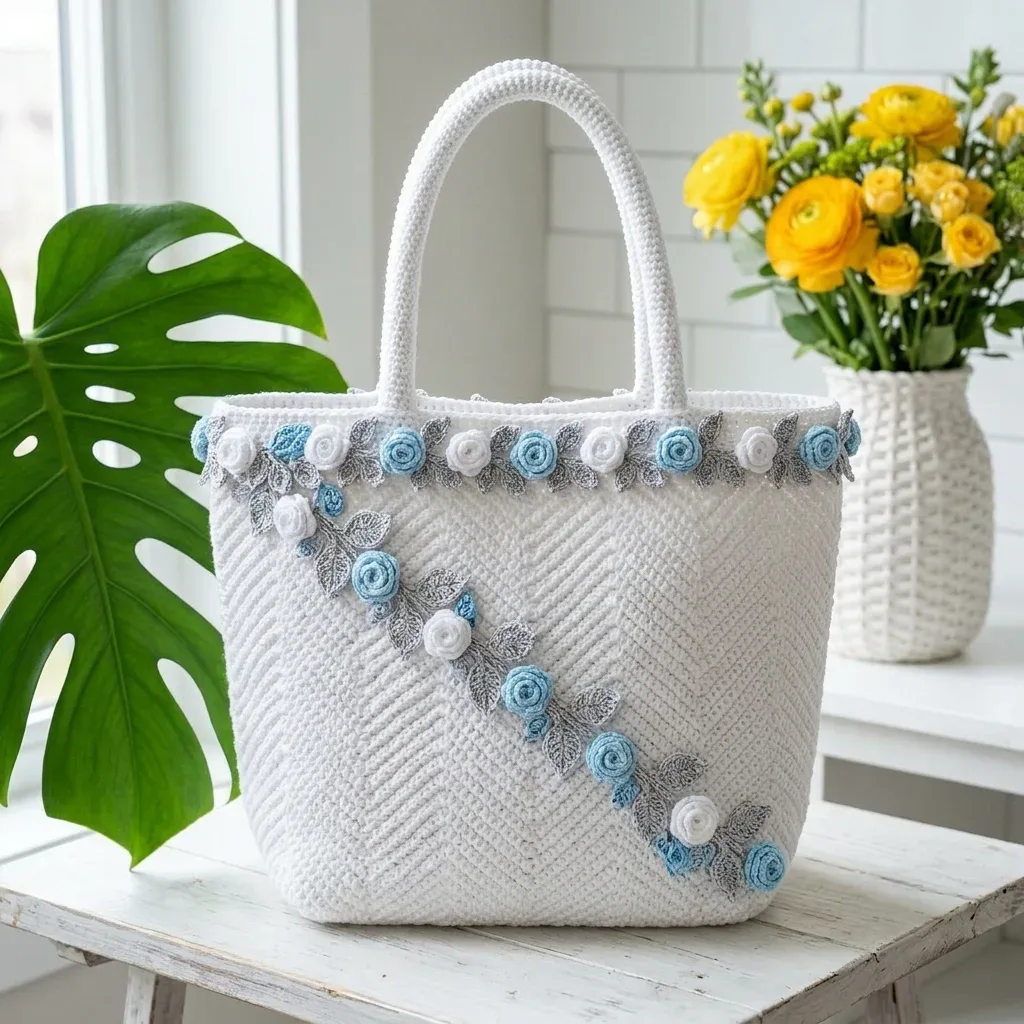
Structured herringbone tote with crochet roses
A boxy tote worked in herringbone half double crochet (UK herringbone half treble), finished with sewn-on roses and leaves.
- Skill
- Intermediate
- Time
- 14-20 hours
- Yarn weight
- Worsted
- Hook
- 4.0 mm

Intermediate
What the original write-up called it. Nothing here is graded again.

Worsted
What the sample was worked in. Any weight works; the size moves with it.

14-20 hours
What the original page reckoned. Your own pace is the one that matters.
About this pattern
This is a structured, boxy tote bag made in herringbone half double crochet (UK herringbone half treble), built from an oval base, a plain body, two attached handles, and a cluster of sewn-on roses and leaves. It uses worsted weight cotton or cotton-blend yarn in four colours, a 4.0 mm hook for the body and a 3.75 mm hook for the embellishments, and takes roughly 14 to 20 hours for an experienced crocheter.
This tote belongs to the herringbone stitch family, built from herringbone half double crochet (UK: herringbone half treble). The diagonal lean of each stitch gives the fabric a woven, almost knitted texture that reads very differently from a plain single or double crochet body, and it is firm enough to hold the bag's boxy shape without a separate insert.
This pattern is rated intermediate. If you've never tried herringbone half double crochet before, the stitch is explained step by step in Section 1; it's straightforward once you understand which loop to pull through first.
Materials
- You’ll need worsted weight cotton or cotton-blend yarn in four colors:
- Main Color (MC): White, approximately 700 yards (640 meters) for the body and handles
- Color A (CA): Light blue, approximately 60 yards (55 meters) for roses
- Color B (CB): Light gray, approximately 80 yards (73 meters) for leaves and some roses
- Color C (CC): White, approximately 40 yards (37 meters) for white roses (can be same as MC)
- Lion Brand 24/7 Cotton in White, Sky, and Silver works beautifully here. This 100 percent mercerized cotton has excellent stitch definition and washes well. The roses keep their shape after blocking.
- Paintbox Yarns Simply DK used doubled in Paper White, Slate Blue, and Granite Grey gives a soft but structured result. The cotton-acrylic blend adds durability.
- Drops Paris in White, Light Blue, and Grey is widely available and affordable. It maintains the stiffness you want for bag construction.
Substitution note
- Avoid purely acrylic yarns for the bag body. They’ll stretch and lose shape over time with regular use. Your embellishment roses can be any smooth yarn that matches the gauge, since they’re decorative rather than structural.
- Size G-6 / 4.0 mm crochet hook for the body and handles
- Size F-5 / 3.75 mm crochet hook for roses and leaves (optional, for tighter embellishments)
- Stitch markers (at least 4)
- Tapestry needle
- Scissors
Optional
- bag insert or stiffening spray for extra structure
- fabric lining (14 x 22 inch rectangle, folded and sewn)
The list is the pattern's own wording.
Instructions
Every round is printed as the pattern wrote it, brackets and all. Open the key beside a round to see only the short forms that round uses.
Rose
The roses are worked as flat spirals that naturally curl into 3D flowers.
Foundation: Ch 16 loosely.
- (15)Round 1
Starting in 2nd ch from hook, work 1 sc in each of next 2 ch, 1 hdc in each of next 2 ch, 2 dc in each of next 6 ch, 1 tr in each of next 4 ch. (15 sts total)Fasten off, leaving a 10-inch tail. Roll the strip into a spiral with the sc end as the center. Use the tail to whipstitch the base together as you roll, securing each layer. Your finished rose will be approximately 0.75 inch (2 cm) in diameter.
Key5
- hdc
- half double crochet: yarn over, insert hook, yarn over, pull up a loop (3 loops), yarn over, pull through all 3 loops
- ch
- chain: wrap yarn over hook and pull through the loop on your hook
- sc
- single crochet: insert hook, yarn over, pull up a loop (2 loops on hook), yarn over, pull through both loops
- dc
- double crochet: yarn over, insert hook, yarn over, pull up a loop, yarn over, pull through 2 loops, yarn over, pull through remaining 2 loops
- tr
- treble crochet: yarn over twice, insert hook, yarn over, pull up a loop, then yarn over and pull through 2 loops three times
Small Leaf
Ch 8.
- Round 1
Sl st in 2nd ch from hook, sc in next ch, hdc in next ch, dc in next ch, hdc in next ch, sc in next ch, sl st in last ch. Do not turn.Working along the opposite side of the foundation ch: sc in next ch, hdc in next ch, dc in next ch, hdc in next ch, sc in next ch, sl st in last ch.Fasten off, leaving a tail for sewing. Each leaf measures approximately 0.75 inch (2 cm) long.
Key5
- sl st
- slip stitch: insert hook, yarn over, pull through both the stitch and the loop on your hook in one motion
- hdc
- half double crochet: yarn over, insert hook, yarn over, pull up a loop (3 loops), yarn over, pull through all 3 loops
- ch
- chain: wrap yarn over hook and pull through the loop on your hook
- sc
- single crochet: insert hook, yarn over, pull up a loop (2 loops on hook), yarn over, pull through both loops
- dc
- double crochet: yarn over, insert hook, yarn over, pull up a loop, yarn over, pull through 2 loops, yarn over, pull through remaining 2 loops
Section 1: Oval Base
The base creates that boxy shape. The foundation chain determines the length.
Foundation Chain: Using MC and 4.0 mm hook, ch 29.
- Round 1
Starting in the 2nd ch from hook, work 1 sc in each of next 27 ch, then work 3 sc in the last ch (this forms the first short-end curve). Rotate your work to stitch along the opposite side of the foundation chain. Work 1 sc in each of next 27 ch along the bottom of the chain, then work 2 sc in the same ch as your very first sc (this forms the second short-end curve). Place marker in the first st of the next round. (60 sc)
Key2
- ch
- chain: wrap yarn over hook and pull through the loop on your hook
- sc
- single crochet: insert hook, yarn over, pull up a loop (2 loops on hook), yarn over, pull through both loops
- (66)Round 2
Rnd 2: Work 1 HbHdc in each of next 27 sts, 2 HbHdc in each of next 3 sts, 1 HbHdc in each of next 27 sts, 2 HbHdc in each of next 3 sts. (66 HbHdc)Step by step for Herringbone Half Double Crochet (HbHdc): Step 1: Yarn over as you would for a normal hdc. Step 2: Insert your hook into the designated stitch. Step 3: Yarn over and pull up a loop (3 loops on your hook). Step 4: Pull the working yarn through ONLY the first loop on your hook (2 loops remaining — this is the key difference from a normal hdc). Step 5: Yarn over and pull through both remaining loops. The result is a stitch that leans diagonally, creating the herringbone texture. Every body round uses this stitch unless told otherwise.
Key3
- HbHdc
- herringbone half double crochet (see special stitch instructions below)
- hdc
- half double crochet: yarn over, insert hook, yarn over, pull up a loop (3 loops), yarn over, pull through all 3 loops
- rnd
- round
- (72)Round 3
Rnd 3: Work 1 HbHdc in each of next 27 sts, [2 HbHdc in next st, 1 HbHdc in next st] 3 times, 1 HbHdc in each of next 27 sts, [2 HbHdc in next st, 1 HbHdc in next st] 3 times. (72 HbHdc)
Key2
- HbHdc
- herringbone half double crochet (see special stitch instructions below)
- rnd
- round
- (78)Round 4
Rnd 4: Work 1 HbHdc in each of next 27 sts, [2 HbHdc in next st, 1 HbHdc in each of next 2 sts] 3 times, 1 HbHdc in each of next 27 sts, [2 HbHdc in next st, 1 HbHdc in each of next 2 sts] 3 times. (78 HbHdc)
Key2
- HbHdc
- herringbone half double crochet (see special stitch instructions below)
- rnd
- round
- (84)Round 5
Rnd 5: Work 1 HbHdc in each of next 27 sts, [2 HbHdc in next st, 1 HbHdc in each of next 3 sts] 3 times, 1 HbHdc in each of next 27 sts, [2 HbHdc in next st, 1 HbHdc in each of next 3 sts] 3 times. (84 HbHdc)
Key2
- HbHdc
- herringbone half double crochet (see special stitch instructions below)
- rnd
- round
Checkpoint: Your base should now measure approximately 13 inches (33 cm) long and 5 inches (12.7 cm) wide. It should lie flat with no curling at the short ends.
Section 4: Handles (Make 2)
Each handle is a firm crocheted tube about 18 inches (45.7 cm) long.
Foundation Chain: Using MC and 4.0 mm hook, ch 73.
Join with sl st to first ch, being careful not to twist. Place marker.
- Round 1
Ch 1, work 1 sc in each ch around. (73 sc)
Key2
- ch
- chain: wrap yarn over hook and pull through the loop on your hook
- sc
- single crochet: insert hook, yarn over, pull up a loop (2 loops on hook), yarn over, pull through both loops
- Rounds 2–4
Work 1 sc in each st around. (73 sc) Join with sl st to first sc. Fasten off, leaving a long tail for sewing.
Key2
- sl st
- slip stitch: insert hook, yarn over, pull through both the stitch and the loop on your hook in one motion
- sc
- single crochet: insert hook, yarn over, pull up a loop (2 loops on hook), yarn over, pull through both loops
The handle is a narrow tube, 4 rounds tall. Work tightly so it maintains its shape. The firm cotton and tight gauge make this self-supporting.
Make a second handle identically.
Section 2: Bag Body
Now we work straight up with no more increases. This creates those clean, boxy sides.
- (84)Rounds 6–30
Rnds 6-30: Work 1 HbHdc in each st around. (84 HbHdc per round)That’s 25 rounds of the same simple instruction. Put on a podcast or your favorite show and enjoy the rhythm of the stitch.Checkpoint: After Round 30, your bag body should measure approximately 10 inches (25.5 cm) tall from the base. The opening measures 13 inches (33 cm) wide and 5 inches (12.7 cm) deep.
Key1
- HbHdc
- herringbone half double crochet (see special stitch instructions below)
Handle Attachment
Flatten each handle so the seam runs along one edge. Position each handle centered over the long side (front and back panels). Each handle should sit approximately 3 inches (7.6 cm) from the center of the top opening. Space both attachment points about 7 inches (17.8 cm) apart.
Using your tapestry needle and matching yarn, whipstitch each handle end firmly to the inside top edge. Stitch through 2 to 3 rounds of the bag wall for security. Reinforce with a second row of whipstitching in the opposite direction.
Checkpoint: Hold the bag by the handles. It should hang straight with handles at equal heights and the bag body remaining open and square.
Roses
Make the following: 12 roses in Color A (light blue)
8 roses in Color B (gray)
8 roses in Color C (white)
Total: 28 roses
Leaves
Make 20 leaves in Color B (gray).
Placement Guide
Top edge garland: The roses and leaves run continuously along the entire top edge (Rnd 31), alternating colors. Pin approximately 22 roses evenly around the full circumference, spacing them about every 3 to 4 stitches with a leaf between each pair. Adjust spacing as needed for an even distribution.
Diagonal garland on front panel: Position a diagonal line of roses from the upper-left area of the front panel (near the left handle base) sweeping down to the lower-right corner. Use approximately 12 roses and 10 leaves. Arrange them in a gentle S-curve or diagonal line. Pin all pieces before sewing to confirm placement.
Sewing embellishments: Using matching yarn and your tapestry needle, sew each rose base securely to the bag with 4 to 6 stitches through the base into the bag body. Sew each leaf at its base and tip so it lies flat.
Making up
- Step 1Weave in all ends securely, especially at the rose bases and leaf attachment points.
- Step 2Wet blocking: Submerge your completed bag in cool water. Gently squeeze out excess water without wringing. Lay flat on a blocking board or clean towel. Shape the base to lie flat and square, pull the sides upright, and allow to dry completely (12 to 24 hours). The cotton content stiffens slightly as it dries, helping the bag hold its boxy shape.
- Step 3Optional stiffening: Lightly spray the exterior with starch or fabric stiffener, focusing on the base and lower body for added structure. Allow to dry fully before use.
- Step 4Optional lining: Cut lining fabric into two panels of 14 x 11 inches plus two side panels of 6 x 11 inches. Sew together with a 0.5 inch seam allowance. Fold the top edge under 0.5 inch and hand-stitch the lining to the inside top edge of the bag, just below the rose garland.
Notes from the pattern
- Place a stitch marker at the start of each round on the oval base and body; with no clear round-end stitch in herringbone half double crochet, markers are the only reliable way to track where a round began.
- Choose a mercerised cotton or cotton-blend yarn rather than pure acrylic for the body and handles, since the pattern relies on the yarn's stiffness and blocking behaviour to help the bag hold its shape.
- Work the roses and leaves at any point before final assembly, since they are made separately and only sewn on at the end, with no round counts to track once the simple repeat is memorised.
- Gauge matters for the finished dimensions: in Herringbone Half Double Crochet worked in the round, 16 stitches = 4 inches (10 cm) and 12 rows = 4 inches (10 cm), measured with the 4.0 mm hook and MC yarn. Make a small swatch and measure it; if you have more stitches per inch, try a larger hook, and if you have fewer, go down a hook size.
- The herringbone stitch naturally leans to the right as you work; this is correct and is exactly what creates the diagonal herringbone texture.
- The finished bag has no built-in closure. Add a button loop or a magnetic snap before adding the optional lining if you'd like the bag to close at the top.
- All rounds are worked on the right side; don't turn your work unless specifically told to.
- Finished handle drop measures approximately 8 inches (20.3 cm), in addition to the bag's 13 inch (33 cm) width, 10 inch (25.5 cm) height, and 5 inch (12.7 cm) depth.
The essentials
- Rounds
- 10
- Parts
- 9
- Level
- Intermediate
- Time
- 14-20 hours
- Hook
- 4.0 mm
- Yarn
- Worsted
Stitches you will use
- Herringbone half double crochet (UK herringbone half treble) Used throughout the bag body from Round 2 onward; the step to watch is pulling through only the first loop before the final yarn-over-and-through-two, which is what creates the diagonal lean.
- Oval base shaping with evenly spaced increases Rounds 1 to 3 of the base build the rounded short ends with extra stitches at the curves; keeping increases aligned round over round keeps the oval symmetrical.
- Flat-spiral rose construction The rose is a single row of graduated stitches (sc through tr) rolled into a spiral and whipstitched at the base; even tension across the row keeps the spiral from puckering or unrolling.
Troubleshooting
The base ends up more circular than
This usually means the increases in Rounds 2 and 3 were not kept to the two groups of 3 extra stitches at each short end; recount the 27-stitch straight sections against the increase stitches before continuing.
The herringbone fabric looks loose or
This happens when the loop is pulled through with too much yarn on the hook in Step 4; keep the first loop snug before pulling through just that one loop, which is what sharpens the diagonal texture.
The rolled rose unspirals or looks flat instead of cupped
This is a tension or whipstitching issue along the base edge; whipstitch each layer of the spiral securely to the one before it as it is rolled, rather than stitching only at the very end.
Substituting yarn
- 100% mercerised cotton, worsted weight
- Closest match to the pattern's intended structure and stitch definition; use the stated 4.0 mm hook with no size change, and expect the firmest, most boxy result.
- Cotton-acrylic blend DK weight, worked doubled
- Gives a slightly softer, more flexible fabric than pure cotton; may need to drop to a smaller hook if the doubled strand feels loose, and blocking will stiffen it less dramatically.
- Smooth acrylic or acrylic-blend
- Fine for the decorative embellishments since they carry no structural load, but avoid acrylic for the body and handles, where it will stretch and lose shape with use.
Washing and care
- Hand wash in cool water as directed, squeezing out excess water without wringing, since the cotton or cotton-blend yarn can distort if twisted while wet.
- Lay the bag flat to dry for 12 to 24 hours with the base shaped square and the sides pulled upright, letting the cotton content stiffen naturally as it dries rather than reshaping it later.
FAQs
Questions
Is herringbone half double crochet hard to learn for this project?
The stitch has one key difference from a normal half double crochet: pulling through only the first loop in Step 4 rather than all three. Once that single step is understood, the rest of the body is a straightforward repeat over many rounds.
Can the roses and leaves be made before the bag body?
Yes, they are worked separately and sewn on at the end, so there is no dependency on the body being finished first. Many crocheters make them in short sessions since each repeat is simple once memorised.
Why does the pattern call for cotton rather than acrylic?
The bag's boxy, self-standing shape depends on the stiffness cotton gains after wet blocking. Pure acrylic yarn will stretch under the weight of contents and will not hold the same structure over time.
What is the stitch marker for if herringbone half double crochet doesn't have a clear round end?
A marker placed at the start of each round on the base and body is the only reliable way to track where a new round begins, since the stitch itself does not create an obvious end-of-round marker. At least four markers are listed in the materials for this reason.
Does the finished bag need an insert or stiffening spray?
Not strictly, since the herringbone fabric and cotton yarn already create a firm, structured bag. A bag insert or stiffening spray is listed as an optional extra for additional rigidity, not a requirement.
These answers came from whoever first published the pattern, kept word for word.