 EVERY CROCHET
Amigurumi 19 rounds No account, no download
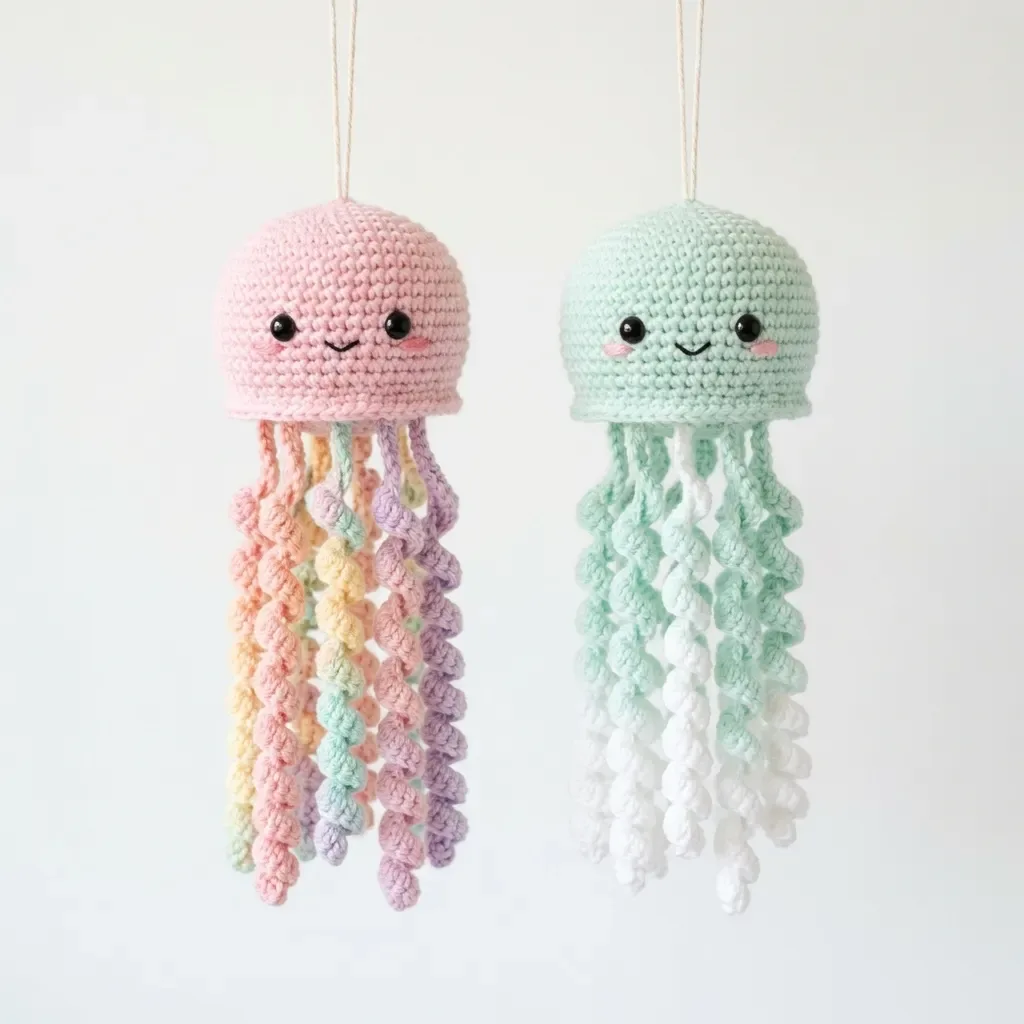
Pastel rainbow jellyfish amigurumi in single crochet
A single crochet (UK: double crochet) jellyfish amigurumi, explained with both US and UK stitch names.
- Skill
- Intermediate
- Time
- 4-6 hours
- Yarn weight
- DK
- Hook
- 3.25 mm

Intermediate
What the original write-up called it. Nothing here is graded again.
DK
What the sample was worked in. Any weight works; the size moves with it.
4-6 hours
What the original page reckoned. Your own pace is the one that matters.
About this pattern
This pattern makes a stuffed amigurumi jellyfish ornament with a rounded bell body, kawaii embroidered face, and five curling pastel tentacles, worked seamlessly in continuous single crochet rounds. The bell measures roughly 3.5 inches (9 cm) across and 2.75 inches (7 cm) tall, with a hanging length of 10 to 11 inches (25 to 28 cm). An experienced beginner should allow 4 to 6 hours.
This hanging ornament takes the shape of a rounded jellyfish bell, worked entirely in single crochet (UK: double crochet), the short, dense stitch family that gives amigurumi pieces their firm, stuffable structure. The bell builds from a magic ring at the crown through a dome, with evenly spaced increases setting the curve before a run of straight rounds and then decreases closing the base. Five pastel tentacles trail from the opening, each worked as a curling spiral rather than a flat strip.
Construction runs seamlessly from the crown of the bell downward in continuous rounds, with no joining or turning between rows. The top opens with six stitches worked into a magic ring, increases out to the widest point, then holds steady before a matching set of decreases closes the base. Stuffing goes in partway through the decrease rounds, filled to about three-quarters full so the dome keeps its plump shape without bulging. Safety eyes and the embroidered face go on before the base closes, since the inside becomes inaccessible afterwards; the five pastel tentacles attach around the opening last.
The finished piece hangs from a simple length of twine or jute cord inserted through the top center of the bell. Safety eyes and a sweet embroidered smile give it kawaii character, and optional rosy cheeks add the finishing touch.
Materials
Yarn
- DK weight yarn (CYCA 3 / Light), 100 percent cotton or cotton-blend recommended for stitch definition and firmness.
- Main color (MC): Pink pastel, approximately 40 yards (37 meters)
- Tentacle colors (TC1 through TC5): Peach, yellow, lavender, mint, and soft pink pastels, approximately 8 to 10 yards (7 to 9 meters) each
Hook
- US size D-3 / 3.25 mm crochet hook. A tighter fabric prevents stuffing from showing through.
Notions
- 2 black safety eyes, 6 mm
- Polyfill stuffing, small amount (approximately 0.5 oz / 15 g)
- Pink embroidery floss or yarn, small length for cheek blush
- Black embroidery floss or yarn, small length for smile
- Stitch marker
- Yarn needle
- Scissors
- Twine, jute cord, or thin ribbon, approximately 18 inches (46 cm), for the hanging loop
The list is the pattern's own wording.
Instructions
Every round is printed as the pattern wrote it, brackets and all. Open the key beside a round to see only the short forms that round uses.
Main Pattern
Using MC (pink pastel), begin with a magic ring. Step by step: wrap yarn around two fingers, crossing the working yarn over the tail end to form a loop; insert hook into the center of the loop, draw up a loop of working yarn, chain 1 (this does not count as a stitch); work the required number of sc into the ring, then pull the tail end firmly to close the ring completely. If magic rings are difficult, chain 2 and work the starting stitches into the second chain from the hook instead - the center won't be quite as tight, but it works.
- Round 1
Work 6 sc into the magic ring. Pull ring closed. PM in first stitch of this round. (6 sts)
Key2
- sc
- single crochet (insert hook, yarn over, pull up a loop, yarn over, pull through both loops)
- PM
- place marker
- Round 2
Inc in each st around. (12 sts)
Key1
- inc
- increase (2 sc worked into the same stitch, produces 2 stitches from 1)
- Round 3
(Sc 1, inc) rep 6 times. (18 sts)
Key3
- inc
- increase (2 sc worked into the same stitch, produces 2 stitches from 1)
- rep
- repeat
- sc
- single crochet (insert hook, yarn over, pull up a loop, yarn over, pull through both loops)
- Round 4
(Sc 2, inc) rep 6 times. (24 sts)
Key3
- inc
- increase (2 sc worked into the same stitch, produces 2 stitches from 1)
- rep
- repeat
- sc
- single crochet (insert hook, yarn over, pull up a loop, yarn over, pull through both loops)
- Round 5
(Sc 3, inc) rep 6 times. (30 sts)
Key3
- inc
- increase (2 sc worked into the same stitch, produces 2 stitches from 1)
- rep
- repeat
- sc
- single crochet (insert hook, yarn over, pull up a loop, yarn over, pull through both loops)
- Round 6
(Sc 4, inc) rep 6 times. (36 sts)
Key3
- inc
- increase (2 sc worked into the same stitch, produces 2 stitches from 1)
- rep
- repeat
- sc
- single crochet (insert hook, yarn over, pull up a loop, yarn over, pull through both loops)
- Round 7
(Sc 5, inc) rep 6 times. (42 sts)
Key3
- inc
- increase (2 sc worked into the same stitch, produces 2 stitches from 1)
- rep
- repeat
- sc
- single crochet (insert hook, yarn over, pull up a loop, yarn over, pull through both loops)
- Round 8
Sc in each st around. (42 sts)
Key1
- sc
- single crochet (insert hook, yarn over, pull up a loop, yarn over, pull through both loops)
- Round 9
Sc in each st around. (42 sts)
Key1
- sc
- single crochet (insert hook, yarn over, pull up a loop, yarn over, pull through both loops)
- Round 10
Sc in each st around. (42 sts)
Key1
- sc
- single crochet (insert hook, yarn over, pull up a loop, yarn over, pull through both loops)
- Round 11
Sc in each st around. (42 sts)
Key1
- sc
- single crochet (insert hook, yarn over, pull up a loop, yarn over, pull through both loops)
Continue Decreasing
- Round 12
(Sc 5, sc2tog) rep 6 times. (36 sts)
Key3
- sc2tog
- single crochet two together (a decrease that consumes 2 stitches and produces 1 stitch)
- rep
- repeat
- sc
- single crochet (insert hook, yarn over, pull up a loop, yarn over, pull through both loops)
- Round 13
Sc in each st around. (36 sts)
Key1
- sc
- single crochet (insert hook, yarn over, pull up a loop, yarn over, pull through both loops)
- Round 14
(Sc 4, sc2tog) rep 6 times. (30 sts)
Key3
- sc2tog
- single crochet two together (a decrease that consumes 2 stitches and produces 1 stitch)
- rep
- repeat
- sc
- single crochet (insert hook, yarn over, pull up a loop, yarn over, pull through both loops)
- Round 15
(Sc 3, sc2tog) rep 6 times. (24 sts) Add stuffing now. Fill the bell approximately three-quarters full with polyfill. The shape should be a plump dome. Do not overstuff.
Key3
- sc2tog
- single crochet two together (a decrease that consumes 2 stitches and produces 1 stitch)
- rep
- repeat
- sc
- single crochet (insert hook, yarn over, pull up a loop, yarn over, pull through both loops)
- Round 16
(Sc 2, sc2tog) rep 6 times. (18 sts)
Key3
- sc2tog
- single crochet two together (a decrease that consumes 2 stitches and produces 1 stitch)
- rep
- repeat
- sc
- single crochet (insert hook, yarn over, pull up a loop, yarn over, pull through both loops)
- Round 17
(Sc 1, sc2tog) rep 6 times. (12 sts) Add a small additional pinch of stuffing if needed to maintain the dome shape.
Key3
- sc2tog
- single crochet two together (a decrease that consumes 2 stitches and produces 1 stitch)
- rep
- repeat
- sc
- single crochet (insert hook, yarn over, pull up a loop, yarn over, pull through both loops)
- Round 18
(Sc2tog) rep 6 times. (6 sts)Fasten off, leaving a 10-inch (25 cm) tail. Thread tail onto yarn needle and weave through the front loops of the remaining 6 stitches. Pull firmly to close the gap completely. Weave in end securely on the inside.
Key2
- sc2tog
- single crochet two together (a decrease that consumes 2 stitches and produces 1 stitch)
- rep
- repeat
Checkpoint
After Round 11, your bell should measure approximately 2.75 to 3 inches (7 to 7.5 cm) across at its widest point and approximately 1.75 inches (4.5 cm) in height from top to working edge. The fabric should be firm with no visible gaps.
Safety Eye and Face Placement
Before beginning Round 12 , you need to add the face elements.
Safety eyes: Insert them between Rounds 5 and 6 of the bell (counting down from the top), approximately 6 to 7 stitches apart horizontally, centered on the front of the bell. The eyes should sit in the upper-center-front area of the bell. Lock backs firmly onto safety eye posts from inside.
Smile: Using black embroidery floss, embroider a small curved smile approximately 3 to 4 stitches below and between the eyes. Work a gentle upward arc of 4 to 5 backstitches. Secure ends inside.
Cheeks (optional): Using pink embroidery floss or chalk pastel, add small rosy circles below and to the outer side of each eye.
Final Checkpoint
The closed bell should measure approximately 3.5 inches (9 cm) at its widest diameter and approximately 2.75 inches (7 cm) in total height. It should be a smooth, even dome with no flat spots.
Spiral Tentacles (Make 5)
All five tentacles are attached after the bell is fully closed and finished. Each tentacle is not worked in rounds; it is a flat chain foundation with stitches worked back along it, and packing extra stitches into every chain stitch makes the strip curl naturally into a coil. Work one tentacle in each of the five tentacle colors (TC1 through TC5).
- Tentacle
Using your desired tentacle color, leave a 6-inch (15 cm) tail for attaching. Make a slip knot and chain 26. Starting in the 2nd chain from the hook, work 3 sc into each chain stitch all the way back to the starting tail end. As you work the 3 sc into each chain, the strip will naturally begin to curl and coil into a spiral shape; do not fight this curl, allow it to happen. At the end of the chain, fasten off, leaving a 6-inch (15 cm) tail for attaching.
Key1
- sc
- single crochet (insert hook, yarn over, pull up a loop, yarn over, pull through both loops)
Result: one finished tentacle measures approximately 4 to 5 inches (10 to 13 cm) in its curled spiral form. Tension tip: keep your chain tension relaxed and consistent; tight chains produce shorter, tighter spirals, while looser chains produce longer, more dramatic spirals - adjust based on your preference. Make 5 tentacles total, one in each of TC1 through TC5, then attach them evenly spaced around the base opening after the bell is closed.
Making up
- Step 1Weave in all ends securely on the inside of the bell using a yarn needle. Work ends back through at least 4 stitches in two directions to prevent unraveling.
- Step 2For cotton yarn: Wet block the finished bell by misting lightly with water, gently shaping the dome with your hands, and allowing to air dry completely on a clean surface.
- Step 3For acrylic yarn: Steam blocking is not recommended for this project since the stuffed dome holds its shape well. A light misting and reshape by hand is sufficient.
- Step 4Tentacles do not require blocking. Their natural coil is part of the design. If tentacles look too stiff, mist them lightly with water and gently encourage the spiral shape with your fingers.
- Step 5Attach the five finished tentacles evenly spaced around the base opening of the closed bell, using their yarn tails to sew them securely in place. Thread a length of twine, jute cord, or thin ribbon (approximately 18 inches / 46 cm) through the top center of the bell to create a hanging loop, and knot the ends securely.
Notes from the pattern
- Use the US D-3 / 3.25 mm hook called for in the materials list; a tight gauge (12 sc x 14 rounds = 2 in x 2 in / 5 cm x 5 cm) keeps the fabric dense enough that stuffing will not show through the stitches.
- Place a stitch marker in the first stitch of Round 1 and move it up into the first stitch of each new round; without it, the continuous rounds make it easy to lose track of where a round begins.
- Stuffing is added at Round 15, filled to about three-quarters full for a plump dome. Overstuffing past this point will distort the bell's curve rather than improve its shape.
- Each of the five tentacle colours (TC1 through TC5) uses only 8 to 10 yards (7 to 9 m), so tails are short; weave each one in separately rather than carrying yarn from one tentacle colour to the next.
- To check gauge: chain 14, work 14 rows of sc, and measure the center of the swatch; it should measure 12 sc by 14 rounds over 2 inches x 2 inches (5 cm x 5 cm). Gauge matters here - it ensures the correct finished size and a dense fabric that holds stuffing without showing through.
The essentials
- Rounds
- 19
- Parts
- 6
- Level
- Intermediate
- Time
- 4-6 hours
- Hook
- 3.25 mm
- Yarn
- DK
Stitches you will use
- Working in continuous spiral rounds Used throughout the bell with no joining or turning; a stitch marker placed in Round 1 and moved up each round is the only way to track where a round starts.
- Even increasing and decreasing The increase rounds build the dome from 6 to 30 stitches and the decrease rounds reverse it; watch that increases and decreases are spaced evenly or the bell will sit lopsided.
- Counting a foundation chain for spiral tentacles Each tentacle starts from a short chain that must be counted carefully; a miscount here is what causes a tentacle to lie flat instead of curling.
Troubleshooting
The bell looks lumpy or uneven rather than a smooth dome.
Increases in Rounds 2 through 5 were likely spaced unevenly. Check the stitch count after each round (12, 18, 24, 30) before moving on, since an off count compounds as the dome builds.
Stuffing is visible through the finished fabric.
Gauge is likely looser than the pattern's 12 sc x 14 rounds over 2 in / 5 cm. Re-check the swatch and move down a hook size, or use a firmer cotton yarn, before continuing.
Tentacles curl unevenly or lie flat instead of spiraling.
The stitch count was likely miscounted into the foundation chain. Recount the chain before working back along it, since the spiral effect depends on an even stitch count per tentacle.
Substituting yarn
- 24/7 Cotton DK
- Excellent stitch definition, widely available, washes well, and comes in pastel colorways. Use Blush for the main color; mix and match pastels for the tentacles.
- Paintbox Yarns Simply DK
- 100 percent acrylic but has a matte cotton-like appearance. Very affordable and comes in a broad pastel range. Slight give in the stitch makes stuffing easier.
- Drops Safran (Sport/DK)
- 100 percent Egyptian cotton with beautiful drape and structure. Produces crisp stitch definition. Slightly thinner, so a tension swatch is essential.
- Substitution note
- Any DK or light worsted weight yarn that produces a tight, dense fabric will work. Avoid fuzzy or bouclé yarns since stitch definition is key to the texture - the tentacle spirals will not show their shape properly with fluffy yarn. Adjust your hook size down one step if your swatch shows open gaps between stitches.
Washing and care
- cotton or cotton-blend yarn, hand wash gently in cool water or spot clean rather than machine washing; reshape the damp dome by hand and let it air dry completely before hanging, since a stuffed piece takes longer to dry through.
- Once dry, store the finished jellyfish flat or hanging in a dust-free spot away from direct sunlight, which can fade the pastel colourway over time.
FAQs
Questions
Can the safety eyes be added after the bell is closed?
No. The eyes need to go in while the dome is still open, before stuffing and before the base closes, since there is no way to reach the inside once it is sealed.
Does the bell need to be stuffed firmly?
It is filled to about three-quarters full rather than packed tight. Overstuffing can distort the rounded dome shape and push stuffing visibly against the stitches.
What happens if gauge is off?
A loose gauge can let stuffing show through the fabric, while a tight gauge will shrink the bell below the stated 3.5 in (9 cm) diameter. Checking the swatch against 12 sc x 14 rounds over 2 in (5 cm) before starting avoids both problems.
Is a stitch marker really necessary?
Yes, since the bell is worked in continuous rounds with no joins to mark a round's end. Moving the marker up into the first stitch of each new round is the only reliable way to keep count.
How long does the whole piece realistically take?
An experienced amigurumi maker can expect 4 to 6 hours. First-time makers should allow up to 8 hours, largely because the spiral tentacles require careful counting.
These answers came from whoever first published the pattern, kept word for word.