 EVERY CROCHET
 Amigurumi 14 rounds No account, no download
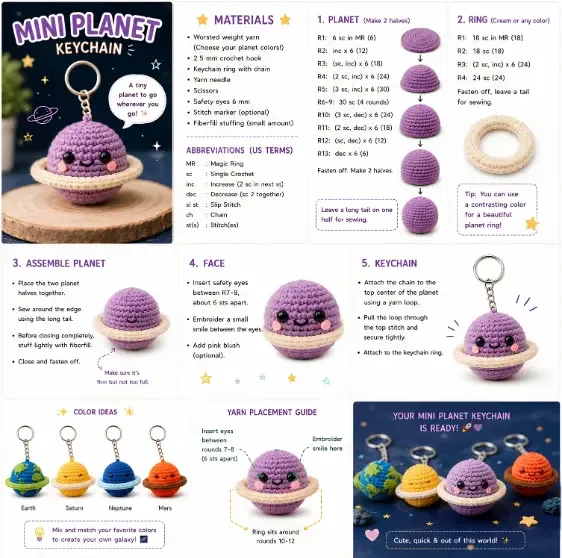
Mini planet amigurumi keychain crochet pattern
Amigurumi mini planet keychain worked in double crochet (UK) / single crochet (US), 2.5mm hook.
- Skill
- Intermediate
- Time
- 4-6 hours
- Yarn weight
- Worsted
- Hook
- 2.5 mm

Intermediate
What the original write-up called it. Nothing here is graded again.

Worsted
What the sample was worked in. Any weight works; the size moves with it.

4-6 hours
What the original page reckoned. Your own pace is the one that matters.
About this pattern
A small amigurumi sphere worked in continuous single crochet (UK: double crochet) rounds from a magic ring, paired with a separate ring piece joined to the body. It uses a 2.5mm hook, worsted weight yarn, 6mm safety eyes and fiberfill stuffing, finished with a keychain ring and chain. The two-part construction and compact size make it a quick, beginner-friendly amigurumi project.
This mini planet keychain belongs to the amigurumi family, worked entirely in single crochet (UK: double crochet) to build a firm, stuffable sphere. The small scale and dense fabric make it a practical carry-along project, finished quickly enough to sit alongside a set of coordinating colourways without becoming repetitive.
The body is built as a sphere worked in continuous spiral rounds from a magic ring, increasing steadily across the opening rounds before the shaping reverses to close the top. A separate ring piece is worked flat in rounds and joined afterwards, giving the planet its distinctive banded look before stuffing and finishing with the keychain hardware.
Materials
- Worsted weight yarn in your favorite colors (choose your planet colors)
- 2.5 mm crochet hook
- Safety eyes (6 mm)
- Polyester fiberfill stuffing (small amount)
- Yarn needle
- Stitch marker (optional)
- Embroidery thread
- Keychain ring and chain
- Scissors
The list is the pattern's own wording.
Instructions
Every round is printed as the pattern wrote it, brackets and all. Open the key beside a round to see only the short forms that round uses.
Main Pattern
- Round 1
6 sc in MR (6)
Key2
- MR
- Magic Ring
- sc
- Single Crochet
- Round 2
inc × 6 (12)
Key1
- inc
- Increase (2 sc in next stitch)
- Round 3
(sc, inc) × 6 (18)
Key2
- inc
- Increase (2 sc in next stitch)
- sc
- Single Crochet
- Round 4
(2 sc, inc) × 6 (24)
Key2
- inc
- Increase (2 sc in next stitch)
- sc
- Single Crochet
- Round 5
(3 sc, inc) × 6 (30)
Key2
- inc
- Increase (2 sc in next stitch)
- sc
- Single Crochet
- Rounds 6–9
30 sc (4 rounds)
Key1
- sc
- Single Crochet
- Round 10
(3 sc, dec) × 6 (24)
Key2
- dec
- Decrease (sc 2 together)
- sc
- Single Crochet
- Round 11
(2 sc, dec) × 6 (18)
Key2
- dec
- Decrease (sc 2 together)
- sc
- Single Crochet
- Round 12
(sc, dec) × 6 (12)
Key2
- dec
- Decrease (sc 2 together)
- sc
- Single Crochet
- Round 13
dec × 6 (6)Fasten off.Make 2 halves.
Key1
- dec
- Decrease (sc 2 together)
Tip: Leave a long tail on one half for sewing.
2. RING (Cream or Any Color)
Part 2
- Round 1
18 sc in MR (18)
Key2
- MR
- Magic Ring
- sc
- Single Crochet
- Round 2
18 sc (18)
Key1
- sc
- Single Crochet
- Round 3
(2 sc, inc) × 6 (24)
Key2
- inc
- Increase (2 sc in next stitch)
- sc
- Single Crochet
- Round 4
24 sc (24)Fasten off, leaving a tail for sewing.
Key1
- sc
- Single Crochet
Tip: Use a contrasting color for a beautiful planet ring.
3. ASSEMBLE PLANET Place the two planet halves together.
The ring sits around rounds 10–12 of the planet body, positioned there when it is joined during assembly to give the sphere its banded look.
Sew around the edge using the long tail.
Before closing completely, stuff lightly with fiberfill.
Close and fasten off.
Make sure it’s firm but not too full.
4. FACE Insert safety eyes between R7–8, about 6 stitches apart.
Embroider a small smile between the eyes.
Add pink blush (optional).
5. KEYCHAIN
Attach the chain to the top center of the planet using a yarn loop.
Pull the loop through the top stitch and secure tightly.
Attach to the keychain ring.
Notes from the pattern
- The 2.5mm hook produces the tight gauge amigurumi needs to keep stuffing from showing through the fabric; sizing down further is unnecessary with worsted weight yarn.
- A stitch marker is essential (not optional in practice) once the spiral rounds begin, since there is no natural round marker in continuous crochet.
- Keep stitches snug and consistent through the increase rounds of the Main Pattern; loose tension here is the most common cause of a lumpy or asymmetric sphere.
- Stuff gradually as the body nears closure rather than all at once at the end, working small amounts of fiberfill in with the fingers or a blunt tool to avoid overstuffing one side.
- Secure the safety eyes tightly before closing the two halves; once the fiberfill is in and the seam is closed, the eye placement can no longer be adjusted.
The essentials
- Rounds
- 14
- Parts
- 2
- Level
- Intermediate
- Time
- 4-6 hours
- Hook
- 2.5 mm
- Yarn
- Worsted
Stitches you will use
- Working in a continuous spiral (magic ring start) Used from Round 1 of the Main Pattern; use a stitch marker to track the round start so increases stay aligned.
- Shaping with increases Rounds 2-5 of the Main Pattern build the sphere with evenly spaced increases; miscounted stitches here will throw off the roundness.
- Attaching a flat panel to a stuffed sphere Part 2's ring is worked separately and sewn to the body afterwards; keep tension even so the ring sits flat against the curve rather than puckering.
Troubleshooting
The sphere looks flat-sided or dented on one edge
This usually comes from uneven stuffing distribution; remove the tail, redistribute the fiberfill evenly with a blunt tool, and re-close.
The ring piece from Part 2 won't lie flush against the body
This happens when the ring is joined with mismatched tension or at the wrong point on the sphere; unpick a few sewing stitches and reposition before resuming, keeping stitches snug and evenly spaced.
Stitch counts drift partway through the increase rounds
This is almost always a missed increase or a lost round marker; count stitches against the number given at the end of each round (for example, 30 after Round 5) and correct before continuing.
Substituting yarn
- Acrylic worsted weight
- Matches the pattern's original gauge closely with a 2.5mm hook; holds shape well for a keychain that gets handled often.
- Cotton worsted weight
- Produces a firmer, slightly stiffer fabric with crisper stitch definition; may need a touch more stuffing to fill the same 2.5mm-hook gauge.
- Wool-blend worsted weight
- Gives softer drape and a fuzzier finish that can blur the round shaping; consider a smaller hook to keep the fabric dense enough to hide stuffing.
Washing and care
- Spot clean with a damp cloth where possible; worsted weight acrylic or wool-blend yarn can be hand washed in cool water if needed, but avoid machine washing pieces that include safety eyes and hardware.
- Air dry flat away from direct heat, and gently reshape the sphere by hand while still damp so the rounds settle evenly before storing on a hook or in a soft pouch.
FAQs
Questions
What size hook does this pattern use?
A 2.5mm crochet hook is used throughout both the Main Pattern and Part 2. This size keeps the fabric dense enough to contain the fiberfill stuffing.
How many pieces make up the finished keychain?
There are two pattern parts: the Main Pattern, a 13-round sphere made of two halves, and Part 2, a 4-round ring that is worked separately and joined to the body, followed by the keychain hardware.
Can the safety eyes be swapped for something else?
The pattern specifies 6mm safety eyes, which give the planet its amigurumi face; embroidery thread on hand can be used instead for a stitched alternative if preferred.
Is a stitch marker necessary for this project?
It is listed as optional in the materials, but in practice it is very useful. Continuous spiral rounds have no natural marker, so tracking the start of each round prevents miscounted increases.
What colour combinations work well for a set of planets?
The source notes five options: an Earth-inspired blue body with green accents and a cream ring, a Saturn-inspired golden yellow sphere with a soft beige ring, a Neptune-inspired deep blue body paired with a light blue ring, a Mars-inspired warm orange-red body with tan details, and a Fantasy Galaxy version in pastel purple, pink and cream. Mixing worsted weight yarn colours across several keychains builds a small crochet solar system.
These answers came from whoever first published the pattern, kept word for word.