 EVERY CROCHET
 Baby & Children 45 rounds No account, no download
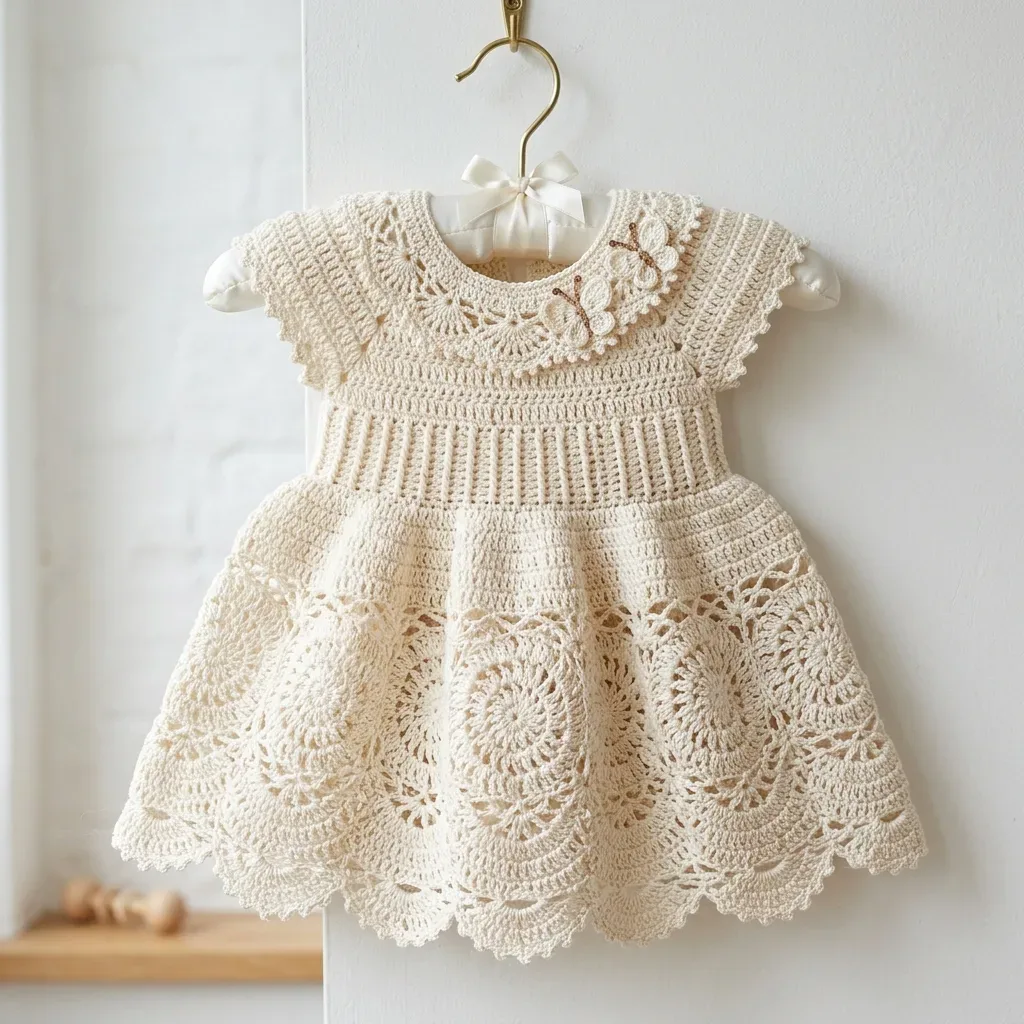
Cream lace baby dress with a raglan yoke and medallions
A cream lace baby dress in single crochet (UK: double crochet), with a raglan yoke, medallions and ribbed waistband.
- Skill
- Advanced
- Time
- 20-30 hours
- Yarn weight
- DK
- Hook
- 3.25 mm

Advanced
What the original write-up called it. Nothing here is graded again.

DK
What the sample was worked in. Any weight works; the size moves with it.

20-30 hours
What the original page reckoned. Your own pace is the one that matters.
About this pattern
This advanced pattern produces a cream lace baby dress with a top-down raglan yoke, cap sleeves, a ribbed waistband, and a medallion skirt joined as the rounds are worked. It suits makers comfortable with lace shawls or doilies, since the stitches are simple but the sequence of sections and stitch-count transitions adds up. The 3 to 6 month size takes roughly 20 to 30 hours; larger sizes take longer.
This cream baby dress belongs to the motif-lace family of crochet, built largely in single crochet (UK: double crochet) and finished with a picot edging. Circular medallion motifs patched across the skirt give the piece its heirloom character, while the main fabric stays plain enough to show off the lace sections. The result reads as delicate but behaves like a sturdy baby garment, provided the yarn chosen has the stitch definition to hold the pattern's curves and picots crisply.
Construction runs top-down and seamless, starting at the neckline and shaping a raglan yoke before dividing for cap sleeves and continuing the bodice in rows. A ribbed waistband worked back and forth in back-loop-only rows cinches the fit without elastic, then stitch counts increase again for the first skirt tier, where medallions are joined as the rounds progress rather than sewn on afterwards. A button-and-loop back opening closes the dress once blocking and seaming are complete.
Materials
Yarn
- DK weight or light DK (CYCA #3), approximately 450 (550, 650, 750) yards / 410 (500, 595, 685) meters total. A mercerized cotton or cotton-blend yarn produces the crispest stitch definition and best drape for the lace sections.
Hooks
- US Size D/3 (3.25 mm) for main fabric
- US Size C/2 (2.75 mm) for the ribbed waistband section
Notions
- Yarn needle for weaving ends
- Stitch markers (at least 6)
- 3 small buttons approximately 3/8 inch / 10 mm diameter, in ivory or cream
- Sewing needle and matching thread for buttons
- Blocking mats and rustproof pins
- Spray bottle with water or basin for wet blocking
- 6 inches / 15 cm of narrow satin ribbon (optional, for a hanger bow)
The list is the pattern's own wording.
Instructions
Every round is printed as the pattern wrote it, brackets and all. Open the key beside a round to see only the short forms that round uses.
Section 1: Neckline Foundation
The neckline is worked as a foundation chain with a back opening maintained throughout.
- Row 1
Ch 68 (62, 72, 80). Do not join. This creates the open-back neckline edge. (67 (61, 71, 79) working sts)
Key1
- ch
- chain
- Row 2
RS, collar setup Ch 1, turn. Sc in each ch across. (67 (61, 71, 79) sc)
Key3
- ch
- chain
- RS
- right side
- sc
- single crochet (insert hook, pull up loop, yarn over, pull through both loops)
- Row 3
WS, collar picot edge Ch 1, turn. [Sc in next st, picot] across, sc in last st. (67 (61, 71, 79) sts)
Key4
- Picot
- ch 3, sl st in first ch made; creates a small decorative loop at the edge of the work
- ch
- chain
- sc
- single crochet (insert hook, pull up loop, yarn over, pull through both loops)
- WS
- wrong side
- Row 4
Ch 1, turn. Sc in each st across. (67 (61, 71, 79) sc)
Key2
- ch
- chain
- sc
- single crochet (insert hook, pull up loop, yarn over, pull through both loops)
- Row 5
Collar lace fan row Ch 3 (counts as dc), turn. Sk 2, [shell in next st, sk 2, sc in next st, sk 2] across to last 4 sts, shell in next st, sk 2, dc in last st. (9 (8, 10, 11) shells + 2 end dc)
Key5
- Shell
- work 5 dc in the same stitch or space; creates a fan-shaped cluster that appears throughout the collar and skirt
- ch
- chain
- dc
- double crochet (yarn over, insert hook, pull up loop, yarn over, pull through 2 loops, yarn over, pull through remaining 2 loops)
- sc
- single crochet (insert hook, pull up loop, yarn over, pull through both loops)
- sk
- skip
- Row 6
Ch 1, turn. Sc in first dc, [sc in each of 5 dc of shell, sc in sc between shells] across, sc in top of t-ch. (67 (61, 71, 79) sc)Checkpoint: The neckline panel should measure approximately 1.5 inches / 4 cm from cast-on edge to end of Row 6.
Key5
- Shell
- work 5 dc in the same stitch or space; creates a fan-shaped cluster that appears throughout the collar and skirt
- t-ch
- turning chain
- ch
- chain
- dc
- double crochet (yarn over, insert hook, pull up loop, yarn over, pull through 2 loops, yarn over, pull through remaining 2 loops)
- sc
- single crochet (insert hook, pull up loop, yarn over, pull through both loops)
Section 2: Yoke Construction
The yoke is worked flat in rows to maintain the back center opening, increasing at 4 raglan points on every RS row. Place markers at the 4 raglan points before beginning.
Raglan Stitch Count Setup for 3 to 6 Months: Back right: 8 sts Right sleeve: 15 sts Front: 19 sts Left sleeve: 15 sts Back left: 8 sts
Total: 67 sts
RS rows (increase rows): Work sc to 1 st before each raglan marker, [inc, sm, inc] at each of the 4 markers. This adds 8 sts per RS row.
WS rows: Sc across without increases.
- Row 7
(RS, increase row 1): Ch 1, turn. Sc across with raglan increases as described. (75 (69, 79, 87) sc)
Key3
- ch
- chain
- RS
- right side
- sc
- single crochet (insert hook, pull up loop, yarn over, pull through both loops)
- Row 8
(WS): Ch 1, turn. Sc across. (75 (69, 79, 87) sc)
Key3
- ch
- chain
- sc
- single crochet (insert hook, pull up loop, yarn over, pull through both loops)
- WS
- wrong side
- Row 9
(RS, increase row 2): Ch 1, turn. Sc across with raglan increases. (83 (77, 87, 95) sc)
Key3
- ch
- chain
- RS
- right side
- sc
- single crochet (insert hook, pull up loop, yarn over, pull through both loops)
- Row 10
(WS): Ch 1, turn. Sc across. (83 (77, 87, 95) sc)
Key3
- ch
- chain
- sc
- single crochet (insert hook, pull up loop, yarn over, pull through both loops)
- WS
- wrong side
- Row 11
(RS, increase row 3): Ch 1, turn. Sc across with raglan increases. (91 (85, 95, 103) sc)
Key3
- ch
- chain
- RS
- right side
- sc
- single crochet (insert hook, pull up loop, yarn over, pull through both loops)
- Row 12
(WS): Ch 1, turn. Sc across. (91 (85, 95, 103) sc)
Key3
- ch
- chain
- sc
- single crochet (insert hook, pull up loop, yarn over, pull through both loops)
- WS
- wrong side
- Row 13
(RS, increase row 4): Ch 1, turn. Sc across with raglan increases. (99 (93, 103, 111) sc)
Key3
- ch
- chain
- RS
- right side
- sc
- single crochet (insert hook, pull up loop, yarn over, pull through both loops)
- Row 14
(WS): Ch 1, turn. Sc across. (99 (93, 103, 111) sc)
Key3
- ch
- chain
- sc
- single crochet (insert hook, pull up loop, yarn over, pull through both loops)
- WS
- wrong side
- Row 15
(RS, increase row 5): Ch 1, turn. Sc across with raglan increases. (107 (101, 111, 119) sc)
Key3
- ch
- chain
- RS
- right side
- sc
- single crochet (insert hook, pull up loop, yarn over, pull through both loops)
- Row 16
(WS): Ch 1, turn. Sc across. (107 (101, 111, 119) sc)
Key3
- ch
- chain
- sc
- single crochet (insert hook, pull up loop, yarn over, pull through both loops)
- WS
- wrong side
- Row 17
(RS, increase row 6): Ch 1, turn. Sc across with raglan increases. (115 (109, 119, 127) sc)
Key3
- ch
- chain
- RS
- right side
- sc
- single crochet (insert hook, pull up loop, yarn over, pull through both loops)
- Row 18
(WS): Ch 1, turn. Sc across. (115 (109, 119, 127) sc)
Key3
- ch
- chain
- sc
- single crochet (insert hook, pull up loop, yarn over, pull through both loops)
- WS
- wrong side
- Row 19
(RS, increase row 7): Ch 1, turn. Sc across with raglan increases. (123 (117, 127, 135) sc)
Key3
- ch
- chain
- RS
- right side
- sc
- single crochet (insert hook, pull up loop, yarn over, pull through both loops)
- Row 20
(WS): Ch 1, turn. Sc across. (123 (117, 127, 135) sc) For 6 to 12 Months and 12 to 18 Months: Work 2 additional RS increase rows (Rows 21 and 23, with even WS rows between) before proceeding.
Key4
- ch
- chain
- RS
- right side
- sc
- single crochet (insert hook, pull up loop, yarn over, pull through both loops)
- WS
- wrong side
Checkpoint: The yoke should measure approximately 3 inches / 7.5 cm from the neckline for the 3 to 6 Month size.
Section 4: Cap Sleeves
Pick up the held 29 sleeve sts and join yarn at underarm.
- Round 1
Join yarn to center of underarm ch, sc 2 across underarm ch, sc across 29 sleeve sts, sc 2 across other side of underarm ch. (33 sc)
Key2
- ch
- chain
- sc
- single crochet (insert hook, pull up loop, yarn over, pull through both loops)
- Round 2
[Sc2tog, sc across to 2 sts before underarm join, sc2tog] around sleeve, working each decrease at each underarm edge. (29 sc)
Key2
- sc2tog
- single crochet 2 together, a decrease (insert hook in next stitch, pull up loop, insert hook in following stitch, pull up loop, yarn over, pull through all 3 loops)
- sc
- single crochet (insert hook, pull up loop, yarn over, pull through both loops)
- Round 3
Sc around. (29 sc)
Key1
- sc
- single crochet (insert hook, pull up loop, yarn over, pull through both loops)
- Round 4
Cap sleeve edging Ch 1, [sc in next 2 sts, picot, sc in next 2 sts] around, join. Fasten off, leaving a 6 inch tail for weaving. (29 sts with picot edging)Repeat for second sleeve.
Key3
- Picot
- ch 3, sl st in first ch made; creates a small decorative loop at the edge of the work
- ch
- chain
- sc
- single crochet (insert hook, pull up loop, yarn over, pull through both loops)
Section 5: Bodice Continuation
Rejoin yarn to body sts at back right edge. Work back and forth in rows, sc across all 71 body sts, maintaining the back center opening.
- Rows 1–5
Rows 1 through 5: Ch 1, turn. Sc across. (71 sc)
Key2
- ch
- chain
- sc
- single crochet (insert hook, pull up loop, yarn over, pull through both loops)
- Row 6
RS, increase for skirt transition Ch 1, turn. [Sc in 6, inc] across, sc in last 1. (81 sc)
Key4
- inc
- increase (work 2 sc in the same stitch)
- ch
- chain
- RS
- right side
- sc
- single crochet (insert hook, pull up loop, yarn over, pull through both loops)
- Row 7
(WS): Ch 1, turn. Sc across. (81 sc) Checkpoint: The piece from neckline to current row should measure approximately 5.5 inches / 14 cm for the 3 to 6 Month size.
Key3
- ch
- chain
- sc
- single crochet (insert hook, pull up loop, yarn over, pull through both loops)
- WS
- wrong side
Section 6: Waistband Ribbing
Switch to C/2 (2.75 mm) hook.
- Row 1
RS, ribbing row Ch 1, turn. Working in BLO, sc across. (81 sc) Repeat Row 1 for a total of 8 ribbing rows, always working in BLO of the previous row.After 8 ribbing rows, switch back to D/3 (3.25 mm) hook.Increase Row (RS): Ch 1, turn. Working through both loops, [sc in 3, inc] across, sc in last st. (101 sc)
Key5
- BLO
- back loop only (inserting your hook under only the back loop of the stitch, leaving the front loop unworked)
- inc
- increase (work 2 sc in the same stitch)
- ch
- chain
- RS
- right side
- sc
- single crochet (insert hook, pull up loop, yarn over, pull through both loops)
Checkpoint: The waistband should measure approximately 0.75 inches / 2 cm in height.
Section 7: Skirt Tier 1
The first skirt tier is worked in joined rounds. Join the back opening with a sl st to the first stitch, creating a ring. Place a marker at the join point (center back).
- Round 1
Ch 3 (counts as dc), dc in next 99 sts, 2 dc in last st, join. (102 dc)
Key2
- ch
- chain
- dc
- double crochet (yarn over, insert hook, pull up loop, yarn over, pull through 2 loops, yarn over, pull through remaining 2 loops)
- Round 2
Ch 1, sc in same st, ch 2, sk 2, [sc in next st, ch 2, sk 2] around, join to first sc. (34 sc, 34 ch-2 sps)
Key3
- ch
- chain
- sc
- single crochet (insert hook, pull up loop, yarn over, pull through both loops)
- sk
- skip
- Round 3
Sl st to first ch-2 sp, ch 4 (counts as dc + ch 1), dc in same sp, [V-stitch in next ch-2 sp] around, join to 3rd ch of beg ch-4. (34 V-sts)
Key6
- V-Stitch
- work [dc, ch 2, dc] in the same stitch or space
- sl st
- slip stitch
- beg
- beginning
- ch
- chain
- dc
- double crochet (yarn over, insert hook, pull up loop, yarn over, pull through 2 loops, yarn over, pull through remaining 2 loops)
- sp
- space
- Round 4
Sl st to ch-2 sp of first V-st, ch 1, sc in same sp, ch 2, [sc in ch-2 sp of next V-st, ch 2] around, join. (34 sc, 34 ch-2 sps)
Key4
- sl st
- slip stitch
- ch
- chain
- sc
- single crochet (insert hook, pull up loop, yarn over, pull through both loops)
- sp
- space
- (34)Round 5
Sl st to ch-2 sp, ch 3 (counts as dc), 4 dc in same sp (half shell), ch 1, [shell in next ch-2 sp, ch 1] around, join to top of ch-3. (34 shells)
Key5
- sl st
- slip stitch
- Shell
- work 5 dc in the same stitch or space; creates a fan-shaped cluster that appears throughout the collar and skirt
- ch
- chain
- dc
- double crochet (yarn over, insert hook, pull up loop, yarn over, pull through 2 loops, yarn over, pull through remaining 2 loops)
- sp
- space
- Round 6
Ch 1, sc in top of join, [sc in each of 5 dc of shell, sc in ch-1 sp] around, ending sc in last ch-1 sp, join. (204 sc)
Key5
- Shell
- work 5 dc in the same stitch or space; creates a fan-shaped cluster that appears throughout the collar and skirt
- ch
- chain
- dc
- double crochet (yarn over, insert hook, pull up loop, yarn over, pull through 2 loops, yarn over, pull through remaining 2 loops)
- sc
- single crochet (insert hook, pull up loop, yarn over, pull through both loops)
- sp
- space
- Round 7
Ch 4 (counts as dc + ch 1), sk 1, [dc in next 3, ch 1, sk 1] 50 times, dc in next 2, join to 3rd ch of beg ch-4. (51 ch-1 sps, 153 dc)
Key4
- beg
- beginning
- ch
- chain
- dc
- double crochet (yarn over, insert hook, pull up loop, yarn over, pull through 2 loops, yarn over, pull through remaining 2 loops)
- sk
- skip
- Round 8
Ch 1, sc in each dc and each ch-1 sp around, join. (204 sc)
Key4
- ch
- chain
- dc
- double crochet (yarn over, insert hook, pull up loop, yarn over, pull through 2 loops, yarn over, pull through remaining 2 loops)
- sc
- single crochet (insert hook, pull up loop, yarn over, pull through both loops)
- sp
- space
- Round 9
Ch 1, [sc in 5, inc] around. (238 sc)
Key3
- inc
- increase (work 2 sc in the same stitch)
- ch
- chain
- sc
- single crochet (insert hook, pull up loop, yarn over, pull through both loops)
- Round 10
Ch 1, sc in each sc around, join. (238 sc)
Key2
- ch
- chain
- sc
- single crochet (insert hook, pull up loop, yarn over, pull through both loops)
Medallion Motif
- Round 1
MR, ch 3 (counts as dc), 11 dc in ring, join with sl st to top of ch-3. (12 dc)
Key4
- sl st
- slip stitch
- ch
- chain
- dc
- double crochet (yarn over, insert hook, pull up loop, yarn over, pull through 2 loops, yarn over, pull through remaining 2 loops)
- MR
- magic ring (an adjustable starting ring for working in the round)
- Round 2
Ch 3 (counts as dc), dc in same st, 2 dc in each st around, join. (24 dc)
Key2
- ch
- chain
- dc
- double crochet (yarn over, insert hook, pull up loop, yarn over, pull through 2 loops, yarn over, pull through remaining 2 loops)
- Round 3
Ch 1, sc in same st, ch 3, sk 1, [sc in next st, ch 3, sk 1] around, join to first sc. (12 sc, 12 ch-3 sps)
Key3
- ch
- chain
- sc
- single crochet (insert hook, pull up loop, yarn over, pull through both loops)
- sk
- skip
- Round 4
Sl st to center of first ch-3 sp, ch 3 (counts as dc), 4 dc in same sp (first shell made), ch 2, [5 dc in next ch-3 sp, ch 2] around, join to top of ch-3. (12 shells, 12 ch-2 sps)
Key5
- sl st
- slip stitch
- Shell
- work 5 dc in the same stitch or space; creates a fan-shaped cluster that appears throughout the collar and skirt
- ch
- chain
- dc
- double crochet (yarn over, insert hook, pull up loop, yarn over, pull through 2 loops, yarn over, pull through remaining 2 loops)
- sp
- space
- Round 5
Sl st across to ch-2 sp, ch 1, sc in same ch-2 sp, ch 5, [sc in next ch-2 sp, ch 5] around, join. (12 sc, 12 ch-5 lps)
Key4
- sl st
- slip stitch
- ch
- chain
- sc
- single crochet (insert hook, pull up loop, yarn over, pull through both loops)
- sp
- space
- Round 6
Sl st to center of ch-5 lp, ch 3 (counts as dc), 6 dc in same lp, ch 3, [7 dc in next ch-5 lp, ch 3] around, join. (12 groups of 7 dc, 12 ch-3 sps)
Key3
- sl st
- slip stitch
- ch
- chain
- dc
- double crochet (yarn over, insert hook, pull up loop, yarn over, pull through 2 loops, yarn over, pull through remaining 2 loops)
- Round 7
Joining round Sl st to ch-3 sp, ch 1, [sc, ch 2, sc, ch 2, sc] in first ch-3 sp for corner, ch 2, sc in 4th dc of next 7-dc group, ch 2. Continue around, joining to adjacent motifs by working [sc, ch 1, sl st to corresponding ch-2 sp of neighboring motif, ch 1, sc] in place of the plain ch-2 picot corner.
Key6
- sl st
- slip stitch
- Picot
- ch 3, sl st in first ch made; creates a small decorative loop at the edge of the work
- ch
- chain
- dc
- double crochet (yarn over, insert hook, pull up loop, yarn over, pull through 2 loops, yarn over, pull through remaining 2 loops)
- sc
- single crochet (insert hook, pull up loop, yarn over, pull through both loops)
- sp
- space
Making up
- Step 1Weave in all ends securely. Block the finished dress by soaking it in lukewarm water, gently pressing out excess moisture, and pinning it to blocking mats. Pay special attention to opening up the lace medallions and the scalloped edging. Allow to dry completely before unpinning.
- Step 2Sew the back opening closed from the waistband down to the hem. Attach button loops along one back edge above the waistband and sew buttons to the opposite edge.
- Step 3If desired, thread a narrow satin ribbon through the hanger and tie in a bow for display.
Notes from the pattern
- Two hooks are needed: D/3 (3.25 mm) for the main fabric and cap sleeves, and C/2 (2.75 mm) for the eight waistband ribbing rows, before returning to D/3 for the increase row.
- Place at least 6 stitch markers before starting the yoke, to track raglan increase points and the underarm stitches held aside for the cap sleeves.
- Check the pattern's own measurement checkpoints as a tension guide: the bodice should measure about 5.5 inches/14 cm from neckline before the waistband, and the finished ribbing about 0.75 inch/2 cm tall.
- Choose a mercerised cotton or cotton-blend yarn; the stitch definition in this weight is what keeps the medallions and picot edging crisp rather than blurred once blocked.
- Gauge: with the D/3 (3.25 mm) hook and the main stitch pattern, 22 single crochet (sc) = 4 inches / 10 cm and 24 rows = 4 inches / 10 cm. Lace gauge: one completed large medallion motif measures approximately 3.25 inches / 8.25 cm in diameter before joining. Gauge is critical for this garment, since a difference of even one stitch per inch will significantly affect sizing; swatch both the solid sc fabric and a single medallion motif before beginning.
- Finished measurements: Newborn (0 to 3 months) chest 14 inches / 35.5 cm, length 10 inches / 25.5 cm; 3 to 6 Months chest 16 inches / 40.5 cm, length 11.5 inches / 29 cm; 6 to 12 Months chest 17.5 inches / 44.5 cm, length 13 inches / 33 cm; 12 to 18 Months chest 19 inches / 48 cm, length 14.5 inches / 37 cm. Instructions are written for the 3 to 6 month size; other sizes appear in parentheses in the order Newborn (3 to 6 Months, 6 to 12 Months, 12 to 18 Months).
- The pattern uses a ch-3 turning chain that counts as the first dc throughout, unless otherwise specified.
- Keep yarn tension slightly loose in the lace sections so the motifs can block open; do not pull joins tight.
The essentials
- Rounds
- 45
- Parts
- 7
- Level
- Advanced
- Time
- 20-30 hours
- Hook
- 3.25 mm
- Yarn
- DK
Stitches you will use
- Top-down raglan yoke shaping Worked across Section 2's 14 rounds and into the cap sleeve division; watch stitch counts carefully at each raglan line as increases accumulate.
- Join-as-you-go medallion motifs Used across Section 7's skirt tier; keep join points aligned round to round so the circular motifs sit flat rather than puckering.
- Back-loop-only ribbing Section 6's eight ribbing rows rely on consistent BLO work with the smaller C/2 (2.75 mm) hook to produce the stretch that cinches the waist.
Troubleshooting
The waistband feels loose rather than snug once worn.
BLO was likely not kept consistent across all eight ribbing rows, or the ribbing was stretched while turning; rework in back loops only and keep tension even row to row.
Stitch counts don't add up after the skirt increase row.
The [sc in 3, inc] repeat across 81 stitches is easy to miscount; mark every third stitch before the row so each increase lands correctly to reach 101 stitches.
The cap sleeve edging looks lumpy
Picots are spaced unevenly; keep exactly 2 sc between each picot all the way around the 29 sleeve stitches as given.
Substituting yarn
- 100% mercerised cotton, DK weight
- Closest match to the yarns specified; keeps sharp stitch definition for the medallions and picots, and the D/3 (3.25 mm) and C/2 (2.75 mm) hooks work as given.
- Cotton-bamboo blend, DK weight
- Softer drape with a sheen similar to the cotton-viscose option, but looser stitch definition; dropping to a C/2 (2.75 mm) hook throughout helps the lace stay crisp.
- 100% linen or cotton-linen blend, DK weight
- Firmer and less stretchy, which suits the medallions but fights the ribbed waistband; sizing up half a hook size on the main fabric keeps the fabric from feeling stiff.
Washing and care
- Hand wash the finished dress in cool water, since it is worked in cotton or a cotton-viscose blend; hot water or wringing can flatten the dimension of the medallions permanently.
- Dry flat on a towel away from direct heat, reshaping the lace medallions and scalloped cap sleeve edging by hand while still damp, then store folded flat with acid-free tissue rather than hung on a hanger.
FAQs
Questions
Can one yarn be used throughout instead of two?
Yes, provided the total yardage matches the 450 to 750 yard range given in the materials list. Using a single DK cotton yarn is simpler than combining two and will not change the construction.
How many buttons are needed and what size?
Three buttons around 3/8 inch/10 mm in diameter are sewn opposite hand-worked loops along the back opening above the waistband.
Is the ribbon mentioned in finishing essential?
No, threading a narrow satin ribbon through is listed as an optional final step. The dress fits and closes correctly without it.
Why does blocking happen before the seaming steps?
Blocking opens up the lace medallions and the scalloped cap sleeve edging, both of which stay curled off the hook. The assembly steps place wet blocking first so the back seam and buttons go on a flat, finished fabric.
These answers came from whoever first published the pattern, kept word for word.