 EVERY CROCHET
 Amigurumi 14 rounds No account, no download
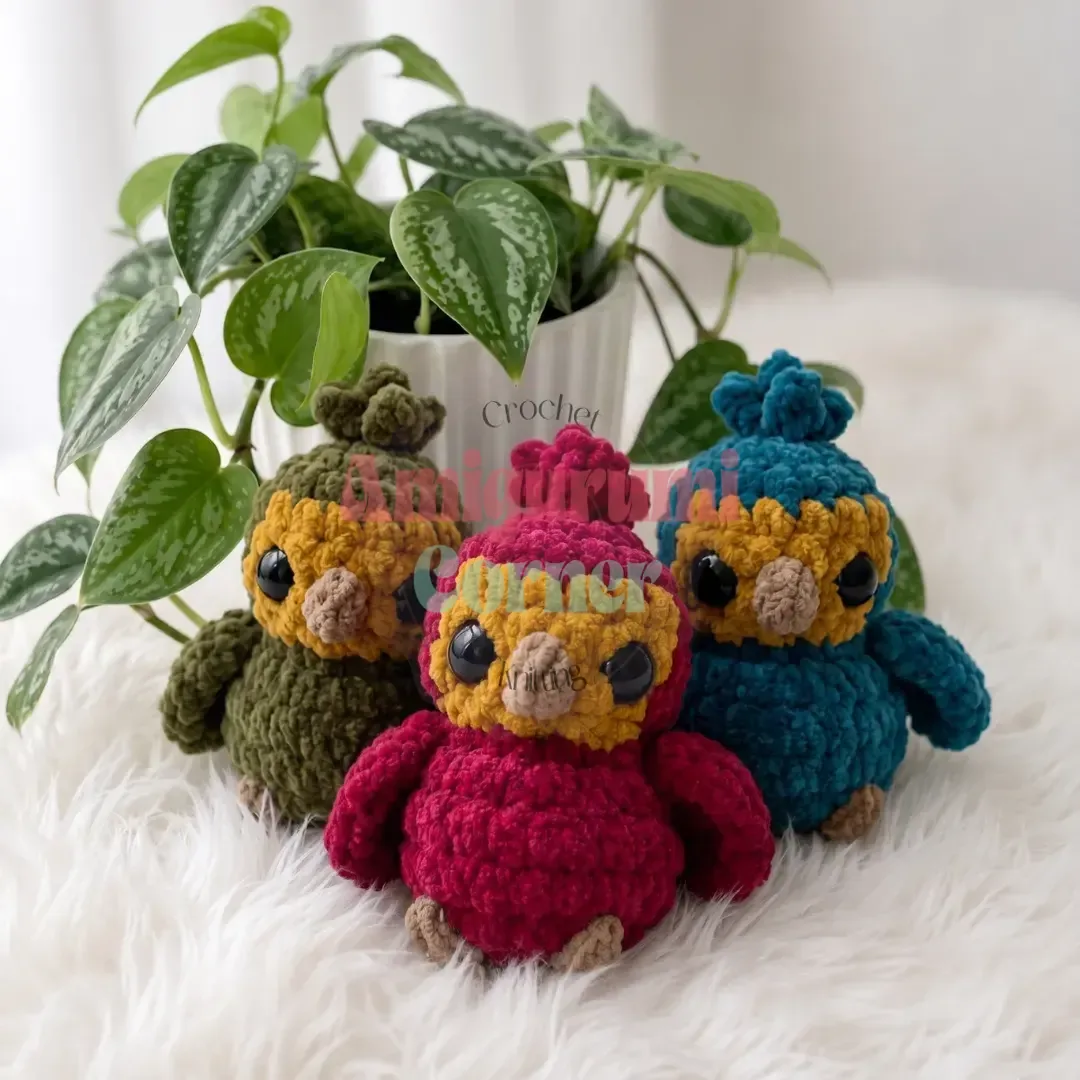
Velvet phoenix amigurumi crochet pattern with crest and wings
Phoenix amigurumi in single crochet (UK: double crochet); written in US terms, UK equivalents given.
- Skill
- Intermediate
- Time
- 4-6 hours
- Yarn weight
- Bulky
- Hook
- 5 mm

Intermediate
What the original write-up called it. Nothing here is graded again.

Bulky
What the sample was worked in. Any weight works; the size moves with it.

4-6 hours
What the original page reckoned. Your own pace is the one that matters.
About this pattern
This is a palm-sized amigurumi phoenix worked in bulky velvet-style yarn on a 5 mm hook, combining a continuously spiralled head and body, two flat crocheted wings, and a spike-stitch crest. The body is thirteen rounds long, colour-blocked in burgundy and mustard, with safety eyes and an embroidered beige beak added during assembly. A stitch marker and basic fiberfill stuffing are essential.
This amigurumi phoenix belongs to the single crochet (UK: double crochet) family that underpins almost all toy crochet, using tight, dense stitches worked in a continuous spiral rather than joined rounds. The body is built up through a sequence of increase rounds, moving from a magic ring of 6 stitches to 12 and then 18, before colour blocking introduces the mustard band. Worked in a bulky velvet-style yarn, the fabric stays firm enough to hold its shape around the fiberfill stuffing without a wire armature or separate joints.
Head and body form a single continuous piece worked in the round from the crown down to the tail, with a stitch marker tracking the start of each spiral round since there is no slip stitch join. The wings are worked flat and separately from a five-chain foundation, building height across one row from single crochet through half double, double and treble stitches before fastening off. A short crest of three chain spikes is anchored directly into the first round of the head once the body is complete, then the beak is embroidered on afterwards rather than crocheted.
Materials
Yarn
- Alize Velluto (or any bulky-weight velvet-style yarn) in three colors — Burgundy (B), Mustard (M), and Beige (for the beak)
Hook
- US H-8 / 5 mm
Safety eyes
- 14 mm — 1 pair
- Fiberfill stuffing
- Stitch markers — at least 1
- Tapestry needle
- Scissors
The list is the pattern's own wording.
Instructions
Every round is printed as the pattern wrote it, brackets and all. Open the key beside a round to see only the short forms that round uses.
Head and Body(worked as one continuous piece)
Begin with B (Burgundy).
- Round 1
6 sc in MR. (6)
Key2
- MR
- Magic Ring
- sc
- Single Crochet
- Round 2
Inc in each st around. (12)
Key1
- inc
- Increase (2 sc in the same stitch)
- Round 3
(1 sc, inc) repeat around. (18)
Key2
- inc
- Increase (2 sc in the same stitch)
- sc
- Single Crochet
For Rounds 4–6, each round is divided into three color sections: 6 sts in B, 6 sts in M, 6 sts in B. You can carry the unused yarn loosely on the wrong side or join and cut each color as preferred.
- Round 4
[B] 6 sc, [M] 6 sc, [B] 6 sc. (18)
Key3
- sc
- Single Crochet
- B
- Burgundy yarn color
- M
- Mustard yarn color
- Round 5
[B] 6 sc, [M] 6 sc, [B] 6 sc. (18)
Key3
- sc
- Single Crochet
- B
- Burgundy yarn color
- M
- Mustard yarn color
- Round 6
[B] 6 sc, [M] 6 sc, [B] 6 sc. (18)Insert 14 mm safety eyes between Rounds 5 and 6, within the mustard section, spaced 2–3 stitches apart. Secure the backings firmly before working Round 7. Do not skip this step — it is impossible to add the eyes after Round 7 is worked.
Key3
- sc
- Single Crochet
- B
- Burgundy yarn color
- M
- Mustard yarn color
- Round 7
[B] 3 dec, [M] 3 dec, [B] 3 dec. (9)Stuff the head firmly before continuing.Continue in B only for all remaining rounds.
Key3
- dec
- Decrease (invisible decrease)
- B
- Burgundy yarn color
- M
- Mustard yarn color
- Round 8
(1 sc, inc) repeat around. (18)
Key2
- inc
- Increase (2 sc in the same stitch)
- sc
- Single Crochet
- Round 9
(2 sc, inc) repeat around. (24)
Key2
- inc
- Increase (2 sc in the same stitch)
- sc
- Single Crochet
- Round 10
Sc in each st around. (24)
Key1
- sc
- Single Crochet
- Round 11
(2 sc, dec) repeat around. (18)
Key2
- dec
- Decrease (invisible decrease)
- sc
- Single Crochet
- Round 12
(1 sc, dec) repeat around. (12)Stuff the body before closing, distributing fiberfill evenly from the center outward. The body should feel firm but not stretched.
Key2
- dec
- Decrease (invisible decrease)
- sc
- Single Crochet
- Round 13
Dec around. (6)To close the opening: thread your tapestry needle and weave through the front loops of all 6 remaining stitches from the right side. Pull tight to close. Make 2–3 securing stitches and fasten off inside the piece.
Key1
- dec
- Decrease (invisible decrease)
Wings(Make 2, worked in B)
Foundation: Ch 5. Starting in the 2nd ch from the hook, work along the chain as follows.
- Row 1
Sc in next ch, hdc in next ch, dc in next ch, (tr, dc, sl st) all into the last ch. (7 sts)Fasten off, leaving a long yarn tail for sewing. Make the second wing identically.
Key6
- sl st
- Slip Stitch
- hdc
- Half Double Crochet
- ch
- Chain
- dc
- Double Crochet
- sc
- Single Crochet
- tr
- Treble Crochet
Crest(worked in B, attached to Rnd 1 of the head)
Attach B yarn to any stitch in Rnd 1 of the head.
Spike 1: Ch 5, sl st into the base sc of the head (insert your hook under the sc stitch).
Spike 2: Ch 4, sl st into the next sc of Rnd 1.
Spike 3: Ch 3, sl st into the next sc of Rnd 1.
Fasten off all ends and weave them securely inside the toy.
Making up
- Step 1Attach the wings: Sew one wing to each side of the body between Rounds 8 and 9, using the long yarn tail and your tapestry needle. Position them symmetrically so the pointed tip of each wing faces downward and slightly back.
- Step 2Embroider the beak: Thread your tapestry needle with Beige yarn. Embroider the beak between the safety eyes, spanning the full width of Round 6 — the mustard band. Work several satin stitches layered over each other to build a small raised mound of color.
- Step 3Embroider the claws: Using B yarn, embroider the claws at Round 12 along the bottom of the body. Space each claw 2 stitches apart and make several straight stitches per claw to give them definition.
- Step 4Finish: Weave all remaining ends securely inside the toy. Give Fawkes a gentle squeeze to even out the stuffing, and he’s ready.
Notes from the pattern
- The US H-8 / 5 mm hook paired with bulky velvet-style yarn produces a dense fabric; check that each stitch closes fully so the fiberfill does not show through.
- least one stitch marker is required to track the start of every round across the continuous spiral head-and-body piece, since rounds are never joined or chained.
- Rounds 4–6 divide into burgundy-mustard-burgundy blocks of 6 stitches each; consistent tension across the colour change keeps the band even rather than rippled.
- Add fiberfill stuffing gradually as the continuous head-and-body piece progresses, firming it as each section closes rather than trying to pack it in at the very end.
- Gauge is not critical for this project. Your finished bird will be approximately palm-sized with the recommended yarn and hook.
- Velvet yarn can be tricky to see into — work in good lighting and count your stitches at the end of every round.
The essentials
- Rounds
- 14
- Parts
- 3
- Level
- Intermediate
- Time
- 4-6 hours
- Hook
- 5 mm
- Yarn
- Bulky
Stitches you will use
- Continuous spiral single crochet (UK: double crochet) Used throughout all 13 rounds of the head and body; keep a stitch marker at the round start since there is no join or turning chain to mark it.
- Colour blocking and yarn carrying Rounds 4–6 split each round into burgundy and mustard sections; carry the resting colour loosely on the wrong side to avoid puckering or tight banding.
- Spike and chain-loop crest The crest is built from three chain spikes of decreasing length slip-stitched into Round 1 of the head; keep tension even so the spikes stand upright rather than flopping.
Troubleshooting
The mustard band puckers or pulls tight around Rounds 4–6.
This usually comes from carrying the unused colour too tightly across the back of the work; loosen the carried strand and check that stitch height stays consistent through the colour blocks.
The wings curl or twist instead of lying flat.
Uneven tension across the sc-hdc-dc-tr progression in the single wing row pulls the fabric off balance; even out stitch tension and press or steam gently after fastening off.
Losing track of where a round starts
This happens because the spiral has no join point to mark it; move the stitch marker up into the first stitch of each new round before starting the next increase or colour section.
Substituting yarn
- Bulky-weight chenille
- Keeps a similarly plush finish and similar finished size on the same hook, though the looser pile can make the beak embroidery less crisp and hides minor tension unevenness.
- Worsted-weight cotton
- Gives crisper stitch definition and a firmer, slightly smaller toy without the velvet sheen; drop to a smaller hook, around 4 mm, to keep the fabric dense enough to contain stuffing.
- Worsted-weight acrylic
- Produces a lighter, more washable toy with less drape than velvet yarn; use a similar hook size but crochet a touch tighter to stop stuffing from peeking through.
Washing and care
- Hand wash gently in cool water and avoid wringing, since polyester velvet-style yarn holds its plush pile best when reshaped by hand and laid flat to dry.
- Store away from direct heat, sunlight and pressure so the pile does not flatten; a light brush of the fibre restores texture after storage or handling.
FAQs
Questions
Can I use a different yarn for this pattern?
Yes — any bulky-weight yarn will work. Velvet or chenille yarn gives the most accurate plush finish, but a smooth bulky acrylic works just as well and may actually be easier to see into. Avoid fuzzy or heavily textured yarn, as it makes counting stitches very difficult.
How do I keep the color sections neat in Rounds 4–6?
The cleanest approach is to cut and rejoin each color at the transition point rather than carrying yarn across. With only three sections of 6 stitches each, you’ll have a few extra ends to weave in, but the face will look sharp and the inside of the head won’t be bunched with carried yarn.
My safety eyes are not sitting straight — what went wrong?
This usually happens when the eyes are inserted after the head is already partially stuffed, or when the backings aren’t pushed all the way down. Always insert and lock the eyes before Round 7 while the piece is still open and flat. Press the backing firmly until it clicks completely into place.
Is this pattern safe for young children?
Because this pattern uses 14 mm safety eyes with snap-in backings, it is not recommended for children under three years old. For a baby-safe version, embroider the eyes in black yarn using satin stitches instead of using plastic safety components.
These answers came from whoever first published the pattern, kept word for word.