 EVERY CROCHET
Baby Garments 25 rounds No account, no download
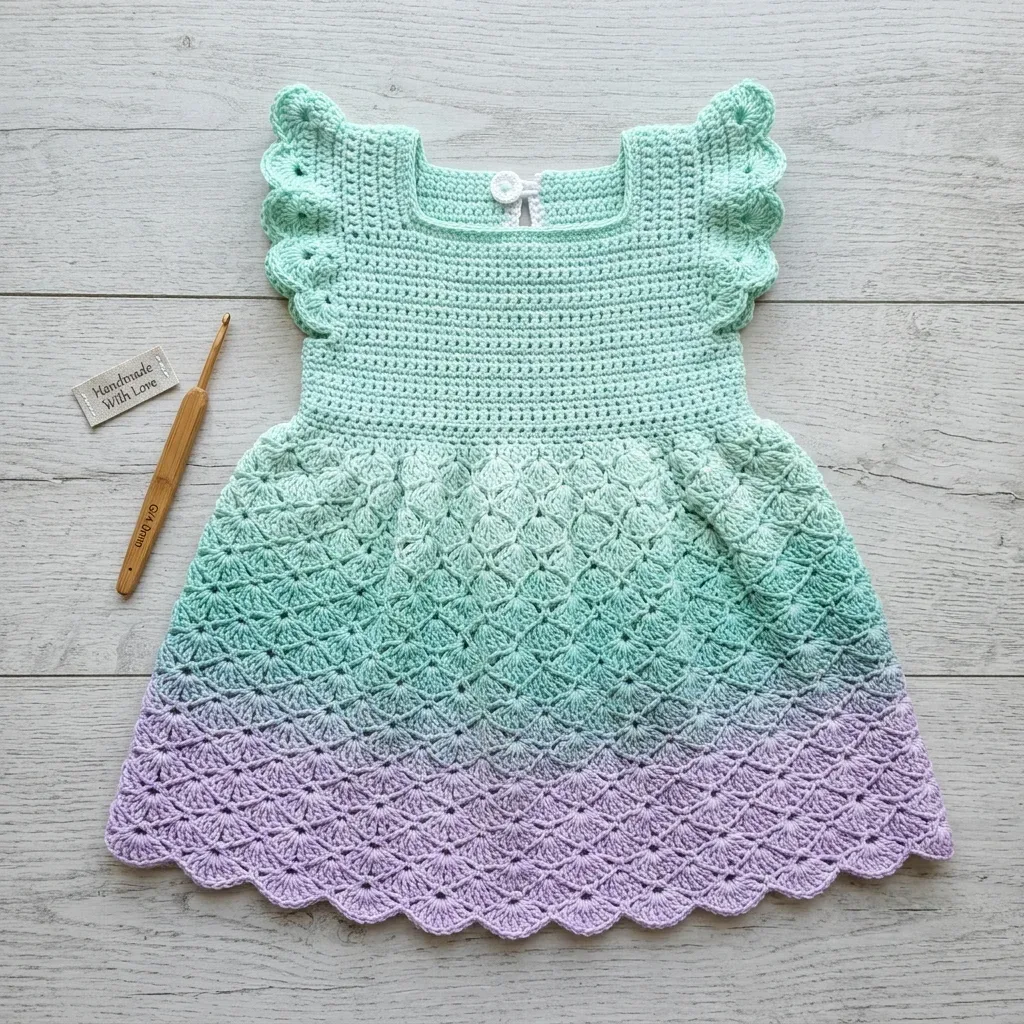
Mint and lavender shell stitch baby dress pattern
A shell stitch (UK: treble crochet) baby dress pattern in mint and lavender, giving both US and UK stitch terms.
- Skill
- Intermediate
- Time
- 8-10 hours
- Yarn weight
- DK (CYCA #3)
- Hook
- 4.0 mm

Intermediate
What the original write-up called it. Nothing here is graded again.
DK (CYCA #3)
What the sample was worked in. Any weight works; the size moves with it.
8-10 hours
What the original page reckoned. Your own pace is the one that matters.
About this pattern
This is a two-colour baby dress for 12 to 18 months, combining a diamond lattice bodice and skirt in mint green with a shell stitch (UK: treble crochet fan) hem in lavender. It uses DK weight cotton or cotton-blend yarn, a 4.0 mm hook, and roughly 350 yards total. Construction runs from three flat bodice panels through rounds of skirt shaping to picked-up flutter sleeves and a back button loop closure.
This baby dress pairs two textured stitch families across its surface: a shell fan built entirely from double crochet (UK: treble crochet), and a diamond lattice formed from alternating V-stitches and single crochet. Each shell groups five double crochet into a single stitch or chain space, anchored to the middle stitch of the previous shell, and the lattice shifts between two row types so that V-stitch and single crochet trade places. Together they give the skirt a layered look created purely by stitch pattern rather than shaping.
The dress builds in four stages. Three bodice panels, one back-right, one back-left and one front, are worked flat in single crochet rows and set aside with markers at the armhole edges. These are joined at the underarms into a single piece, and the skirt is then worked downward in continuous joined rounds, moving from the diamond lattice in Mint Green to the shell hem in Lavender. Flutter sleeves are picked up around the armholes last, and a button loop closes the back neck.
Materials
Yarn
- DK weight yarn, CYCA #3, in cotton or cotton-acrylic blend
- Color A (Mint Green): approximately 220 yards
- Color B (Lavender): approximately 130 yards
Total yardage
- approximately 350 yards
Hook
- US size G-6 / 4.0 mm crochet hook, or size needed to meet gauge
Notions
- Yarn needle for weaving ends
- Stitch markers, at least 6
- One white button, approximately 3/8 inch diameter
- Scissors
- Blocking mat and pins
Yarn suggestions
- Lion Brand 24/7 Cotton in Mint and Lilac works beautifully. Paintbox Yarns Simply DK in Spearmint Green and Dusty Violet is another excellent choice. For a more luxurious finish, try Scheepjes Catona held double in Chrystalline and Lavender.
- Choose a smooth yarn with good stitch definition. Fuzzy or textured yarns will obscure the pretty shell and lattice details. Cotton or cotton-blend yarns block beautifully and feel perfect against baby skin.
The list is the pattern's own wording.
Instructions
Every round is printed as the pattern wrote it, brackets and all. Open the key beside a round to see only the short forms that round uses.
Back Bodice Right Panel
Using Color A, chain 23.
- Round 1
(WS): Sc into the 2nd chain from hook and into each chain across. Turn. (22 sc)through 12: Ch 1, sc across. Turn. (22 sc) Place a stitch marker at the armhole edge, which is the left edge when the right side is facing. Set aside but do not fasten off.
- Round 2
(RS): Ch 1, sc into each stitch across. Turn. (22 sc)
- Round 3
through 12: Repeat Row 2. Turn after each row. (22 sc) After Row 12, the panel measures approximately 2.5 inches tall. Place a stitch marker at the armhole edge, which is the right edge when looking at the right side. Set aside but do not fasten off.
Front Bodice
Using Color A, chain 41.
- Round 1
(WS): Sc into the 2nd chain from hook and into each chain across. Turn. (40 sc)
- Round 2
through 12: Ch 1, sc across. Turn. (40 sc) Place stitch markers at both ends to mark the armhole edges. Set aside.
Skirt Setup Round
Turn the joined piece so the wrong side faces you. The skirt is now worked in joined rounds from this point down.
- Round 1
Setup: With right side facing, join Color A with slip stitch to the first stitch at the center front bottom of the joining row. Ch 1. Sc across all stitches, working 1 sc into each of the 4 underarm bridge chains on each side as well. Join with slip stitch to first sc. (88 sc)
At the waist joining round you should have 88 sc total forming a complete circle. The waist should measure approximately 19 to 20 inches when the back edges are pinned together.
Skirt Diamond Lattice Section in Color A
- (22)Round 1
Lattice Round 1: Ch 4, which counts as dc plus ch 1. Skip next stitch. Work (dc, ch 1, dc) into next stitch. Skip next stitch. Sc into next stitch. Skip next stitch. Repeat from (dc, ch 1, dc) into next stitch, skip next stitch, sc into next stitch around. End with slip stitch to 3rd chain of beginning ch-4. (22 V-sts, 22 sc)
- (44)Round 2
Lattice Round 2: Ch 1. Sc into the first ch-1 space of first V-stitch. Ch 1. Dc into next sc. Ch 1. Sc into next ch-1 space. Ch 1. Dc into next sc. Repeat around. Join with slip stitch to first sc. (44 sc, 44 dc)
- (22)Round 3
Lattice Round 3: Ch 4, which counts as dc plus ch 1. Dc into same space as beginning to form the first V-stitch. Skip the next dc. Sc into the next sc. Skip next dc. Work (dc, ch 1, dc) into next sc. Repeat around. Join with slip stitch to 3rd chain of beginning ch-4. (22 V-sts, 22 sc)
- (44)Round 4
Lattice Round 4: Repeat Lattice Round 2. (44 sc, 44 dc)
- (22)Round 5
Lattice Round 5: Repeat Lattice Round 3. (22 V-sts, 22 sc)
- (44)Round 6
Lattice Round 6: Repeat Lattice Round 2. (44 sc, 44 dc)
Skirt Expansion Round
Expansion Round 7: Ch 1. Sc into the first ch-1 space. Work 2 sc into the next dc for an increase. Sc into the next sc. Work 2 sc into the next dc for an increase. Repeat around. Join with slip stitch to first sc. (110 sc)
Hem Expansion Round
- Round 1
Expansion Round 15: Ch 1. Sc across each working position of Round 14, placing 2 sc into every 18th sc for 6 increases total. Join with slip stitch to first sc. (114 sc)
- (17)Round 2
To distribute evenly, work 17 sc, then 2 sc into next stitch. Repeat 5 more times, then sc to end of round.
Color Change
At the end of Round 15, join Color B. Before making the final slip stitch join, draw up Color B through the loop on the hook to complete the slip stitch. Fasten off Color A. Continue all remaining rounds in Color B.
Skirt Shell Hem Section in Color B
- (19)Round 1
Shell Round 1: Ch 3, which counts as first dc. Work 4 dc into same stitch as join to complete the beginning shell. Skip 2 stitches. Sc into next stitch. Skip 2 stitches. Work 5 dc into next stitch for a shell. Repeat around. End with slip stitch to top of beginning ch-3. (19 shells, 19 sc)
- (19)Round 2
Shell Round 2: Ch 1. Sc into same stitch as join, which is the center of the beginning shell. Ch 2. Work 5 dc into next sc. Ch 2. Sc into center dc of next shell. Repeat around. Join with slip stitch to first sc. (19 shells, 19 sc)
- (19)Round 3
Shell Round 3: Ch 3, which counts as dc. Work 4 dc into same sc for beginning shell. Ch 1. Sc into center dc of next shell. Ch 1. Work 5 dc into next sc. Repeat around. Join with slip stitch to top of beginning ch-3. (19 shells, 19 sc)
- (19)Round 4
Shell Round 4: Ch 1. Sc into same stitch. Ch 2. Work 5 dc into next sc. Ch 2. Sc into center dc of next shell. Repeat around. Join with slip stitch to first sc. (19 shells, 19 sc)
- (19)Round 5
Shell Round 5: Ch 3. Work 4 dc into same sc. Ch 1. Sc into center dc of shell. Ch 1. Work 5 dc into next sc. Repeat around. Join with slip stitch to top of ch-3. (19 shells, 19 sc)
Scallop Border Round
Scallop Round: Ch 1. Sc into same stitch. Work 5 dc into next sc. Sc into center dc of next shell. Repeat around. Join with slip stitch to first sc. Fasten off. (19 shells, 19 sc)
The completed skirt from waist to hem should measure approximately 9 inches.
Flutter Sleeves
- Round 1
Each armhole opening spans the 12 bodice rows plus the 4-chain underarm bridge, giving approximately 30 stitch positions per armhole.
- Round 2
Flutter Sleeve Setup Round: With right side facing and Color A, join yarn with slip stitch at the center underarm bridge of one armhole. Ch 1. Work 30 sc evenly around the armhole opening. Distribute approximately 12 sc up the back armhole edge, 4 sc along the top shoulder curve, 12 sc down the front armhole edge, and 2 sc across the underarm chain bridge. Join with slip stitch to first sc. (30 sc)
- (4)Round 3
Flutter Scallop Round: Work (slip stitch into next stitch, ch 2, 4 dc into same stitch, ch 2, slip stitch into same stitch) into every 3rd sc around. Work 10 scallops total. Join with slip stitch. Fasten off. (10 scallops)Repeat for the second armhole.
Neckline and Back Opening Edging
With right side facing and Color A, join yarn at the top right corner of the back right panel.
- (108)Round 1
Neckline Edging Round Ch 1. Sc evenly along the right back opening edge, approximately 12 sc. Continue across the back neck, approximately 22 sc. Continue along the top of the front neckline, approximately 40 sc. Continue across the second back neck section, approximately 22 sc. Work down the left back opening edge, approximately 12 sc. Do not join. Work is now flat along the opening. (approximately 108 sc)
- (112)Round 2
Edging Row 2: Sc into each sc along the entire edging, working 3 sc into each corner stitch at the four neckline corners to keep the work flat. Turn. (approximately 112 sc)
- (3)Round 3
At the top of the right back opening, work the button loop: Button Loop: Ch 6. Skip 3 sc. Slip stitch into next sc. Fasten off.Sew the button to the corresponding position on the left back panel.
Making up
- Step 1Weave in all yarn ends securely using your yarn needle. Work the tails through the backs of stitches in multiple directions to prevent unraveling.
- Step 2Blocking: Soak the finished dress in cool water with a small amount of gentle wash for 15 minutes. Roll in a clean towel to remove excess water. Do not wring. Lay flat on a blocking mat. Pin the hem scallops outward to open them fully. Pin the neckline corners to right angles. Pin the flutter sleeves flat. Allow to dry completely before removing pins.
Notes from the pattern
- The pattern is written for a US G-6 / 4.0 mm hook; swatch first, since the chest circumference depends on hitting 18 sc and 20 rows to 4 inches.
- least 6 stitch markers are needed, since each bodice panel's armhole edge must stay marked until all three panels are joined at the underarms.
- The gauge swatch (chain 24, 24 rows of single crochet, measured over the centre 18 stitches and 20 rows) should be blocked before measuring, as blocking is part of how this cotton yarn settles.
- The colour change from Mint Green to Lavender happens at a specific round rather than gradually, so the transition point should be marked or noted in advance to avoid losing track of it mid-round.
The essentials
- Rounds
- 25
- Parts
- 11
- Level
- Intermediate
- Time
- 8-10 hours
- Hook
- 4.0 mm
- Yarn
- DK (CYCA #3)
Stitches you will use
- Shell fan stitch Used for the entire Lavender hem section; keep each five-double-crochet fan anchored to the middle stitch of the previous fan or the shells drift out of alignment.
- Diamond lattice stitch Used through the Mint Green skirt body; Row A and Row B must alternate correctly, with V-stitches landing into the previous row's chain spaces, or the lattice loses its diamond shape.
- Picking up stitches around a finished edge Used for the flutter sleeves at the armholes and for the neckline edging; uneven pick-up spacing shows as puckering along the sleeve edge.
Troubleshooting
The shell fans in the hem look uneven or lean to one side
This usually means a fan was anchored to the wrong stitch rather than the middle stitch of the previous fan; unpick back to the last correctly anchored shell and re-anchor before continuing.
The two back bodice panels come out slightly different widths before joining
This happens when a row is missed or added during the Rows 2 through 12 repeat; recount to 22 sc on each back panel and 40 sc on the front panel before setting any panel aside.
The waist joining round puckers or won't lie flat
This points to an uneven stitch count at the underarm bridges; check that 1 sc was worked into each of the 4 underarm bridge chains on both sides so the round totals 88 sc.
Substituting yarn
- DK weight acrylic
- Lighter and less structured drape than cotton, so the shell fans sit softer rather than crisp; the same 4.0 mm hook generally still meets gauge, and the piece becomes machine washable.
- Sport weight cotton-acrylic blend
- Produces a smaller finished dress at the stated stitch counts, so a hook one size up may be needed to bring the chest circumference back toward 20 inches.
- DK weight wool or wool blend
- Adds more elasticity and warmth but less stitch definition in the diamond lattice; blocking becomes more important to open the shells, and the hook size usually stays the same.
Washing and care
- Hand wash the finished dress in cool water with a gentle wash, since the materials list specifies cotton or cotton-acrylic blend yarn; roll in a towel to remove excess water rather than wringing.
- Lay flat to dry on a blocking mat, pinning the hem scallops open and the flutter sleeves flat, and store folded rather than hung so the shell hem keeps its shape between wears.
FAQs
Questions
What age and size does this dress fit?
It is sized for 12 to 18 months, with a finished chest circumference of approximately 20 inches and a total length of about 15 inches from shoulder to hem.
Can the colour change be moved to use more or less lavender?
The Color Change can be shifted earlier or later in the skirt, but this will use more or less of the 130 yards allotted to Lavender against the 220 yards of Mint Green, so yardage should be checked before changing the round.
Why are at least 6 stitch markers needed?
Each of the three bodice panels needs its armhole edge marked before the panels are joined at the underarms, and some markers are reused for the neckline during edging, so having 6 on hand avoids running short mid-project.
What happens if the gauge swatch comes out too large or small?
Because this is a fitted garment, going up a hook size if the swatch measures too small, or down a size if it measures too large, keeps the chest circumference close to the stated 20 inches.
Can a different button be used for the back closure?
Yes, though the button loop is sized for the stated 3/8 inch button, so a noticeably larger or smaller button will need the loop's chain length adjusted to match.
These answers came from whoever first published the pattern, kept word for word.