 EVERY CROCHET
 Home Decor 19 rounds No account, no download
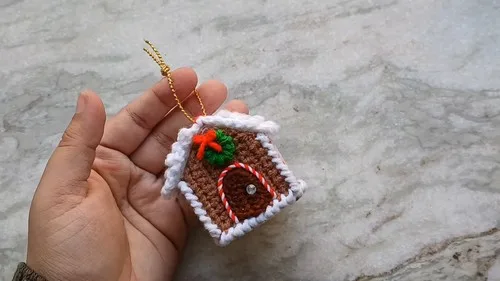
Single crochet gingerbread house pattern with wreath and candy cane trim
Single crochet gingerbread house pattern, called double crochet in the UK, finished with a wreath and candy cane trim.
- Skill
- Intermediate
- Time
- 6-9 hours
- Yarn weight
- Worsted

Intermediate
What the original write-up called it. Nothing here is graded again.

Worsted
What the sample was worked in. Any weight works; the size moves with it.

6-9 hours
What the original page reckoned. Your own pace is the one that matters.
About this pattern
This pattern builds a three-dimensional gingerbread house from flat single crochet (UK double crochet) panels: four walls with a peaked roofline shaped by back-loop-only rows and paired increases and decreases, plus a base. Decorations include a door with a rounded top, a twisted red-and-white rope braid for candy canes, and a small reverse-single-crochet wreath. Cardboard reinforces the interior before the panels are sewn together into a standing house.
The gingerbread house is worked mainly in single crochet (UK double crochet), the short, dense stitch used for every wall panel, the base, and the main body of the door. The rounded top of the door introduces a half double crochet (UK half treble), and the wreath is edged in reverse single crochet (UK reverse double crochet), sometimes called crab stitch, which leaves a neat corded rim rather than the usual smooth loop. Keeping to one stitch family across the walls makes it straightforward to match panel heights before the pieces are joined into a house shape.
Each wall begins with a foundation chain and eight rows of straight single crochet, worked back and forth with a turning chain at the start of each row. From Row 9, working into the back loop only creates a ridge marking the shift from wall to roof; increases across Rows 10-13 build the peak on one edge, then decreases bring it back down. Cardboard glued inside the walls, base, and roof adds rigidity before the four panels are sewn into a house shape, with the door, candy cane braid, and wreath attached while pieces are still flat.
Materials
- Worsted weight yarn in deep brown (walls, base, roof, and door)
- Crochet hook (size to suit your yarn)
- Worsted weight yarn in green (wreath)
- Worsted weight yarn in red (candy cane braid and bow)
- Worsted weight yarn in white (candy cane braid and seaming the base)
- Cardboard, cut to size (to reinforce the walls, base, and roof)
- Craft glue
- Rhinestone doorknob (embellishment)
- Golden thread (for the hanging loop)
The list is the pattern's own wording.
Instructions
Every round is printed as the pattern wrote it, brackets and all. Open the key beside a round to see only the short forms that round uses.
Gingerbread Cookie Piece (Four Walls & Base)
Slip knot and chains: Start with a slip knot and chain 9 (8 + 1).
- Row 1
Skip the first chain and single crochet into the second chain from the hook, continuing across for a total of 8 single crochets.
- Rows 2–8
Chain one, turn, and single crochet into each stitch for six rows. This completes one of the side walls.
- Row 9 (Front Wall)
Front Wall Chain one, turn, and work into the back loops only. Single crochet into the first 7 stitches, then increase in the last stitch for a total of 9 single crochets.Rows 10-13: Continue increasing stitches to create the upward slope of the peak.
Rows 10-18, Roof & Decorations
- Row 10
Increase in the first stitch, then single crochet into the next 8 stitches (10 total).
- Row 11
Single crochet into the first 9 stitches, and increase in the last stitch (11 total).
- Row 12
Increase in the first stitch, then single crochet into the next 10 stitches (12 total).
- Row 13
Single crochet into the first 11 stitches, and increase in the last stitch (13 total).Decrease stitches to create the downward slope.
- Row 14
Decrease over the first two stitches, then single crochet into the remaining 11 stitches (12 total).
- Row 15
Single crochet into the first 10 stitches, and decrease over the last two stitches (11 total).
- Row 16
Decrease over the first two stitches, then single crochet into the remaining 9 stitches (10 total).
- Row 17
Single crochet into the first 8 stitches, and decrease over the last two stitches (9 total).
- Row 18
Decrease over the first two stitches, then single crochet into the remaining 7 stitches (8 total). This completes the front wall.Rows 19 and beyond: Repeat the pattern to create the remaining walls and the base of the house.Roof Chain: Start with a slip knot and chain 11 (10 + 1).
- Row 1
Single crochet into each chain, starting from the second chain from the hook (10 total).
- Row 2 (Shingles)
Shingles Turn, work in the back loops only. Chain 3, slip stitch into the third chain to form a picot. Skip the next stitch and slip stitch into the back loop of the following stitch. Repeat this 4 more times for a total of 5 picots.
Key1
- picot
- picot stitch
- Row 3
Chain one, turn, and single crochet into the front loops of Row 1.
- Row 4
Turn, slip stitch into the back loop of the first stitch. Picot, then skip the next stitch and slip stitch into the back loop of the following stitch. Repeat this 3 more times.
Key1
- picot
- picot stitch
Repeat: Repeat rows 2-5 once more. For the last shingle row (Row 10), you can work under both loops.
- Door
Using deep brown yarn, chain 7, make half double crochets into the chains, and create a rounded shape at the end.
- Rope Braid
Take equal lengths of red and white yarn, tie a knot, and twist the pieces together.
- Wreath
Use green yarn to chain 5, form a ring with a slip stitch, and make 8 reverse single crochets into the ring. Add a small bow with a piece of red yarn.
Making up
- Step 1Decorate: Sew the door, candy cane stripes, and rhinestone doorknob onto the front panel while the pieces are flat. Embroider windows onto the side panels using the candy cane braid.
- Step 2Reinforce: Cut cardboard pieces to size and glue them to the inside of the walls, base, and roof to make the structure firm.
- Step 3Sew Walls: Sew the walls into a house shape.
- Step 4Attach Base and Roof: Sew the base of the house onto the walls with white yarn using reverse single crochets. Glue the roof onto the house.
- Step 5Add Loop: Add a golden thread loop on top to hang the ornament.
Notes from the pattern
- No hook size is given in the source instructions; choose a hook that matches the chosen yarn weight and produces a firm, dense fabric, since the walls need to hold their shape once cardboard is added.
- Place a stitch marker at the start of Row 9, where the back-loop-only instruction begins, since it is easy to keep working into both loops out of habit after eight straight rows.
- Keep tension firm and even through the eight straight rows of each wall (Rows 2-8); loose stitches here will make the panels sag once the cardboard insert is glued in.
- Work the deep brown walls and base, green wreath, red and white candy cane braid, and red bow as separate pieces or colour sections rather than carrying yarn across, since the assembly step sews and glues them on afterwards.
The essentials
- Rounds
- 19
- Parts
- 2
- Level
- Intermediate
- Time
- 6-9 hours
- Yarn
- Worsted
Stitches you will use
- Straight-row single crochet Used for all four wall panels across Rows 2-8; watch that the stitch count stays at 8 throughout so every panel matches before assembly.
- Back-loop-only single crochet Appears once at Row 9 on the front wall; watch that only the back loop is worked, since the ridge it leaves marks the start of the roof slope.
- Paired increase and decrease shaping Rows 10-13 increase from 9 to 13 stitches and later rows decrease again to form the roof peak; watch that each increase or decrease sits on the same edge every row so the peak stays centred.
Troubleshooting
The roof peak sits off to one side instead of centred.
The increases and decreases across Rows 10-18 were placed at alternating edges rather than the same edge each row. Unpick back to Row 9 and rework, keeping every increase and decrease on the same side.
The four wall panels come out at different heights.
The stitch count drifted during the six straight rows (Rows 2-8), usually from a missed or extra stitch at the turning chain. Count stitches at the end of every row before starting the next.
The transition from wall to roof looks
Row 9 was worked into both loops instead of the back loop only, which erases the ridge that marks where the roof shaping starts. Unpick to Row 9 and rework into the back loop only.
Substituting yarn
- Cotton, worsted weight
- Gives crisper stitch definition and a firmer, more matte fabric that suits the flat cookie-like shape, but is stiffer to work and may need a slightly larger hook to keep the same gauge.
- Acrylic, worsted weight
- Matches the density used throughout the pattern's straight rows and peak shaping, is easy to source in the deep brown, green, red, and white needed, and holds its shape once the cardboard inserts are added.
- Wool blend, DK weight
- Produces a smaller, finer-gauge house with more visible stitch texture on the candy cane braid and wreath; more rows will be needed to reach the same panel size, and a smaller hook keeps the fabric dense.
Washing and care
- Because cardboard is glued inside the walls, base, and roof for structure, the finished house should not be washed or submerged; spot clean the yarn surface only, working from the outside so moisture does not reach the cardboard.
- Store the house upright on a shelf away from damp, and reshape any flattened corners by gently pressing the panels back into line, since the cardboard inserts hold the overall shape once set.
FAQs
Questions
What hook size should be used for this pattern?
The source instructions do not list a hook size. Choose one that matches the yarn weight in use and produces a dense, firm fabric, since the walls need to support the cardboard reinforcement.
Does the gingerbread house need to be stuffed?
No stuffing is used. Cardboard pieces are cut to size and glued inside the walls, base, and roof to give the house its structure.
Why is Row 9 worked into the back loop only?
Working into the back loop only leaves a visible ridge on the front wall that marks the transition from the straight wall rows to the shaped roof rows that follow.
How is the candy cane braid made?
It is not crocheted. Equal lengths of red and white yarn are knotted together at one end, then twisted to form the rope braid used for the door stripes and window trim.
Can the colours be changed from the deep brown, green, and red shown?
Yes. The walls, wreath, and candy cane braid can be worked in any colour combination without affecting the stitch counts or shaping, since the colours only affect the decorative pieces.
These answers came from whoever first published the pattern, kept word for word.