 EVERY CROCHET
 Garments 28 rounds No account, no download
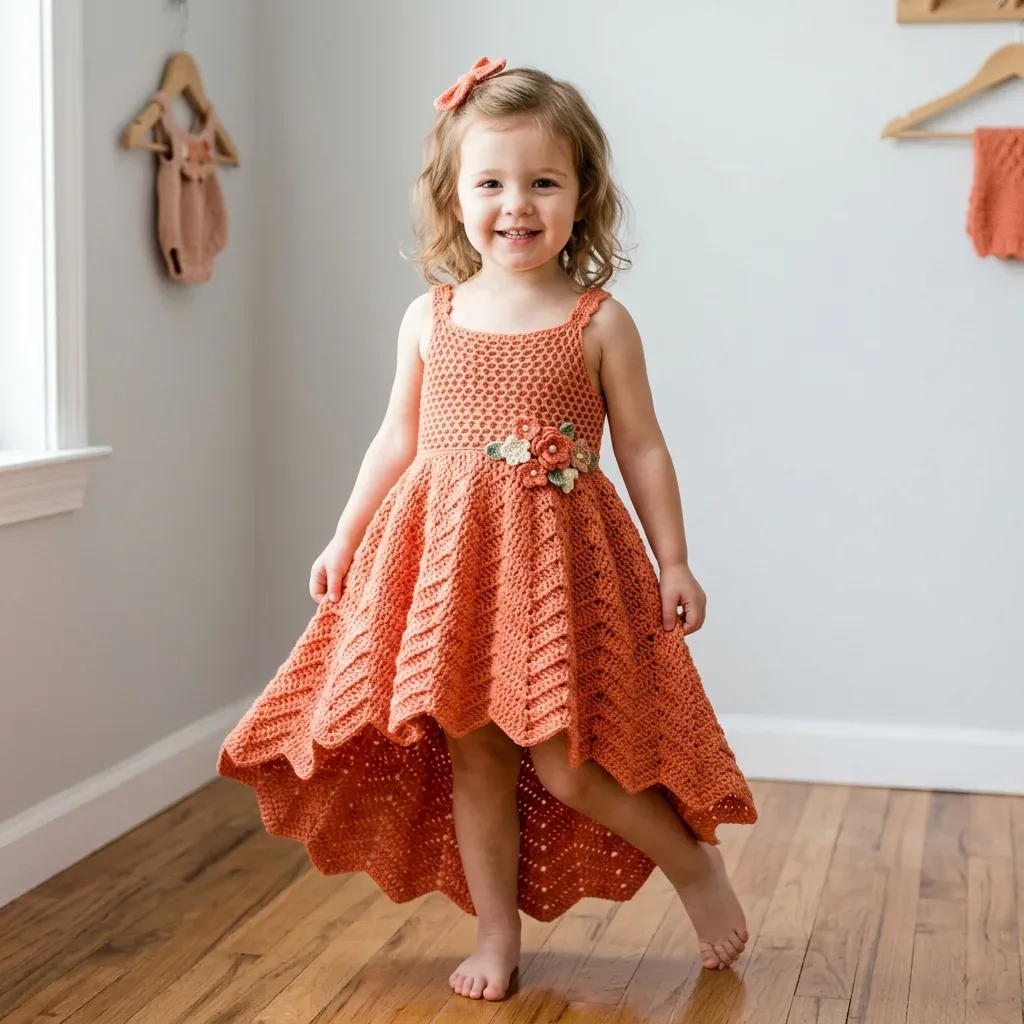
Chevron lace summer dress with a honeycomb mesh bodice
A chevron lace (UK treble crochet) skirt and honeycomb mesh bodice, sizes 2T to 6, with US and UK stitch terms noted.
- Skill
- Intermediate
- Time
- 6-10 hours
- Yarn weight
- DK
- Hook
- 3.5 mm

Intermediate
What the original write-up called it. Nothing here is graded again.

DK
What the sample was worked in. Any weight works; the size moves with it.

6-10 hours
What the original page reckoned. Your own pace is the one that matters.
About this pattern
This is a honeycomb mesh and chevron lace summer dress for children's sizes 2T to 6, worked in DK cotton with two hook sizes: a US E-4 (3.5mm) for the bodice and a US F-5 (3.75mm) for the skirt and straps. The piece is built in separate sections, including a honeycomb mesh bodice, six chevron lace skirt panels, strap and neckline edging, and three crochet flowers, then seamed and blocked.
This dress pairs two crochet fabrics: a honeycomb mesh bodice worked in single crochet, and a chevron lace skirt built from double crochet (UK treble crochet) clusters and skip-stitches. The mesh creates small staggered holes across the chest and back, while the chevron lace forms sharp diagonal peaks and valleys across six bias-cut panels. Together they give the dress a fitted top and a skirt with visible movement, sized from 2T through to size 6.
Construction happens in sections rather than one continuous piece, running from the waistband foundation through to the flower embellishments in section ten. The bodice front and back panels are worked flat then seamed, the neckline and strap edging finishes the top, and six chevron lace skirt panels are picked up from the waistband and sewn into place. Bias shaping along the bodice front panel's edges rotates the chevron angle and produces the dress's high-low hem.
Finished Sizes: Size 2T: chest 20 inches, waist 19 inches, length center front 14 inches, length center back 20 inches. Size 3T: chest 21 inches, waist 20 inches, length center front 15 inches, length center back 21.5 inches. Size 4T: chest 22 inches, waist 21 inches, length center front 16 inches, length center back 23 inches. Size 5: chest 23 inches, waist 22 inches, length center front 17 inches, length center back 24 inches. Size 6: chest 24.5 inches, waist 23 inches, length center front 18 inches, length center back 25.5 inches. All measurements include approximately 1 inch of ease at chest and waist.
This is an advanced pattern. It calls for experience with fitted garments, lace repeats, and precise gauge management, and typically takes 18 to 28 hours to complete.
Materials
Yarn
- DK weight, 100% cotton or cotton-blend
- Size 2T: 450 yards
- Size 3T: 500 yards
- Size 4T: 560 yards
- Size 5: 620 yards
- Size 6: 680 to 700 yards
- Main color (MC): coral or terracotta, plus small amounts of rust, cream, and sage green for the three crochet flower contrast colors (CC1, CC2, CC3)
Recommended Yarns
- Paintbox Yarns Simply DK in shade Tomato Red or Blood Orange (4 skeins for sizes 2T to 4T, 5 skeins for sizes 5 to 6)
- Lion Brand 24/7 Cotton DK in Terracotta (3 skeins for sizes 2T to 4T, 4 skeins for sizes 5 to 6)
- Drops Safran in Orange
Hooks
- US size E-4 (3.5 mm) for the bodice and US size F-5 (3.75 mm) for the skirt and straps. You need both hooks.
Notions
- At least 6 stitch markers, yarn needle, small pearl or shell beads for flower centers (optional, 6 to 9 beads), rust-proof blocking pins, blocking mat, spray bottle with water
The list is the pattern's own wording.
Instructions
Every round is printed as the pattern wrote it, brackets and all. Open the key beside a round to see only the short forms that round uses.
Section 7: Skirt Panels
The skirt is constructed from 6 bias-cut chevron lace panels. All sizes work the skirt with 18 sts per panel at the waist edge, and 108 total waistband pickup sts.
Panel Foundation Pickup Row:
With F-5 hook and RS of waistband facing, attach MC at panel start position. Pick up and sc across 18 sts.
- Round 0
Pickup sc across 18 sts, then work 7 additional ch sts at the end. Turn. 25 sts total
Key2
- sc
- single crochet: Insert hook into stitch, yarn over, pull up a loop (2 loops on hook), yarn over, pull through both loops.
- ch
- chain
- Round 1
(RS, chevron lace on 25 sts): ch 3 (counts as dc), dc in same st, sk 2 sts, dc in next st, ch 1, sk 1, dc in next, ch 1, sk 1, dc in next, sk 2, 3 dc in next (peak), sk 2, dc in next, ch 1, sk 1, dc in next, ch 1, sk 1, dc in next, sk 2, 2 dc in last st. 25 sts and sps
Key4
- dc
- double crochet: Yarn over, insert hook into stitch, yarn over and pull up a loop (3 loops on hook), yarn over and pull through 2 loops (2 loops remain), yarn over and pull through remaining 2 loops.
- ch
- chain
- sk
- skip
- RS
- right side
- Round 2
ch 1, turn, sc in each dc and ch-sp across. 25 sc For the 3 FRONT panels (bias shaping):
Key4
- ch-sp
- chain space
- sc
- single crochet: Insert hook into stitch, yarn over, pull up a loop (2 loops on hook), yarn over, pull through both loops.
- dc
- double crochet: Yarn over, insert hook into stitch, yarn over and pull up a loop (3 loops on hook), yarn over and pull through 2 loops (2 loops remain), yarn over and pull through remaining 2 loops.
- ch
- chain
- Round 3
Bias RS ch 3, 2 dc in same st (increase at right selvage), work chevron lace to last 2 sts, dc2tog (decrease at left selvage). 25 sts
Key4
- dc2tog
- double crochet two together (decrease)
- dc
- double crochet: Yarn over, insert hook into stitch, yarn over and pull up a loop (3 loops on hook), yarn over and pull through 2 loops (2 loops remain), yarn over and pull through remaining 2 loops.
- ch
- chain
- RS
- right side
- Round 4
ch 1, turn, sc across. 25 sc Continue this bias shaping for 28 (30, 32, 34, 36) total rows per front panel.For the 3 BACK panels: Work chevron lace rows 1 and 2 straight (no bias) for 36 (38, 40, 42, 44) rows total.
Key2
- sc
- single crochet: Insert hook into stitch, yarn over, pull up a loop (2 loops on hook), yarn over, pull through both loops.
- ch
- chain
Panel hem edging (work on each panel):
With F-5 hook, attach MC at bottom corner, ch 1, sc evenly along hem edge. Work (sc, ch 2, sc) at each chevron point and work sc2tog at each chevron valley. Fasten off.
Make all 6 panels: Front Left, Front Center, Front Right, Back Left, Back Center, Back Right.
Honeycomb Mesh (for the bodice)
This creates a beautiful textured fabric with offset holes that look like honeycomb cells.
- Round 1
Foundation sc in each st across.
Key1
- sc
- single crochet: Insert hook into stitch, yarn over, pull up a loop (2 loops on hook), yarn over, pull through both loops.
- Round 2
ch 1, turn, sc in first st, (ch 1, sk 1 st, sc in next st) to end.
Key3
- sc
- single crochet: Insert hook into stitch, yarn over, pull up a loop (2 loops on hook), yarn over, pull through both loops.
- ch
- chain
- sk
- skip
- Round 3
ch 1, turn, sc in first sc, (sc in ch-1 sp, ch 1, sk next sc) to last 2 sts, sc in ch-1 sp, sc in last sc.
Key3
- sc
- single crochet: Insert hook into stitch, yarn over, pull up a loop (2 loops on hook), yarn over, pull through both loops.
- ch
- chain
- sk
- skip
- Round 4
ch 1, turn, sc in first sc, (ch 1, sk 1 st, sc in next st) to end. Repeat rows 3 and 4 for pattern. The staggered offset of sc and ch-1 spaces creates the honeycomb cell appearance.
Key3
- sc
- single crochet: Insert hook into stitch, yarn over, pull up a loop (2 loops on hook), yarn over, pull through both loops.
- ch
- chain
- sk
- skip
Chevron Lace (for the skirt, multiple of 12 + 1 stitches)
Foundation row: sc across.
- Round 1
(RS): ch 3 (counts as dc), dc in same st, (sk 2 sts, dc in next st, ch 1, sk 1 st, dc in next st, ch 1, sk 1 st, dc in next st, sk 2 sts, 3 dc in next st, sk 2 sts, 3 dc in next st) across to last 7 sts, sk 2 sts, dc in next st, ch 1, sk 1 st, dc in next st, ch 1, sk 1 st, dc in next st, sk 2 sts, 2 dc in last st.
Key4
- dc
- double crochet: Yarn over, insert hook into stitch, yarn over and pull up a loop (3 loops on hook), yarn over and pull through 2 loops (2 loops remain), yarn over and pull through remaining 2 loops.
- ch
- chain
- sk
- skip
- RS
- right side
- Round 2
ch 1, turn, sc in each dc and ch-1 sp across.Rows 1 and 2 form the chevron lace repeat. The peaks form at the 3-dc clusters and the valleys between the skip-2 pairs.
Key3
- sc
- single crochet: Insert hook into stitch, yarn over, pull up a loop (2 loops on hook), yarn over, pull through both loops.
- dc
- double crochet: Yarn over, insert hook into stitch, yarn over and pull up a loop (3 loops on hook), yarn over and pull through 2 loops (2 loops remain), yarn over and pull through remaining 2 loops.
- ch
- chain
Section 1: Waistband Foundation
With MC and E-4 hook, ch 97 (101, 107, 111, 117).
- Round 1
sc in 2nd ch from hook and in each ch across. 96 (100, 106, 110, 116) sc
Key2
- sc
- single crochet: Insert hook into stitch, yarn over, pull up a loop (2 loops on hook), yarn over, pull through both loops.
- ch
- chain
- Round 2
ch 1, turn, sc in BLO of each sc across. 96 (100, 106, 110, 116) sc
Key3
- BLO
- back loop only: Work your stitch into only the back loop of the stitch below, leaving the front loop unworked.
- sc
- single crochet: Insert hook into stitch, yarn over, pull up a loop (2 loops on hook), yarn over, pull through both loops.
- ch
- chain
- Round 3
ch 1, turn, sc in BLO of each sc across. 96 (100, 106, 110, 116) sc
Key3
- BLO
- back loop only: Work your stitch into only the back loop of the stitch below, leaving the front loop unworked.
- sc
- single crochet: Insert hook into stitch, yarn over, pull up a loop (2 loops on hook), yarn over, pull through both loops.
- ch
- chain
- Round 4
ch 1, turn, sc in BLO of each sc across. 96 (100, 106, 110, 116) sc The waistband is 4 rows of BLO sc, creating a firm ribbed band approximately 0.75 inch tall. Do not fasten off. Place markers at stitch 24 (25, 27, 28, 29) and stitch 72 (75, 79, 82, 87) to indicate side seam positions.
Key3
- BLO
- back loop only: Work your stitch into only the back loop of the stitch below, leaving the front loop unworked.
- sc
- single crochet: Insert hook into stitch, yarn over, pull up a loop (2 loops on hook), yarn over, pull through both loops.
- ch
- chain
Checkpoint: Your waistband should measure approximately 0.75 inch tall and 19 inches wide (before seaming).
Section 2: Bodice Front Panel
The bodice front is worked across the center 48 (50, 52, 54, 58) stitches.
- Round 1
Foundation With E-4 hook, attach MC at left side marker, ch 1, sc in each of the next 48 (50, 52, 54, 58) sts to right side marker. 48 (50, 52, 54, 58) scBegin Honeycomb Mesh:
Key3
- sc
- single crochet: Insert hook into stitch, yarn over, pull up a loop (2 loops on hook), yarn over, pull through both loops.
- ch
- chain
- MC
- main color
- Round 2
ch 1, turn, sc in first st, (ch 1, sk 1 st, sc in next st) across to end. 24 (25, 26, 27, 29) sc plus 23 (24, 25, 26, 28) ch-1 sps
Key3
- sc
- single crochet: Insert hook into stitch, yarn over, pull up a loop (2 loops on hook), yarn over, pull through both loops.
- ch
- chain
- sk
- skip
- Round 3
ch 1, turn, sc in first sc, (sc in ch-1 sp, ch 1, sk next sc) to last 2 sts, sc in ch-1 sp, sc in last sc. 48 (50, 52, 54, 58) units
Key3
- sc
- single crochet: Insert hook into stitch, yarn over, pull up a loop (2 loops on hook), yarn over, pull through both loops.
- ch
- chain
- sk
- skip
- Round 4
ch 1, turn, sc in first sc, (ch 1, sk 1 st, sc in next st) across to end. 48 (50, 52, 54, 58) unitsRepeat rows 3 and 4 for the honeycomb mesh pattern.Continue honeycomb mesh on front panel for: Size 2T: 24 rows total (approximately 4.4 inches)Size 3T: 26 rows total (approximately 4.7 inches)Size 4T: 28 rows total (approximately 5.1 inches)Size 5: 30 rows total (approximately 5.5 inches)Size 6: 32 rows total (approximately 5.8 inches)Do not fasten off. Place a locking stitch marker in the working loop.
Key3
- sc
- single crochet: Insert hook into stitch, yarn over, pull up a loop (2 loops on hook), yarn over, pull through both loops.
- ch
- chain
- sk
- skip
Section 3: Bodice Back Panels
The bodice back is worked in two halves. Each back panel starts at the side seam marker and works to the center back.
Left Back Panel: Attach MC at right side marker, ch 1.
- Round 1
sc across the 24 (25, 27, 28, 29) sts from right side marker to end of waistband row.Adjust to even counts: For sizes 3T and 4T, work one sc2tog at the beginning of row 1. Adjusted counts: 24 (24, 26, 28, 28) sc
Key2
- sc2tog
- single crochet two together (decrease): Insert hook into first stitch, yarn over and pull up a loop, insert hook into next stitch, yarn over and pull up a loop (3 loops on hook), yarn over and pull through all 3 loops.
- sc
- single crochet: Insert hook into stitch, yarn over, pull up a loop (2 loops on hook), yarn over, pull through both loops.
- Round 2
ch 1, turn, sc in first st, (ch 1, sk 1 st, sc in next st) across. 24 (24, 26, 28, 28) unitsContinue honeycomb mesh for the same number of rows as the front panel. Fasten off.Right Back Panel: Attach MC at left side marker, ch 1.
Key4
- sc
- single crochet: Insert hook into stitch, yarn over, pull up a loop (2 loops on hook), yarn over, pull through both loops.
- ch
- chain
- sk
- skip
- MC
- main color
- Round 1
sc across the 24 (25, 27, 28, 29) sts from left side marker to next boundary. Adjust stitch count as for left back panel. 24 (24, 26, 28, 28) scWork honeycomb mesh for same number of rows as left back panel. Fasten off.
Key1
- sc
- single crochet: Insert hook into stitch, yarn over, pull up a loop (2 loops on hook), yarn over, pull through both loops.
Section 5: Neckline and Strap Edging
- Round 1
With E-4 hook and RS facing, attach MC at left back seam, ch 1, sc evenly around entire top opening: Across center back right panel top: sc in each st across 24 (24, 26, 28, 28) stsAt center back gap: work 4 sc evenly down right side of gap, 4 sc up left side of gap Across center back left panel top: 24 (24, 26, 28, 28) scDown left side strap placement area: 6 sc Across front panel top: 48 (50, 52, 54, 58) sc Up right side strap placement area: 6 scSl st to first sc to join.
Key4
- sc
- single crochet: Insert hook into stitch, yarn over, pull up a loop (2 loops on hook), yarn over, pull through both loops.
- ch
- chain
- RS
- right side
- MC
- main color
- Round 2
ch 1, do not turn, sl st in each sc around. Fasten off.
Key3
- sl st
- slip stitch
- sc
- single crochet: Insert hook into stitch, yarn over, pull up a loop (2 loops on hook), yarn over, pull through both loops.
- ch
- chain
Section 6: Straps
Each strap is approximately 2 inches wide.
Foundation: With E-4 hook and MC, ch 11.
- Round 1
sc in 2nd ch from hook and each ch across. 10 sc
Key2
- sc
- single crochet: Insert hook into stitch, yarn over, pull up a loop (2 loops on hook), yarn over, pull through both loops.
- ch
- chain
- Round 2
ch 1, turn, sc in first st, (ch 1, sk 1 st, sc in next st) across. 10 units
Key3
- sc
- single crochet: Insert hook into stitch, yarn over, pull up a loop (2 loops on hook), yarn over, pull through both loops.
- ch
- chain
- sk
- skip
- Round 3
ch 1, turn, sc in first sc, (sc in ch-1 sp, ch 1, sk sc) to last 2 sts, sc in ch-1 sp, sc in last sc. 10 unitsRepeat rows 2 and 3 for: Size 2T: 18 total rows Size 3T: 20 total rows Size 4T: 22 rows Size 5: 24 rows Size 6: 26 rows Work 1 row sc edging along each long edge of the strap. Fasten off.
Key3
- sc
- single crochet: Insert hook into stitch, yarn over, pull up a loop (2 loops on hook), yarn over, pull through both loops.
- ch
- chain
- sk
- skip
Pin straps to front and back bodice top with approximately 2 inches in from each side seam. Sew straps securely with yarn needle.
Crochet Flower (make 3 total, one each in CC1, CC2, CC3)
Magic ring, ch 1, work 5 sc into ring, sl st to first sc to join. (5 sc)
- (5)Round 2
(ch 3, tr in same st, ch 3, sl st in same st, sl st in next st) 5 times. (5 petals)Fasten off leaving a 12 inch tail for attaching. Thread a pearl bead through center if desired before attaching.
Key2
- sl st
- slip stitch
- ch
- chain
Section 4: Seaming the Bodice
With yarn needle and MC, seam front panel to each back panel at side seams using mattress stitch or slip stitch seam on WS.
Seam the center back panels together from the waist up, stopping 1.5 (1.5, 2, 2, 2) inches before the top edge. Leave this gap open for the back neckline.
Section 8: Assembling the Skirt
Seam the 6 panels together in this order (as worn): Back Left, Back Center, Back Right, Front Right, Front Center, Front Left.
Seam the final edges (Front Left to Back Left) and (Front Right to Back Right) to close the skirt tube.
The shorter front panel edges fall at center front, creating the dramatic V dip points. The longer back panels create the sweeping back hem.
Section 10: Adding the Crochet Flowers
Make three flowers following the special stitch instructions. Arrange the three flowers overlapping slightly at the left hip, approximately 1 inch below the waistband on the front panel. Sew each flower securely through all layers. Stitch bead to center of each flower if desired.
Making up
- Step 1Turn garment WS out. Fold the waistband BLO rows to the inside and whipstitch the remaining free loops of the foundation chain to the inside of the skirt pickup row. This creates a neat self-belt effect at the waistline.
Notes from the pattern
- This pattern needs both an E-4 (3.5mm) hook for the bodice sections and an F-5 (3.75mm) hook for the skirt and straps; keep both hooks to hand rather than substituting one for the other.
- least six stitch markers are needed to track the waistband's 108 pickup stitches across the six 18-stitch panel divisions.
- Rust-proof pins are needed to pin the waistband, neckline and every hem point, and the chevron lace panels need to be stretched gently while pinned so the lace opens fully before drying.
- Yardage runs from 450 yards for size 2T up to 680 to 700 yards for size 6, and the suggested yarns step up from 4 to 5 skeins (or 3 to 4 skeins) between the smaller and larger size groups, so buy for the largest size if sizing up.
- Gauge matters for this fitted garment: with the E-4 hook, honeycomb mesh bodice gauge is 20 sc = 4 inches and 22 rows = 4 inches; with the F-5 hook, chevron lace skirt gauge is one 12-stitch chevron repeat = 2.4 inches wide and 8 rows of chevron lace = 2 inches tall. Work a 5 inch by 5 inch swatch in each stitch pattern, block it flat, and measure through the center before beginning; gauge swatches are mandatory.
- Cotton yarn is essential for this project: it blocks beautifully, holds stitch definition in both the honeycomb and chevron patterns, and feels comfortable against skin on warm days. Avoid fuzzy or halo yarns because they will obscure the stitch texture.
The essentials
- Rounds
- 28
- Parts
- 12
- Level
- Intermediate
- Time
- 6-10 hours
- Hook
- 3.5 mm
- Yarn
- DK
Stitches you will use
- Chevron lace repeat Used across the skirt panels on a multiple of 12 plus 1 stitches; watch that the 3-dc peak clusters and the skip-2 valleys stay aligned row to row.
- Picking up stitches along an edge Each of the six skirt panels picks up 18 sts from the waistband with the F-5 hook to reach 108 total; watch for even spacing so the panels sit flush against each other.
- Bias shaping Applied on the bodice front panel by increasing one edge and decreasing the other on every right-side row; watch that both edges are adjusted every row or the chevron angle and high-low hem will not form.
Troubleshooting
The chevron lace skirt panels look flat
This usually means the panels were not stretched enough while pinned; re-wet and re-pin with more lateral tension across the lace before leaving it to dry again.
The waistband pickup does not reach 108
This comes from uneven spacing when picking up the 18 stitches per panel; divide the waistband into six equal sections with stitch markers before picking up with the F-5 hook.
The bodice sits square instead of showing the high-low hem.
This happens when the increase and decrease are not worked on every right-side row of the bodice front panel; check that one edge increases and the other decreases on each RS row.
Substituting yarn
- Mercerised cotton, DK weight
- Keeps the same yardage and hook sizes (E-4 and F-5) but gives a shinier finish and crisper definition in the chevron lace peaks.
- Cotton-linen blend, DK weight
- Adds drape but less stretch recovery, so the bias-shaped bodice may benefit from working more consistently with the larger F-5 hook to maintain ease.
- Acrylic or acrylic-cotton blend, DK weight
- Lighter and machine washable but holds the honeycomb mesh and pinned shapes less firmly, so the skirt panels may need extra stretching at the blocking stage.
Washing and care
- Hand wash in cool water as for the finished dress, pressing out water in a towel rather than wringing, to protect the cotton fibres and the chevron lace shape.
- Reshape by pinning the waistband, neckline and hem points flat again after washing and leave to dry fully, typically 24 to 48 hours for DK cotton, before storing folded rather than hung to avoid stretching the straps.
FAQs
Questions
Can the bodice and skirt hooks be swapped?
No, the pattern specifies an E-4 (3.5mm) hook for the bodice sections and an F-5 (3.75mm) hook for the skirt and straps. Using only one hook throughout will change the density of either the honeycomb mesh or the chevron lace.
How much yarn is needed for size 5?
Size 5 uses 620 yards of DK cotton, compared with 450 yards for 2T and up to 700 yards for size 6. Check the yardage for the specific size before buying skeins.
Are the pearl or shell beads required for the flowers?
No, the beads for the flower centres are listed as optional. Around 6 to 9 beads are suggested if using them across the three crochet flowers.
Why does the skirt need stretching before drying?
The chevron lace panels are bias-cut and sit compactly until opened. The source instructions call for gently stretching the panels while pinned to the blocking mat so the lace pattern shows fully once dry.
Can the chevron lace repeat be resized for a different stitch count?
The chevron lace is built on a multiple of 12 plus 1 stitches, so any change to panel width needs to keep that multiple intact. Breaking the multiple will shift where the peaks and valleys fall.
These answers came from whoever first published the pattern, kept word for word.